| Table of Contents | ||
|---|---|---|
|
Map Jira Project with QMetry Project
Map Single Jira Project with QMetry Project
These steps have to be performed in QMetry by Login as QMetry Project Admin :
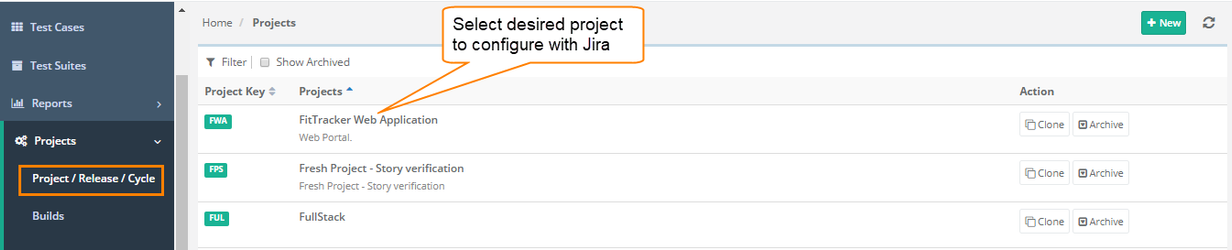
- Go to Projects > Project/Release/Cycle
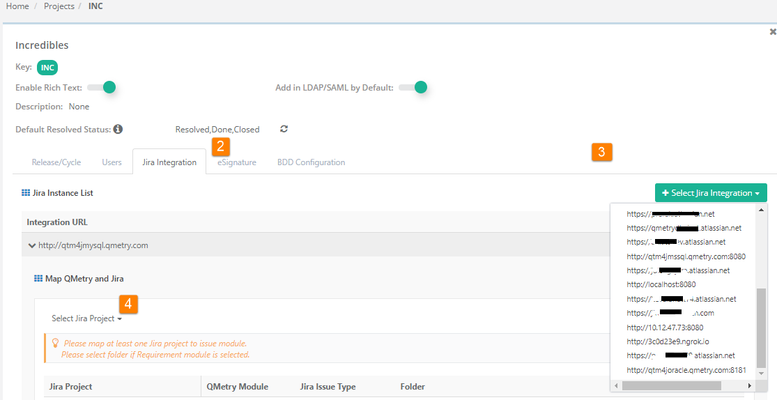
- Open the Project > Jira Integration tab.
- Select the Jira URL with which this QMetry project mapping has to be done.
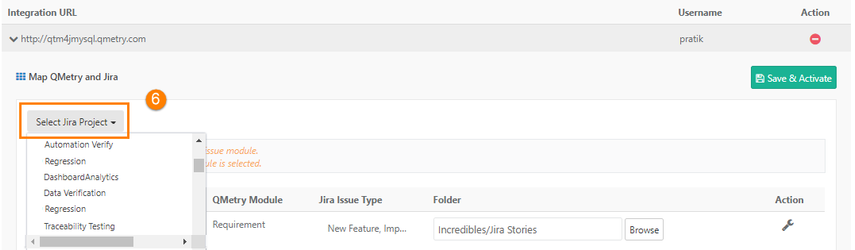
- Select the Jira project to configure with this QMetry Project.
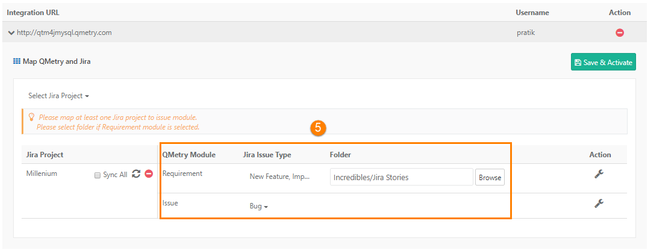
- Once the Project is selected, select Issue Type <> QMetry Module associations. The issue type is a multi-select list. If the requirement is mapped, select the folder to import requirements.
- Click on Save and Activate.
Map multiple Jira projects from a single Jira instance with one QMetry project
QMetry allows multiple Jira projects to be configured with one QMetry project. Below are the steps for the same :
- Go to Projects > Project/Release/Cycle
- Open the Project > Jira Integration tab.
- Select the Jira URL with which this QMetry project configuration has to be done.
- Select the Jira project to configure with QMetry Project.
- Map Jira Issue Types to QMetry Modules.
Map Jira Issue types to QMetry modules
- Once the Project is selected, if you are managing your project requirements as Jira stories/epics/sub-task, you should select the Issue Types "Story", "Epic" or "Sub-task" to be associated with the Requirement module. Selection of Issue Type is a multi-select filter, which allows you to select multiple issue types and map with the requirement module. Selection of the folder where the imported issues will be created is mandatory. The first time sync will import all the issues to the selected folder. These issues can later on be moved to other folders in QMetry where any changes done to the issues will be synced. However, all the new stories/epics/sub-tasks that are not part of QMetry will be synced into the selected folder.
- To map issue types like bugs, tasks or sub-tasks to Issue module, users can select Issue Types associated to Issue module. This is a multi-select filter. The issue types that are mapped with Requirement module can not be mapped with the Issue module and vice-versa. The issues that would be imported and synced with QMetry, would be visible in Issue module with the external key indicating the Jira Issue Key.
- Click on Save and Activate/update once the configuration is done. ("Update" if Jira integration was already Saved and Activated for the QMetry project.)
- Go to Integrations and check the syncing of Requirement, Issue and Metadata is completed.
...
| Panel | ||
|---|---|---|
| ||
1. Jira sub-tasks can be imported into QMetry as Requirements or Issues. The Jira Sub Tasks -tasks details are displayed in the Sub Tasks - tasks Issues tab when Jira Sub Tasks -tasks are imported as a requirement or issue. The sub-task issue details page shows the parent key of the sub-task to trace back to its parent entity. Read aboutabout Sub Task2. Epics can be imported in QMetry as Requirements or Issues. The Epic fields - Epic Link, Epic Status, Epic Color and Epic Name are supported and are available in the Jira details section of an Epic imported as a Requirement or Issue. Issues that are part of these Epics can be viewed in the "Issues in Epic" tab. To view the issues of the Epic under the "Issues in Epic" tab, their issue types must also be integrated with the Jira project and synced in QMetry. These issues show the "Epic Link" (Epic Key) to trace back to its Epic. Read about Epic Traceability. |
Map multiple Jira projects from multiple Jira
...
instances with one QMetry project
QMetry allows multiple Jira instances to be configured with one QMetry project. Below are the steps for the same:
...
Project Admin has to select a folder during Jira configuration to import requirements from Jira into QMetry. QMetry v8.5.1 onwards, it is mandatory to select a folder for requirement requirements while Jira integration.
Users who were using QMetry v8.5 or below, requirements from Jira were imported in into the Imported folder in QMetry by default. QMetry v8.5.1 onwards, Project Admin has to select a folder of their preference to import requirements in QMetry. Requirements already imported earlier will remain intact in their respective folders. New requirements will be imported in the folder selected during Jira configuration.
...
- Folders with external entities in it them can not be archived. User Users can move the imported requirements to other folders and then can archive the folder.
- The folder that , which was synced during Jira integration for the import of requirements, can not be archived.
- In bulk archive folderfolders, the folders having external entity entities will be skipped. Sub-folders Subfolders of this folder will also be skipped from the bulk archive even if they do not have external entities in them.
See also,
Auto-organize Imported Requirements
Change Mapping of Issue Type with Requirement module
...
Issues synced based on the earlier mapping will be converted into internal issues and they will no more longer be Jira issues.
New issues will be synced as requirements as per the changed Issue Type.
...
Scenario 2. In addition to the existing Issue Type, another Issue Type is mapped with the Requirement
Issues synced based on the earlier mapping will remain intact as Jira issues.
...
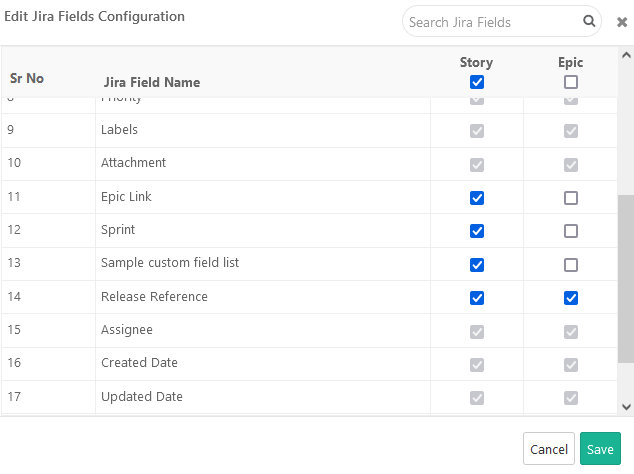
QMetry displays default Jira issue fields in QMetry Modules. Project Admin can choose to display Jira custom fields as per project needs. The Configuration of custom fields has to be done separately for every configured Jira Project and Issue Type.
...
- Number
- Date
- Date and Time
- Single line
- Multiline
- Multi-Look-Up Option
- Single Look-Up Option
- User picker
- Multi-user picker
- Version picker
- Multi-version picker
...
Note: In case If QMetry does not display a Jira field in on the configuration screen - Configuration screen, sync the project data by clicking "Sync" project data to configure the field.
Below are the steps :
- Configure custom fields for Requirements and Issues.
- Sync Jira data to QMetry. For example, newly created custom fields, etc.
A. Sync All: It will sync all issues irrespective of their updated
...
date.
B. Sync: It will sync only those issue values
...
that are recently updated in Jira based on their updated
...
date.


Jira’s custom fields can be configured (enabled/disabled) for each individual Jira issue types type integrated with the QMetry project.
You can sync the mapped Jira custom fields in the QMetry Insight module for Visual Reports and Advanced Query Reports. Read more about about Sync fields Fields to Reports.
Note: At least one of the Jira Project Projects should be integrated with the Issue Module. Once the Jira is integrated with the QMetry project the internal issue module will be disappeared from the QMetry project.
You can view the status under the Integration Scheduler Status tab under Integration > Integrations.
...
Users can view all the integrated Jira instances, their associated QMetry projects, and their current Status status either "Active" or "Inactive".
The Integration tab gives you a quick idea of update on the integration status of Jira and QMetry project integrationprojects.
Steps
- Expand Integration on the sidebar menu and select Jira Integrations. There are two tabs on the screen: Integration and Jira Scheduler Status.
- Open the Integration tab.
...