...
...
...
...
| Table of Contents | |||
|---|---|---|---|
|
...
|
Understanding Agent Concept
Users can define Agent Alias and add tasks for QMetry Agent. On activation, the Agent requests
...
tasks through QMetry. QMetry Automation Agent checks the schedule(s) set in QMetry and executes the automation tests. Users can run Custom Command regardless of Automation Framework or Build Framework. The automation agent can be run immediately or can be scheduled on future
...
dates and
...
times. Users can schedule recurring execution of
...
commands. The execution will be scheduled automatically as per set occurrences. QMetry Agent keeps running the jobs accordingly.
The flow works like this:
...
Configure QMetry Agent in Integration > Automation Agent. Download the Agent. Run custom command through QMetry Automation Agent wizard.
QMetry Automation Agent will trigger the execution through a custom command, and the test result file will be generated accordingly.
Import the above result file in QMetry using REST API.
Note: Automation-related rights are assigned from Customization > Roles. The logged-in user will have access rights over the Agent feature accordingly.
QMetry Agent Configuration
Compatibility : QMetry Agent is a java Java executable file that needs Open JDK 17.
Automation Agent Key
Use this key to configure QMetry Automation Agent.
To generate an Automation Key, go to Integration > Automation Agent and click on the Generate new Key.
...
Steps to configure QMetry Automation Agent
Configure QMetry Automation Agent using UI
| Expand | ||
|---|---|---|
| ||
Step 1. Go to Integration > Automation Agent. Step 2. Expand the Download & Run Agent section, if not expanded already. |
...
 Step 3. You will find Agent download and installation instructions on the screen. Download QMetryAgent.zip by clicking on the Automation Agent download link. |
...
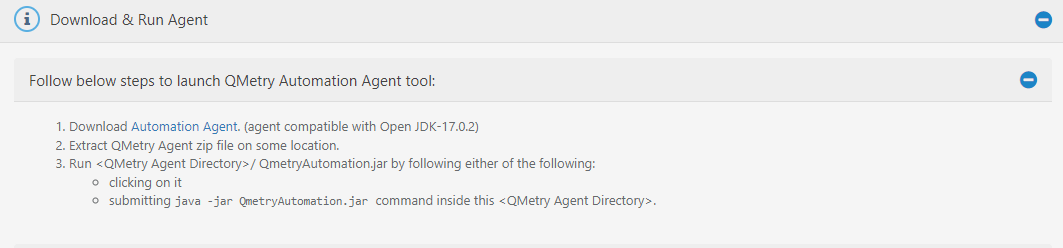 Step 4. Extract the QMetryAgent.zip on the computer drive. Step 5. Open the QMetryAgent folder. Step 6. Run <QMetry Agent Directory>/ QmetryAutomationAgent.jar by clicking on it. The QMetry Automation Agent wizard opens. |
...
The QMetry Automation Agent has the following fields on it:
|
...
|
...
Interval Time: By default, the interval time between two scheduled jobs will be |
...
180 seconds. You can change the time by modifying the "Interval" parameter in the QMetryAgent.properties. The minimum value should be 60 seconds. Click on the Start Agent button. |
...
Users can also view logs by clicking on the View Logs button. Once the Agent is configured, it will be added to the list of Registered Agents with the Status “Active”. 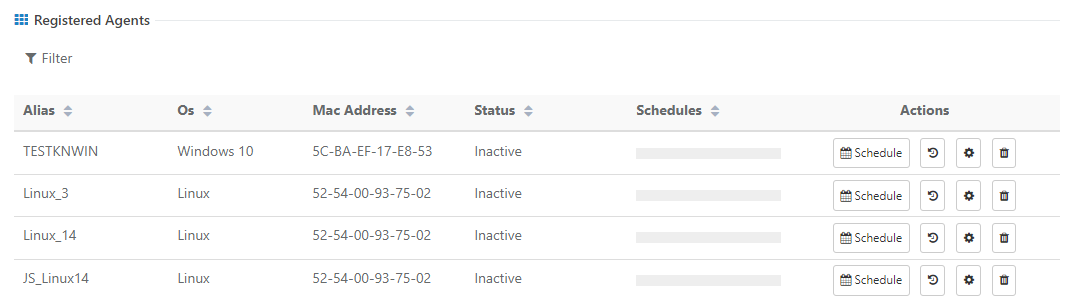 |
Configure QMetry Automation Agent using Command Line
Configure QMetry Automation Agent using Command Line on Windows
| Expand | ||||||||||||
|---|---|---|---|---|---|---|---|---|---|---|---|---|
Step 1. Go to Integration > Automation Agent. Step 2. Expand the Download & Run Agent section, if not expanded already.  Step 3. You will find Agent download and installation instructions on the screen. Download QMetryAgent.zip by clicking on the Automation Agent download link. 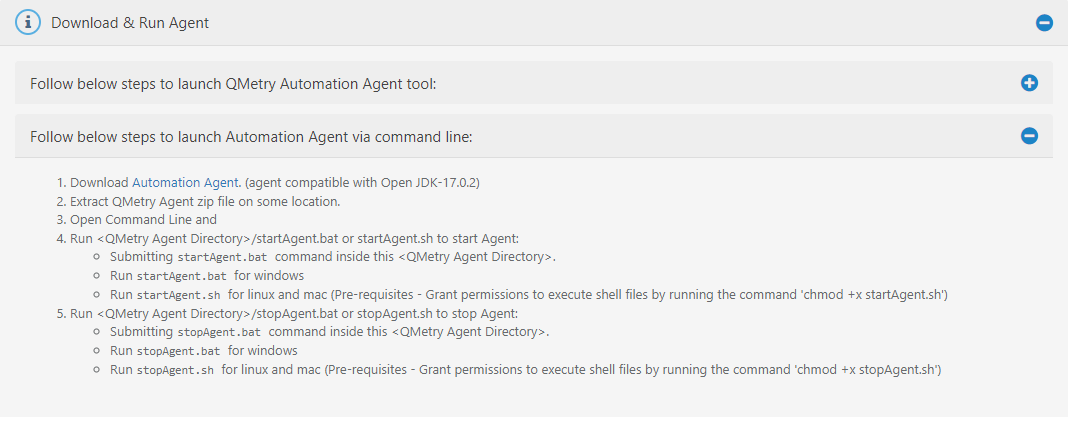 Note: The downloaded zip file will be in the format QMetryAgent_A.B.C.zip where A.B.C will be the version of QMetry Agent. Step 4: Copy the QMetryAgent_A.B.C.zip file to your server. Navigate to the directory where this file is kept and extract the zip file on the computer drive. 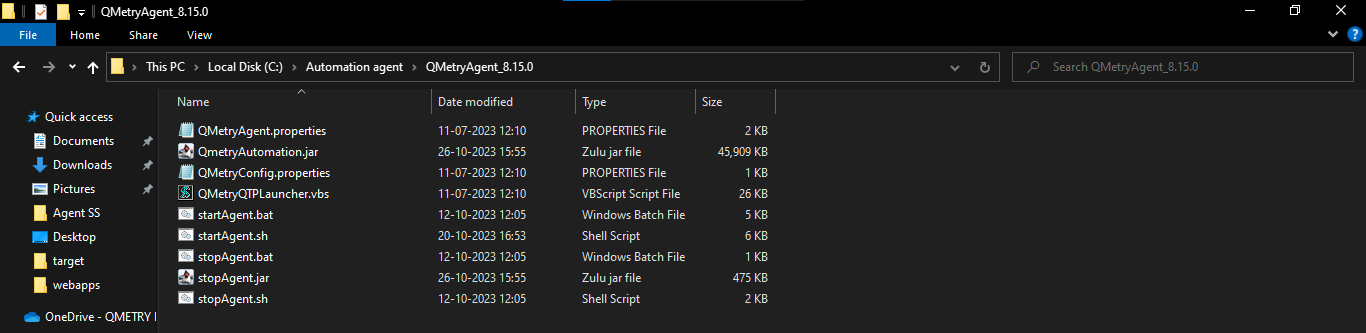 Step 5: Execute the following command to run the agent.
The QMetry Automation Agent command line wizard will open. Users need to fill required information.
Note: This will enable the agent to start automatically when the system reboots. To stop the running agent: Run stopAgent.bat by clicking on it. → Interval Time: By default, the interval time between two scheduled jobs will be 180 seconds. You can change the time by modifying the "Interval" parameter in the QMetryAgent.properties. The minimum value should be 60 seconds. |

Configure QMetry Automation Agent using Command Line on Linux / MacOS
| Expand | ||||||||||||
|---|---|---|---|---|---|---|---|---|---|---|---|---|
| ||||||||||||
Step 1. Go to Integration > Automation Agent. Step 2. Expand the Download & Run Agent section, if not expanded already.  Step 3. You will find Agent download and installation instructions on the screen. Download QMetryAgent.zip by clicking on the Automation Agent download link.  Note: The downloaded zip file will be in the format QMetryAgent_A.B.C.zip where A.B.C will be the version of QMetry Agent. Step 4: Copy the QMetryAgent_A.B.C.zip file to your server. Navigate to the directory where this file is kept and execute the following commands.
Note: Replace A.B.C with the actual version of QMetryAgent. 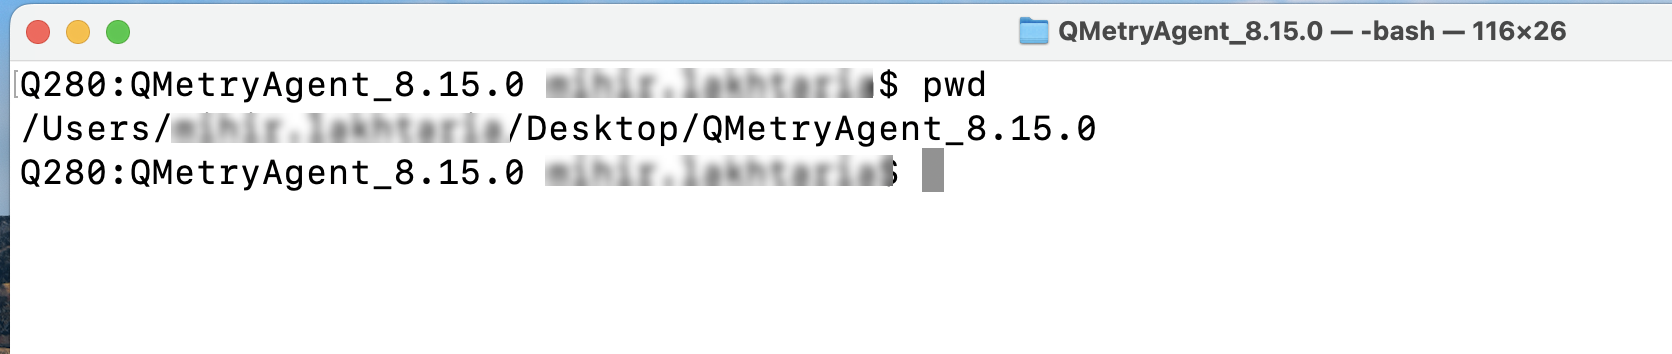 Step 5: Execute the following commands.
Note: Replace A.B.C with the actual version of QMetryAgent.  Step 6: Run the agent by executing the following command. The QMetry Automation Agent command line wizard will open. Users need to fill required information.
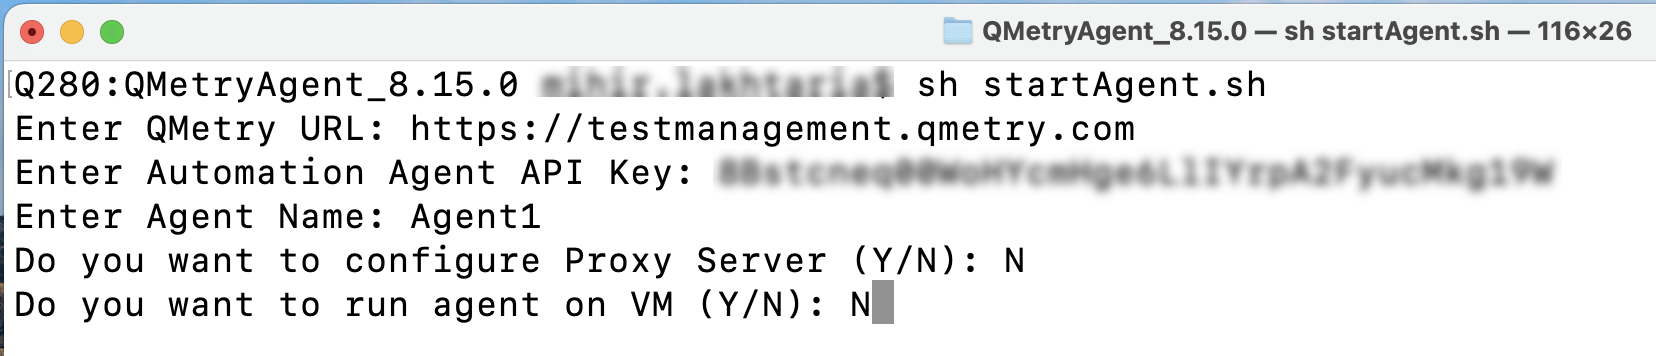 Note: This will enable the agent to start automatically when the system reboots. To stop the running agent:
→ Interval Time: By default, the interval time between two scheduled jobs will be 180 seconds. You can change the time by modifying the "Interval" parameter in the QMetryAgent.properties. The minimum value should be 60 seconds. |
Once the Agent is configured, it will be added on to the list of Registered Agents with the Status as “Active”.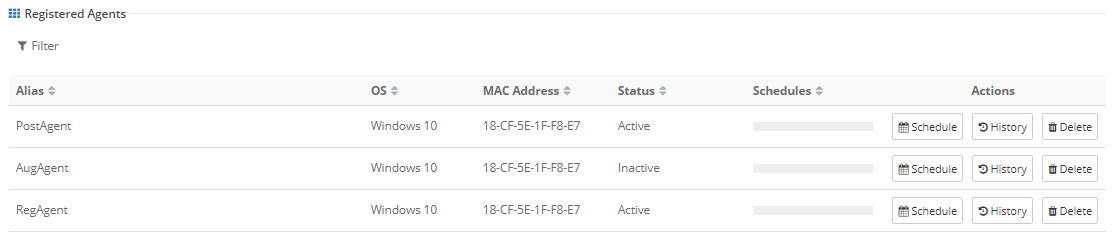
...
The screen lists out all agents added in QMetry with the details of OS, Machine Address, Status (Not Registered, Active, Inactive, Not Applicable), and Schedules.
Filter Options
You can filter the Registered Agents on the following criteria:
Alias
OS
Status
When you are done with Agent configuration in the Integration > Automation Agent, download download and run the Agent, Carry and carry out automation testing by scheduling tasks for Agent.
The columns on the screen are described below:
Alias: This is Agent Alias mentioned by the user while adding Agent.
OS: Operating System on the hosting machine on which the command will be executed.
MAC Address:
MachineThe machine address of the hosting machine on which the command will be executed.
Status: The Agent status could be ‘Active’ or ‘Inactive’.
Active: QMetry Agent is executed to request a schedule from the QMetry application. When you start the agent, it attains ‘Active’ status and remains ‘Active’ till it keeps requesting for schedule from QMetry application at the frequency defined.
Inactive: As stated above, QMetry Agent and its connection with QMetry application are checked at a defined interval. If QMetry Agent is not communicating with QMetry application for more than the defined time and it stops requesting for schedule, then the QMetry Agent status is updated as ‘Inactive’.
Schedules: The column shows the number of pending schedules and in-progress schedules. For example, 4 Scheduled / 2 In-progress.
Updated At: This is the system date and time when the Agent is added to QMetry.
The Actions column includes the Schedule, History and Delete buttons.
Schedule Agent: Click on the Schedule button to schedule QMetry Agent run.
Automation Testing
User Users can run the schedule on the spot or at a specific scheduled date and time.
Note: QMetry Agents can be scheduled irrespective of the Approval workflow if the e-Signature feature is enabled.Execution
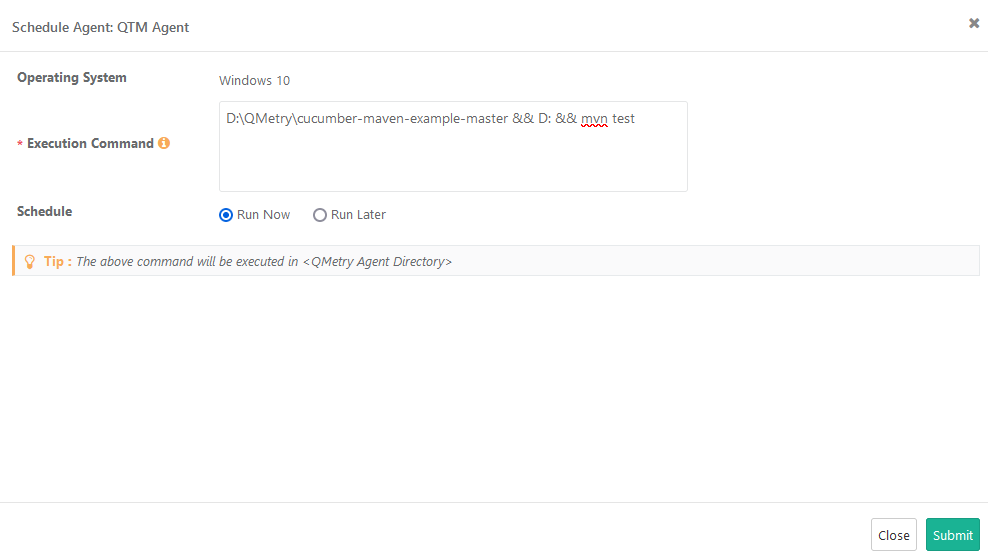
Execution Command
...
Users can run Custom Command regardless of Test Framework or Build Framework. This is a command line input, which you provide on the command line interface.
Users can trigger and execute more than 255 characters (upto 5000) command through the Automation Agent.
...
cd D:\QMetry\cucumber-maven-example-master && D: && mvn test
Schedule Automation Agent Run
You can schedule QMetry Agent to run at your preference.
(A) Run Now
(B) Run Later
One Time
Recurring
Only one kind of scheduling could occur Run now / One time / Recurring. i.e if Recurring schedule exists and if user submits Run Now option then the Recurring Schedule Job will be deleted.
| Expand | ||
|---|---|---|
| ||
If you want to execute the Agent job immediately, then select the Run Now option and click Submit. |
...
 |
| Expand | ||
|---|---|---|
| ||
You can schedule the agent to run on a future date and time. Scheduling executions helps testers set execution |
...
schedules to be run one after the |
...
other.
|
...
|
...
|
Manage Schedule
The Manage Schedule option for the agent allows users to alter the scheduled time and execution commands for the run later or recurring triggers.
Steps
1. Go to Integration > Automation Agent.
2. On the Registered Agents section, click on the Manage Schedule button to manage the schedule details of that particular Agent.
...
The Actions column includes icons for Edit Schedule and Delete Schedule.
Edit Schedule: Click on the Edit Schedule button to Edit the schedule.
Delete Schedule: Click on the Delete Schedule button to Delete the schedule.
...
Edit Schedule:
1. Click on the Edit icon for the scheduled agent that you want to update.
...
The Edit Schedule Agent screen opens.
2. Make required changes in the schedule of the agent.
3. Click Update.
...
Delete Schedule:
Go to Integration > Automation Agent.
On the Registered Agents section, click on the Manage Schedule icon.
Click on the Delete icon to delete the schedule.
View QMetry Automation Agent History
Go to Integration > Automation Agent.
On the Registered Agents section, click on the History button to view the schedule details of that particular Agent. A pop-up screen opens that displays the schedule details of the Agent.
...
The columns include Custom Command Input, Scheduled At, Execution, and Execution Status
...
Execution Status is categorized as below:
...
.
Refresh the page by clicking on the Refresh icon, at the top right corner, to view the latest execution status of the job.
Logs are available to download by clicking on the Download icon under the Action column.
...
The count of pages
...
is displayed at the bottom of the screen. Navigation buttons are provided to let users navigate through the pages
...
.
Once the Agent is
...
scheduled, the Total Schedules count increases on the Schedule screen.
...
The task that is immediate on the schedule gets executed. Other scheduled tasks get executed in sequence in accordance with their scheduled date and time.
Delete Agent
Go to Integration > Automation Agent.
On the Registered Agents section, click on the Delete button for the Agent you want to delete.
...
Import Automation Test Result File
The Agent job is triggered to execute the command as per the set Schedule. The result file is generated in accordance with the command. Use this file to update the test assets and execution status in QMetry.
| Info | icon | false
|---|---|
| title | NoteMake sure you upload the result file in QMetry using Postman to update the test execution results in QMetry. |
To know more about importing automation test results into QMetry, refer to Import Automation Results through REST API.
Other ways to push automation results into QMetry:
View Test Assets and Test Results in added/updated in QMetry
...
Open the Test Cases module. The test cases imported through automation testing are displayed with the "Automated" Testing Type.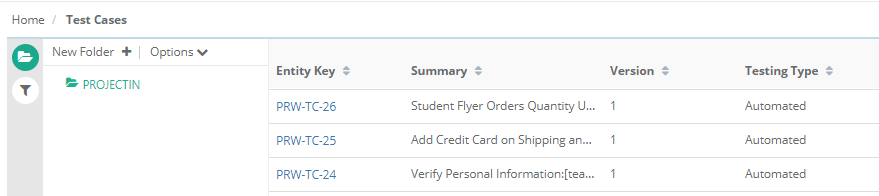
...
Test Suite
Go to the Test Suites module. You can see the Auto-Generated test suite added in QMetry as a result of automation testing.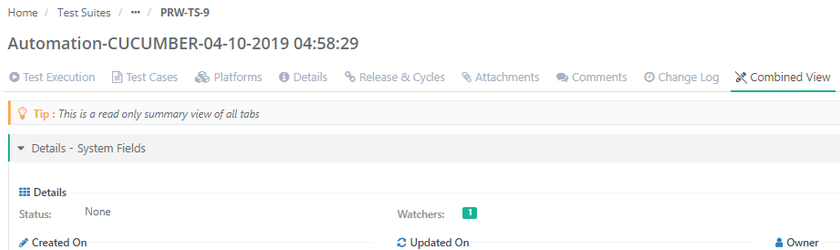
...
Test Execution Screen
Test execution status of test cases and steps are updated on the Test Execution Screen.
Go to the Test Suites module.
Open the test suite imported in QMetry as a result of automation testing.
On the Test Execution tab, click on the execution icon.
It opens the Test Execution Screen displaying test execution status of test cases with their test steps.
...