| Table of Contents |
|---|
...
For the selected Project on the drop-down the grid displays the following information of UDFs.
- Field Label
- Field Name
- Field Type
- Associated Projects Count: Associated projects are projects in which that particular field is in use.
- ActionActions: The column contains Edit and Delete buttons under it. These two buttons will not be displayed for System Fields.
...
If the Layout Management feature is enabled on the QMetry instance, then the created user defined fields get added to the Default Section of the respective module layout.
 Note:Field Name has limit of 40 characters and Field Label has limit of 100 characters.
Enter the following details.
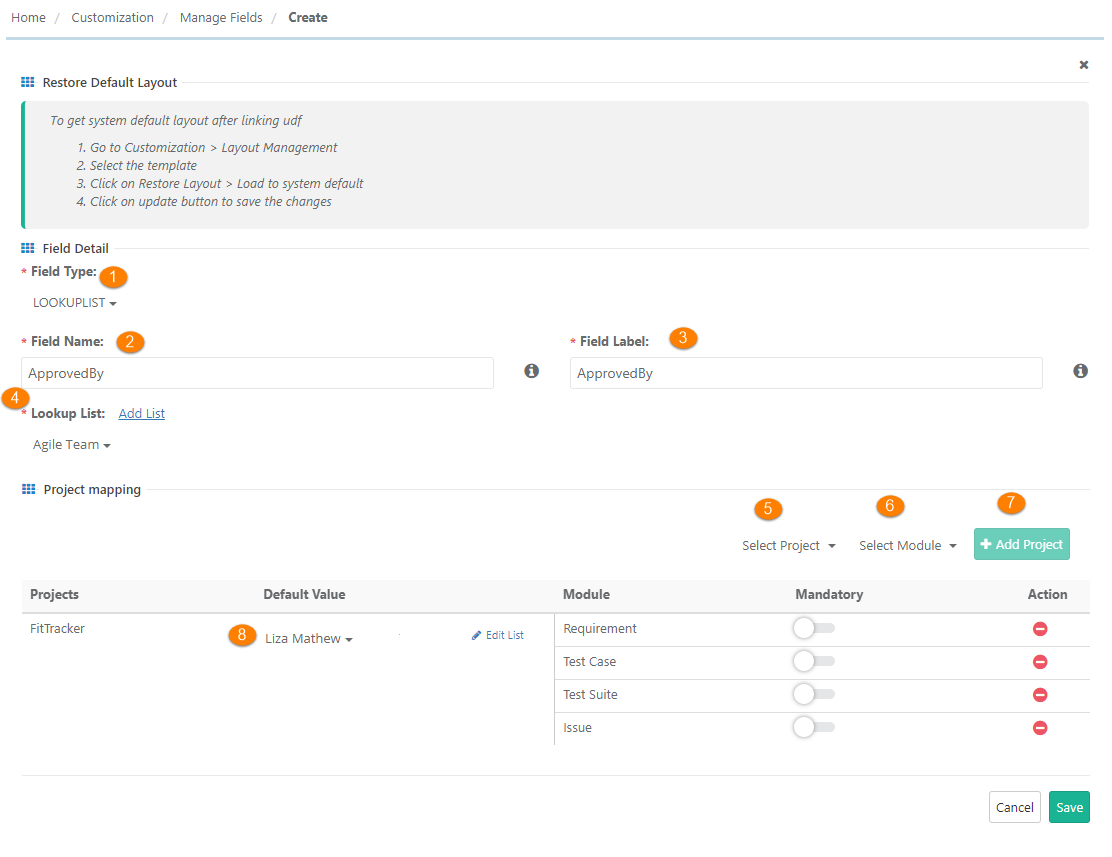
- Select Field Type.
- Field Name: This field represents the unique ID for UDF. It remains the same in any Project. Blank space is not allowed in the name.
- Field Label: Enter the label that will be displayed on the screen. It is like a field alias and can be changed on a Project by Project basis.
- Lookup List: The field is enabled only if the Field Type is either “Lookup List” or “Multi-Select Lookup List”. The drop-down list displays all List Name(s) added to List. Select the List Name and the List Values will be populated for the List accordingly. Select the List on the drop-down for the UDF. If the list does not exist, then click on the Add List to add a new list. (Field Length: The field is enabled only if the Field Type is "String". Specify a maximum number of characters which user can enter for a specific field. In case of String type, the limit is 255 characters.)
- Select Project:Select the Project(s) in which you want to create the new custom field.
- Select Module: Select the module(s) from to associate the new custom field with. You can also add custom fields to the Test Step section of Test Cases.
- Click on the Add Project button.
- Default Value: Preserving a default value for a UDF is very helpful when the user is adding records with similar values for a particular field or when the value needs to remain consistent for all the entities of that module. The UDF value will auto-populate for the field when a new entity is added to the associated modules.
Use Case: QA Manager is creating test cases with a UDF "Reviewer" and needs to keep QA Lead's name as default to appear for each test case. So the tester enters the QA Lead's name as a default value for the field.
- When the UDF is a type of Look-up list/Multi Select Look-up list, select the Default Value you want to maintain for that list.
- When the UDF is of type other than look-up list/multi select look-up list, enter the Field Default value you want to provide for that field.
...
Click Save to save the User Define Field.

Editing Existing Fields
...
- Go to Customization > Manage Fields.
- Expand the System Defined Fields section.
- Show Testing Type field: By default the setting is On. To make the Testing Type field visible on the test case grid view or column list, turn the flag "On", else keep the flag "Off".
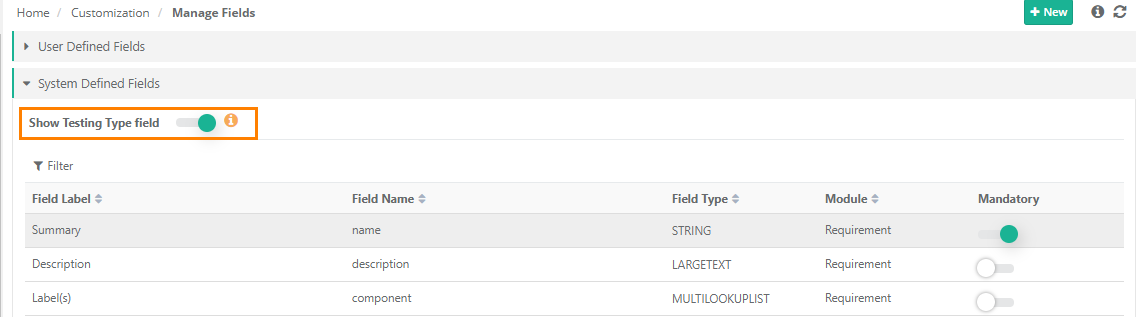
It hides the Testing Type field wherever it is displayed throughout the application. If the field has been part of saved filters, then the filters will be cleared.
Note: This settings will not impact Dashboard and Reports. The Testing Type field will still be visible even though the Show Testing Type field is Off.
Defining Default Value for Particular Field
...