This implementation guide runs you through the process of implementing QMetry in your organization according to the QA processes followed in the projects with quick set up steps to get your teams up and running on QMetry. This documentation is useful for the QMetry administrators and key players.
Table of Contents maxLevel 2
Step 1: Prepare
As you plan and prepare to get QMetry up and running in your organization, complete the following steps.
...
Administrators need to manage Projects as well as Users implementing the test projects.
Syncing with the Team
Always be in communication with the team to let them adopt QMetry at ease and get their feedback.
...
- To set up project, go to: Projects >> Project / Release / Cycle

- Resources - Help Documentation for Project.
Define Builds
- Define Builds based on your development cycle. It can be defined as product version names or iteration details.
- To set up project, go to: Projects >> Build
- Resources - Help Documentation for Build
Define Platforms and Platform Attributes
- Define Platforms and Platform Attributes based on your testing environment
- To set up Platforms, go to: Projects >> Platform
- Resources - Help Documentation for Platform
- To define Platform Attributes, go to: Custom Configuration >> Platform Attribute
- Resources - Help Documentation for Platform Attribute
Define Labels
- Define Labels that would be used to identify test assets or group them.
- To set up project, go to: Projects >> Labels
- Resources - Help Documentation for Label
Define User Role and Rights
...
To view/edit/create a new role, go to: Customization >> Roles
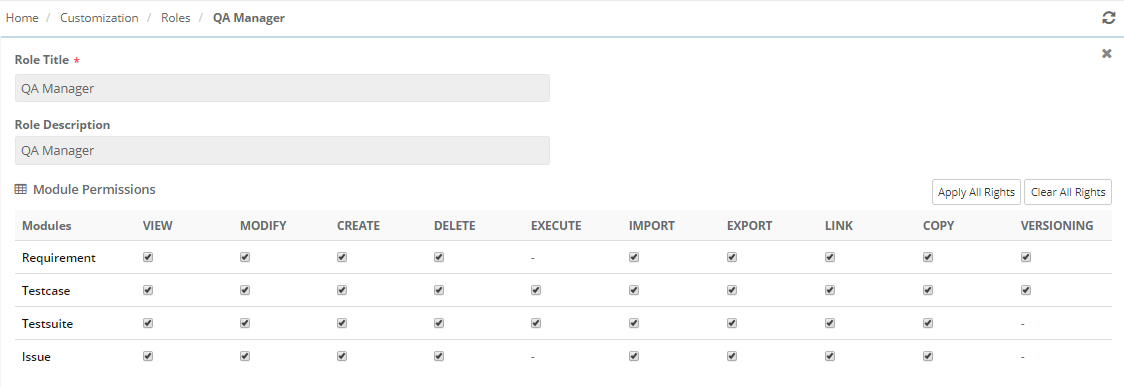
Resources - Help Documentation for User Roles
Understanding Rights
Every Role is linked to set of rights/permissions that are allowed to the users with the role.
...
To view/edit rights to a role, go to: Administration >> Roles >> Edit Role
Resources - Help Documentation for User Rights
Customization
The "Customization App" allows you to customize your QMetry's General Settings, Lists, System and Custom fields, Email Notifications and SMTP settings. Below is a quick overview of the settings you can modify under each section:
...
This can be done in Custom Configuration >> General Settings.
Resources - Help Documentation for General Settings.
Execution Status
Default Execution Statuses available in QMetry are:
...
This can be done in Customization >> Execution Status.
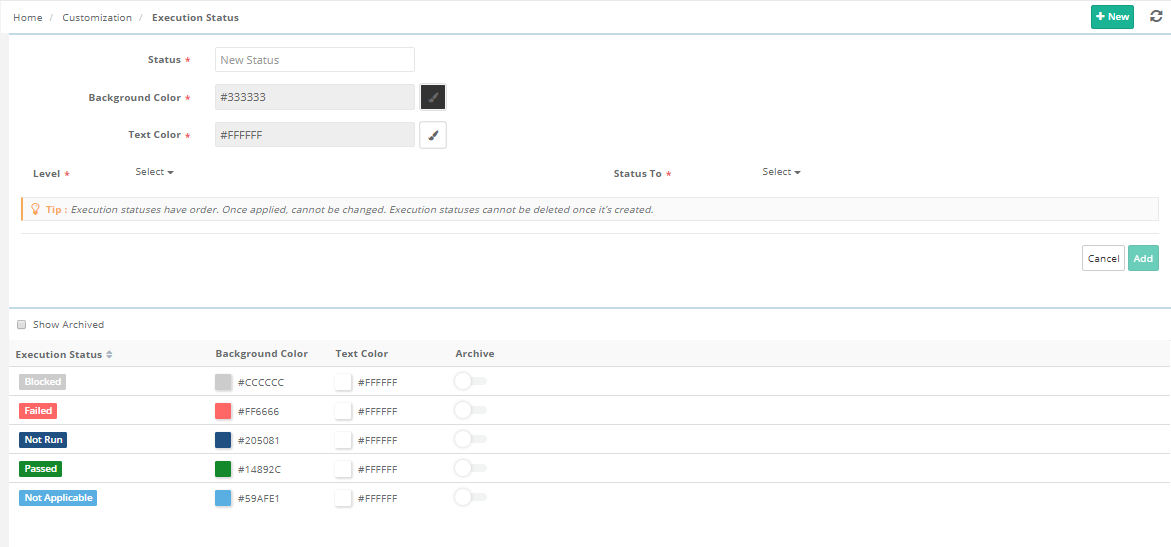
Resources - Help Documentation for Execution Status
Custom Fields
All the modules in QMetry have pre-defined system fields that help you to manage your default asset data in terms of Requirements, Test Cases, Test Suites, etc. However, when your QMetry Project is mapped to the processes / workflows in your organization, you might require additional fields to be created in QMetry to add your data. These fields are the custom or user-defined fields in QMetry. This section mainly contains the system fields and the fields you add (or have added).
...
This customization is available under Customization >> Manage Fields.
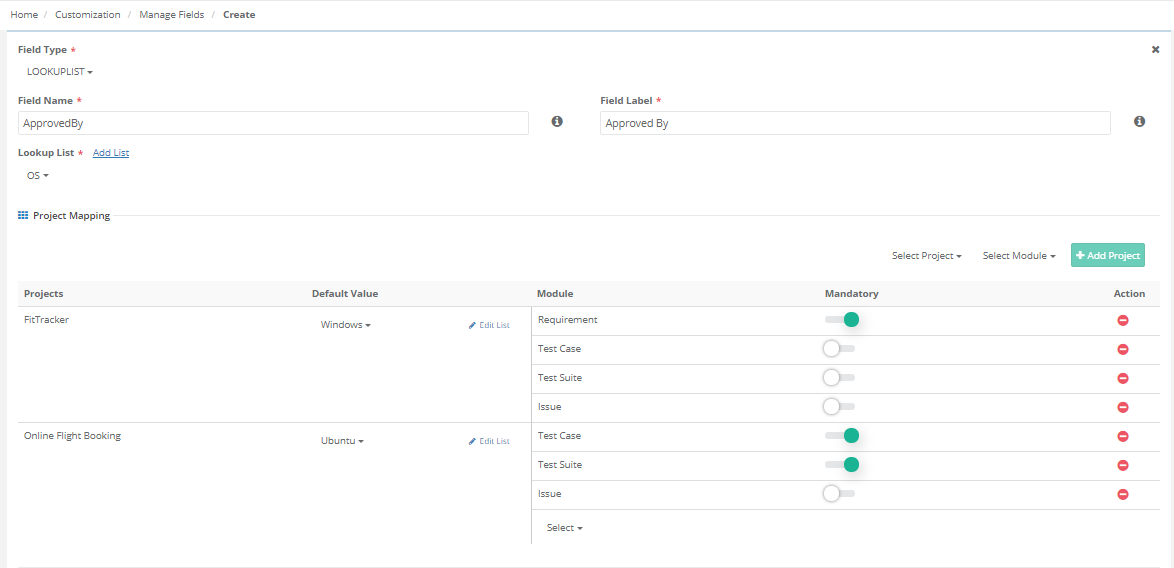
Resources - Help Documentation for Manage Fields.
Lists
This section contains all the existing lists and list values available across different modules like Requirements, Test Cases, Test Suites and Issues. You can create your custom lists and their list values which you utilize in the custom fields which you create in QMetry.
This can be done under Customizations >> Lists.

Resources - Help Documentation for Lists.
Notifications
QMetry allows you to send out Notifications via email for various events that take place in QMetry to different users belonging to a particular role. Below are the notifications that can be setup in QMetry. You can go ahead with the default notification settings which are set up as per the best practices. Further customization required can be done by choosing the user role and user.
...
The customization of Notifications is available under: Customization >> Notifications.

Resources - Help Documentation for customizing notifications.
Customization Tips & Tricks
...
- Assign Project and Role: Admin can assign Projects and Roles to the user that is being created.
- Resources: Help Documentation for Creating a User
Jira Integration
Jira can be configured with QMetry modules as an external system and based on it, users can perform module wise activities. If Jira is configured with QMetry, the Issues module will not be available in QMetry.
- If Jira is configured with the Issue module in QMetry, then users can -
- link issue with test cases (from Execution screen)
- create issue from test case run (from Execution screen)
- If Jira is configured with the Requirement module in QMetry, then users can sync Jira stories as requirements in QMetry.
Flow Chart
- Resources: Flowchart - Integration of QMetry with JIRAJira
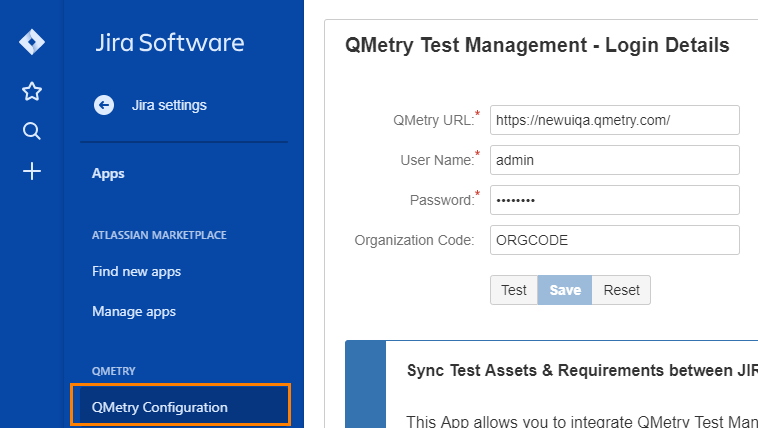
Configure Jira Integration in QMetry
...
- The Jira Integration – QMetry Enterprise add-on, which is available on Atlassian Marketplace, should be installed in your Jira Instance. Administrator login is required to be able to install the add-on.
Link QMetry & Jira Project
...
- Click on the Save & Active button to sync the issues.
- Resources: Map JIRA projects, Issue type and Fields with QMetry Project
Import Data
This feature allows users to import test assets into QMetry from an Excel sheet or Jira. The functionality is provided as a wizard that is easy to follow and it helps you to import bulk of requirements & test cases quickly.
...
- Convert the requirement/test case file (XLS/XLSX/CSV) format into QMetry field format to make it compatible with QMetry.
- Make sure that all the columns in the Excel file have a corresponding field in QMetry.
- Majority of the columns in the Excel file should map to one of the QMetry fields. If there are columns which don’t really map, define those additional fields as ‘User Defined Fields’ in the Admin module.
- Make sure you map the required columns in the Excel file with their corresponding fields in QMetry.
- Import the XLSX/XLS/CSV file into QMetry by mapping the QMetry fields with XLSX/XLS/CSV columns.
- Verify that the imported requirements/test cases are displayed in QMetry as you expected.
Resources : Help documentation for Import from Excel
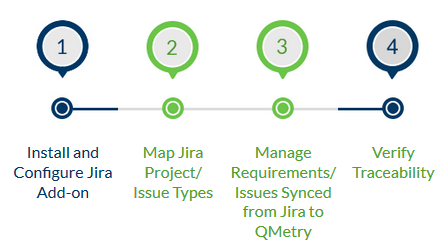
Sync Requirements and Issues from Jira:
...
- Configure Jira within QMetry. Explained above in Jira integration steps.
- Map Jira projects, Issue Types and fields with QMetry project.
- Once Jira Issue Type is mapped with QMetry modules, Jira issues are synced into Requirements and Jira Issues are available to link on Execution screen in QMetry.
Resources: Sync Requirements & Issues
Summary and Checklist: Set Up QMetry
...
- To set up LDAP go to Integration >> LDAP/SAML. The LDAP should be “Active” to define the authentication type as LDAP.
- Assign a default role and default project for them to login. Once the integration is done users can login to QMetry and their QMetry accounts would be auto created.
- Resources : Help Documentation for LDAP Setting
SAML Setup
QMetry Supports SAML Authentication. Security Assertion Mark-up Language (SAML) is an XML-based standard for exchanging authentication and authorization data between an identity provider and a service provider. SAML is used for single sign-on to eliminate application wise passwords. QMetry Admin can integrate SAML for authentication to allow QMetry Users to login using single sign on. Currently, QMetry supports only Okta as an SAML provider.
- To set up SAML go to Integration >> SAML.
- Assign a default role and default project for them to login. Once the integration is done users can login to QMetry and their QMetry accounts would be auto created.
- Resources: Help Documentation for SAML Setting
SMTP Setup
QMetry provides a way to configure Simple Mail Transfer Protocol settings for outgoing mail transport from QMetry. Users receive email notifications e.g. test case creation, requirement creation, etc. from the account configured in SMTP Settings.
- To set up SMTP go to Customization >> SMTP Settings.
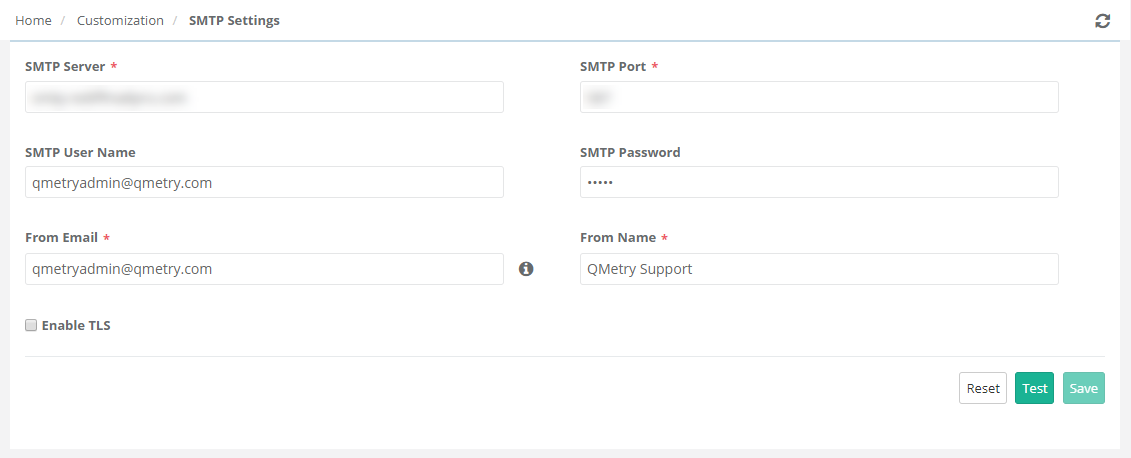
- Resources : Help Documentation for SMTP Setting
Audit Configuration
QMetry Audit Log displays events like Create, Update, and Delete of test assets e.g., creation of requirements, editing test cases, and deleting test suites. Admins can configure the number of days they require to retain information of Audit and Changelog within QMetry. They can download the logs for the days configured here.
- To set up notification settings go to Customization >> General Settings & Audit >> Audit.
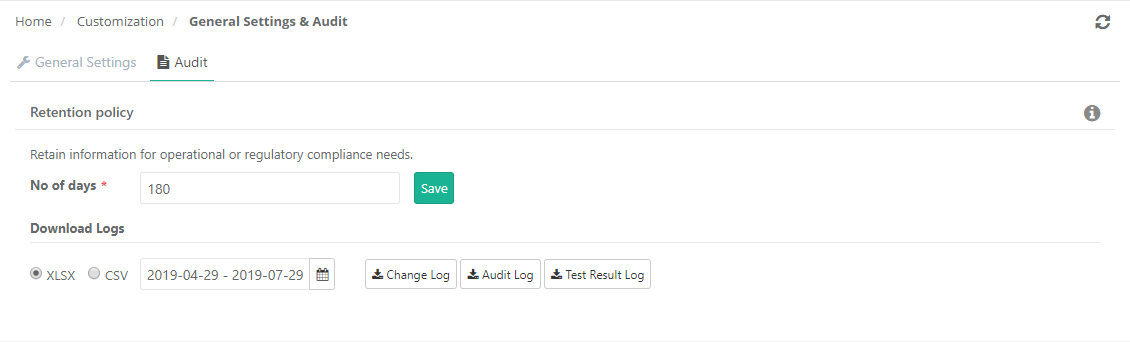
- Resources: Help Documentation for Audit Configuration
Summary and Checklist: Extend
...