| Table of Contents | ||
|---|---|---|
|
...
It opens next screen with fields on it to add a new project.
...
Project Name: Enter name of the Project that is being added. A Project Name can include Alphabets, Numbers and supported special characters. in it. A Project can be the current Project being tested and can contain multiple Releases and Cycles.
Project Key: The Project Key is a short-hand reference of the Project Name that will be used as a reference within the Project's test assets. Enter a A Project Key with maximum limit of 5 characters. Name can be of 10 characters. The Project Key can’t be edited once it is created. A Project Key can include Alphabets , Number and supported special characters.and Numbers in it.
Note: Only new projects can be added with the key maximum up to 10 characters. The keys of existing projects cannot be edited.
Description: Enter description regarding the Project.
...
Enable rich text editor
You can enable the flag to make rich text editor available in modules across the application. The rich text editor is applied to Large Text fields of modules. The settings are applicable at Project level.
...
Add new LDAP/SAML users to this Project
...
Use Case: Priority defined by Admin has three values Critical, Major and Low. This is as per customer business rule and Admin does not want users to add any other values than the defined ones. Users import an excel with priority as High, Medium, Trivial or any junk values like P1, P2, P3, etc. To stop users adding unnecessary values to Lists, Admin want to set the Auto Create Values flag Off.
...
If the values in QMetry are archived, the import will be blocked.
...
For more details, refer to Test Executions Execution Screen Default View
...
Configure Resolved Status for Reports
...
The following reports will be generated in accordance with the configuration:
Resolved Issue Verification (under Issue Analysis Report)
Issue Created vs. Resolved (under Issue Trends Report)
...
The following tabs are there on the screen:
Release/Cycle
Users
Jira Integration (as per permissions set in Administration > Roles)
eSignature
BDD Configuration
Automation Tool
Adding Releases under a Project
One Default Release is provided when you create a Project.
On the project details page, click on the '+' icon and select Add Release on it.
A blank row appears on the screen to enter release details.
Enter the Release Name, Release Start Date, Release Completion Date in sequence and click Add.
The Release is added on the list.
...
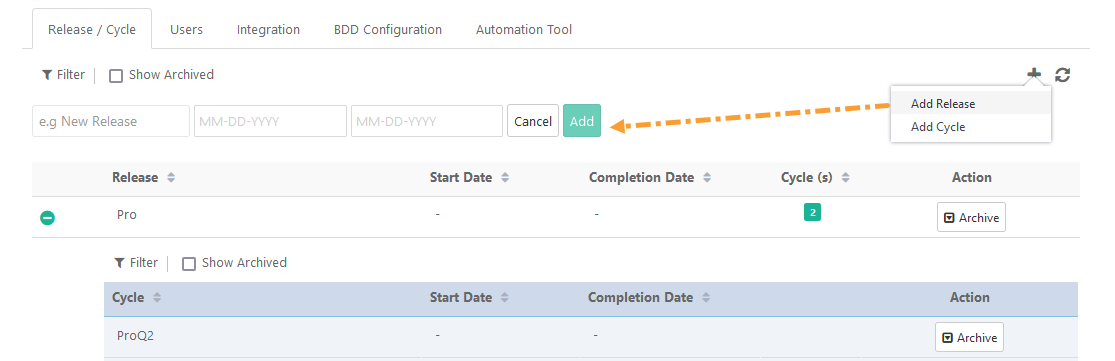
Adding Cycles under a Release
Cycles are added within respective releases. Once Default Cycle is provided under the Default Release.
Click on the '+' icon and select Add Cycle on it. A blank row appears on the screen to enter Cycle details.
Select Release within which the Cycle is to be added.
Enter the Cycle Name, Cycle Start Date, Cycle Completion Date in sequence and click Add. Cycle Start and Completion Dates should be within Release Start and End Date. Now click Add.
The Cycle is added under the selected Release.
...
Expand Release to view Cycles added under it.
...
Users whose assigned user role has project rights assigned can access the project.
Editing a Release/Cycle
Hover the mouse over the field values and the Edit icon becomes visible.
Click on the Edit icon and change the required value.
Save individual values after editing.
Deleting a Release/Cycle
1. To delete a Release/Cycle, first you need to archive that release/cycle. To archive release and archive cycle, click on the Archive button under the Action column on the respective grid.
...
Audit logs are also maintained for the changes made to the “Make Build selection mandatory during execution” settings.
Note: Bulk Execution performed on the “Bulk Execute” screen (Test Suite > Test Execution tab > Bulk Execute) is exempted from mandatory build selection. All the bulk executions from this screen will be performed on None build.
Steps to make a build selection mandatory while creating a new project:
Go to Projects > Project/Release/Cycle.
Click on the New button to create a new project.
...
Enable the Make Build selection mandatory during execution
...
option to make the build selection mandatory before proceeding towards execution.
...
Steps to make a build selection mandatory while editing an existing project:
Go to Projects > Project/Release/Cycle. You can see the list of created projects.
Open the project by clicking on the project name. The edit screen opens.
...
Enable the Make Build selection mandatory during execution
...
option to make the build selection mandatory before proceeding towards execution.
...
If you have enabled the Make Build selection mandatory during execution option in Projects module, you can see the tip “Build is set as Mandatory during execution” on the Build grid (Projects > Builds).
...
Users can edit values of Project Name and Description, and change other settings .
Go to Projects > Project/
...
Release/Cycle. It displays the list of Projects of which you have rights.
Open project detail page by clicking on the Project name on the list.
Hover the mouse over Project Name and Description to change respective values by clicking on the Edit icon.
Configure settings for
...
available options.
Archiving Projects
You can archive Projects which are no more required. Users with "Modify" Project rights can archive projects. The rights also allow the users to archive Release and Cycle.
Use Case: Work on a Project is finished and the Admin does not want the team to see the Project and its associated Releases and Cycles. So the Admin decides to archive the Project.
Go to Projects > Project/Release/Cycle.
It displays the list of Projects of which you have rights.
Click on the Archive button for the Project that you want to archive. The project is archived after confirmation.
...
You can also archive project from project detail page. Open the project detail page and click on the Archive icon at the top right corner of the screen.
...
Archived Releases and Cycles will be hidden on the respective lists across all modules.
Once a project is archived, the project name will not appear on the Project list.
Archived projects can not be edited.
Unarchiving Projects
Once a project is archived, there are two buttons enabled for it – Unarchive and Delete.
Click on the Unarchive button to unarchive the archived project.
Cloning a Project
...
Cloning a Project
The Clone feature of QMetry lets you create a new project that is similar to an existing project without having to configure it from scratch. Once you create the new project, you can make changes to it independently from the original project. Users can add a clone of an existing Project with either Folder Structure or Folder Structure along with Data.
Permissions Required: Users should have “Clone” rights for Project to be able to clone the project.
Important Notes:
The amount of time project clone runs depends on the amount of data in the project.
When a project clone is initiated, the source project will be locked in a read-only mode, and no operations can be performed on the project while the clone is in-progress. Hence, it is strongly advised to run the clone during off-peak hours.
Once the clone operation is initiated, a backend process is initiated. This process is not accessible on the QMetry UI and it cannot be terminated.
If a clone gets failed, the scheduler shall display a failure. For any unexpected reason, if the project clone gets stuck, the job will be auto killed and the project
...
Users can add a clone of an existing Project with either Folder Structure or Folder Structure along with Data.
...
lock is released automatically after 8 hours.
Steps:
1. Go to Projects > Project/Release/Cycle. It displays the list of Projects of which you have rights.
2. Click on the Clone button for the project you want to clone.
...
3. The next screen opens with Project Name and Project Key fields on it. Make required changes to the Project Name and Key. By default, it will suffix "_copy" to the Project Name.
...
Select either of the options:
Folder Structure: It will copy the folder structure along with releases and cycles. It will not copy assets contained in the folders.
Folder Structure along with Data: It will clone project meta-data and requirements, test cases, test suites within folders along with releases cycles.
4. Then click on the Clone button.
...
For the Clone activity that has been carried out, you can view the details of Activity Executed By, Source Project, and Destination Project.
...
Deleting ProjectsProjects
Users can delete a project only if it is archived.
1. First, archive the Project as described in Archiving Projects.
2. To view archived projects on the Projects screen, select the Show Archived check box on the Project list view.
Once the Project is archived, then only you can see the Delete button on the screen. Users can delete a project only if it is archived.
3. Click on the Delete button to delete the project.
...
Unarchive a Project
1. To view archived projects on the Projects screen, select the Show Archived check box on the Project list view.
Once the Project a project is archived, then only you can see there are two buttons enabled for it – Unarchive and Delete.
2. Click on the Unarchive button on to unarchive the screenarchived project.
Assign a Project to Users
After users have been added (as described in the article Users) you can link users to a project and control their permissions. You should be a Project Administrator to use this functionality. Each project has its separate data, users and settings. When a user is linked to a project, they can access the project in accordance with the role assigned to them.
...
Open the Project detail page by clicking on the Project name. It opens the screen with tabs on it.
Open the Users tab. It lists out all the users associated with the Project, in other words, the users who are allowed to use the Project. The columns display Name, Username, Role, and Status details of the user.
To open the list of available users, click on the Link button above the grid.
Select users and their Role for the project.
To link a single user, click on the Link icon for the user.
To link multiple users, select users and then click on the Link Selected Users button at the bottom.
...
To add a new user click on the Create New User link available beside the Link button above the grid.
...