Versions Compared
Key
- This line was added.
- This line was removed.
- Formatting was changed.
The Bulk Operation feature is provided to perform -
|
|
|
|
|
Notes:
- Filters applied on folders, system, custom, or Jira fields on the module are carried forward to the bulk operations. This allows performing bulk operations by filtering on all the fields.
- Fields enabled on the module grid are also enabled while selecting records on the bulk operations screen.
When Jira is integrated with the project, requirements can be filtered on Jira fields. Users can then perform bulk operations on filtered records.
From where to access the Bulk Operation feature?
Open Test Case module list view.
Click on the Con icon  Image Modified at the top right corner on the toolbar and select Bulk Operations
 Image Removed
.
Users can apply filter on test cases from the Test Cases module main screen. Filters applied on folders, system or custom fields on the module are carried forward to the bulk operations. With this, the bulk operations can be performed by filtering on all the fields. Fields enabled on the module grid are also enabled while selecting records on the bulk operations screen.
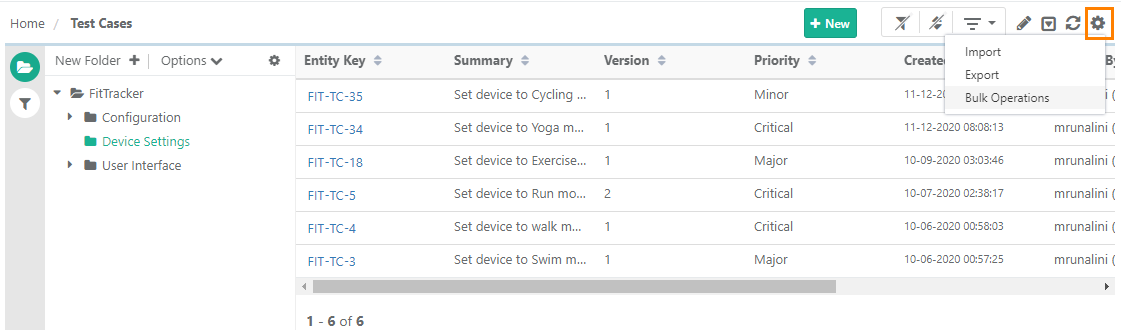 Image Added
The table below show what operations you can perform for different test assets.
Module/Operation | Copy | Move | Edit | Delete | Archive | ||
|---|---|---|---|---|---|---|---|
Unarchive | Approve | |||
|---|---|---|---|---|
Within Same Project | Across Project | Within Same Project | Across Project | |
Requirement | Y | Y | Y | Y |
Y | Y | Y | Y |
Y | |||||||||
Test Case | Y | Y | Y | Y | Y | Y | Y | Y | Y |
Test Suite | Y | N | Y | N | Y | Y |
Y | Y | Y | |
Issue* | Y | Y | Y |
Y | Y | Y | NA |
NA | NA | ||||||||
Platform | NA | NA | NA | NA | NA | Y | Y | Y | NA |
*
Requirements/Issues should have been created only in QMetry. Bulk Operations could not be carried out on
requirements/issues imported from Jira.
Note: Bulk Operation can be performed on maximum 1000 records at a time.
If the number of test assets exeeds 1000, then the Bulk Operations button will remain disabled. Different filters are provided to help you narrow down the test assets count and move ahead with bulk operation
Available Filters
 Image Removed
.
Bulk Edit
Step 1 Select the Edit operation you want to perform on the assets and click Next.
 Image Removed
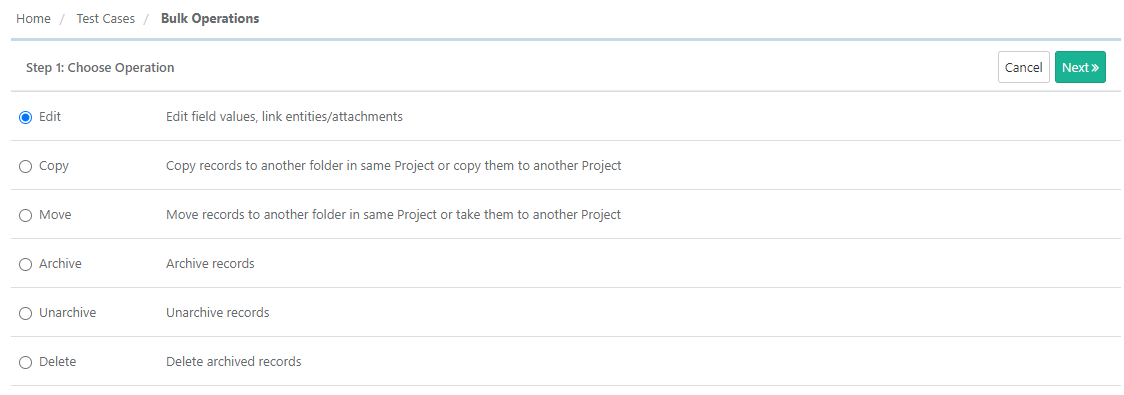 Image Added
Step 2 Select assets: The next screen displays records with check box. Select assets on which you want to perform bulk operations by selecting check boxes and then click Next.
Note: Users can carry Bulk Operation only on internal QMetry
issues and not on
issues that are imported from Jira
Step 3 Operation Details: The screen depends on the operation you selected in Step 1 above.
For example, for Edit operation, the screen opens with fields for editing bulk test cases.
- Specific Version: You can select a particular Version of the test case to edit. Test Cases with multiple versions are expandable and you can view all the available versions for the test case.
Use Case: Each version of the test case is expandable so that users can view details of all versions at one place.
Expand the test case and select the required version you want to edit
.Image Removed.
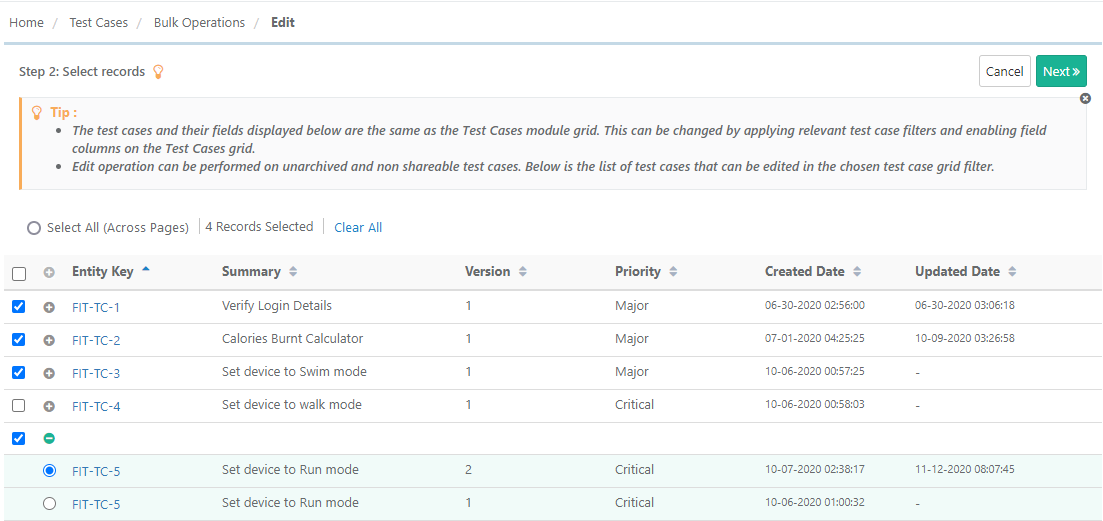 Image Added
Step 3 Operation Details: The screen depends on the operation you selected in Step 1 above.
For example, for the Edit operation, the screen opens with fields for editing bulk test cases.
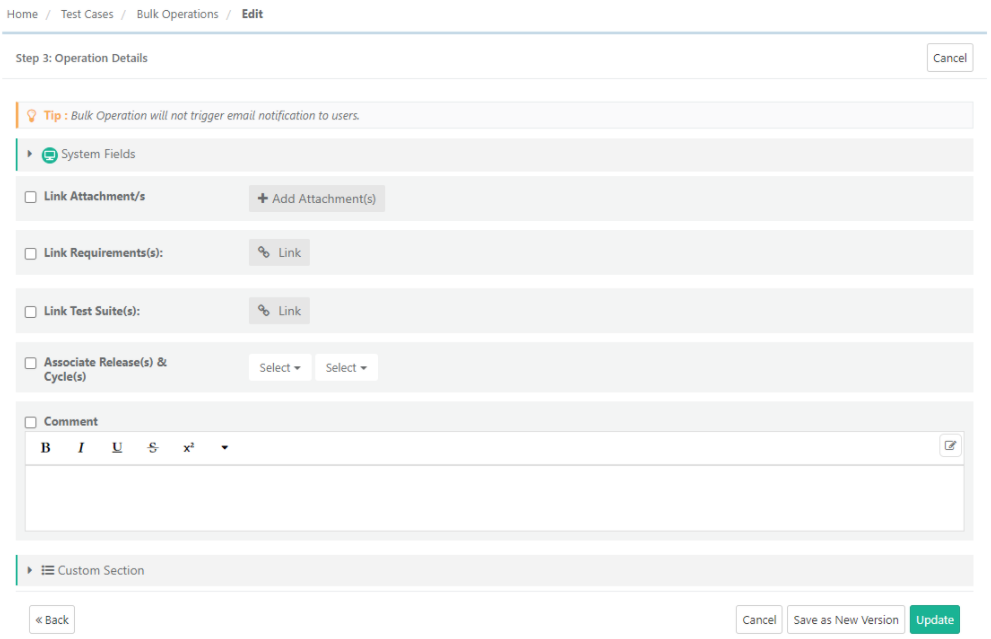 Image Added
Bulk Operations for Test Cases:
- Bulk link Test cases with Requirements.
- Bulk edit specific versions of test cases.
- Bulk link attachments.
- Bulk link Releases and Cycles.
Bulk Operations for Requirements:
- Bulk link Requirements with Test cases Issues.
- Bulk edit specific versions of Requirements.
- Bulk link attachments.
- Bulk link Releases and Cycles.
Bulk Operations for Test Suites:
- Bulk link Test suites with Platforms & Test cases.
- Bulk link attachments.
- Bulk link Releases and Cycles.
Once you are done changing field values, click either Save as New Version or Update for requirements/test cases. (In case of test suites, click Update.)
Bulk Comment
Go to Bulk Operations.
Step 1 Choose Operation: Select Edit as the operation to perform and click Next.
Step 2 Select records
- Select requirement records which are to be commented. If you want to add comment in all the requirements across pages then select the Select All (Across Pages) option.
- You can apply Filter to search specific records based on different criteria.
Step 3 Operation Details: The screen depends on the operation you selected in Step 1 above.
For example, for Edit operation, the screen opens with fields for editing bulk requirements.
- Add comments in the Comments field. Observe that the edited fields gets selected automatically.
- Save the changes, click either Save as New Version or Update for requirements/test cases. (In case of test suites/issues, click Update.)
Tagging Users in Comments
You can also tag users for adding bulk comments (through Bulk Operations > Edit). In this case, a single notification will be sent to the tagged users for multiple test assets. The email contains Keys, a Summary, and a Comment on the assets.
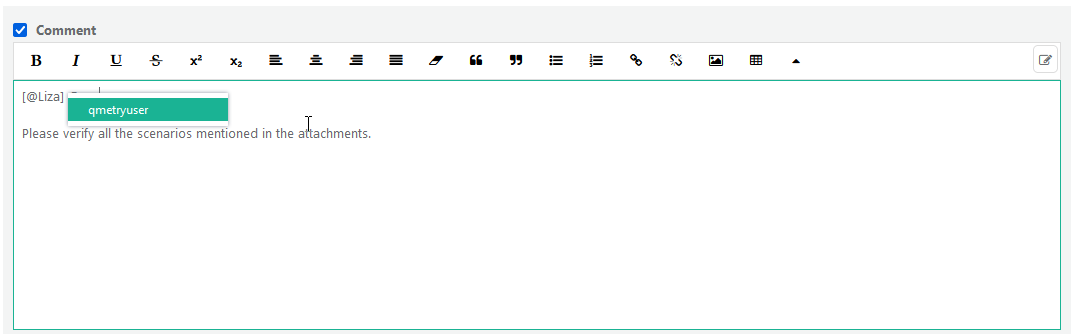 Image Added
The following image shows the email received on Bulk Edit of requirements with tagging users in the Comment field.
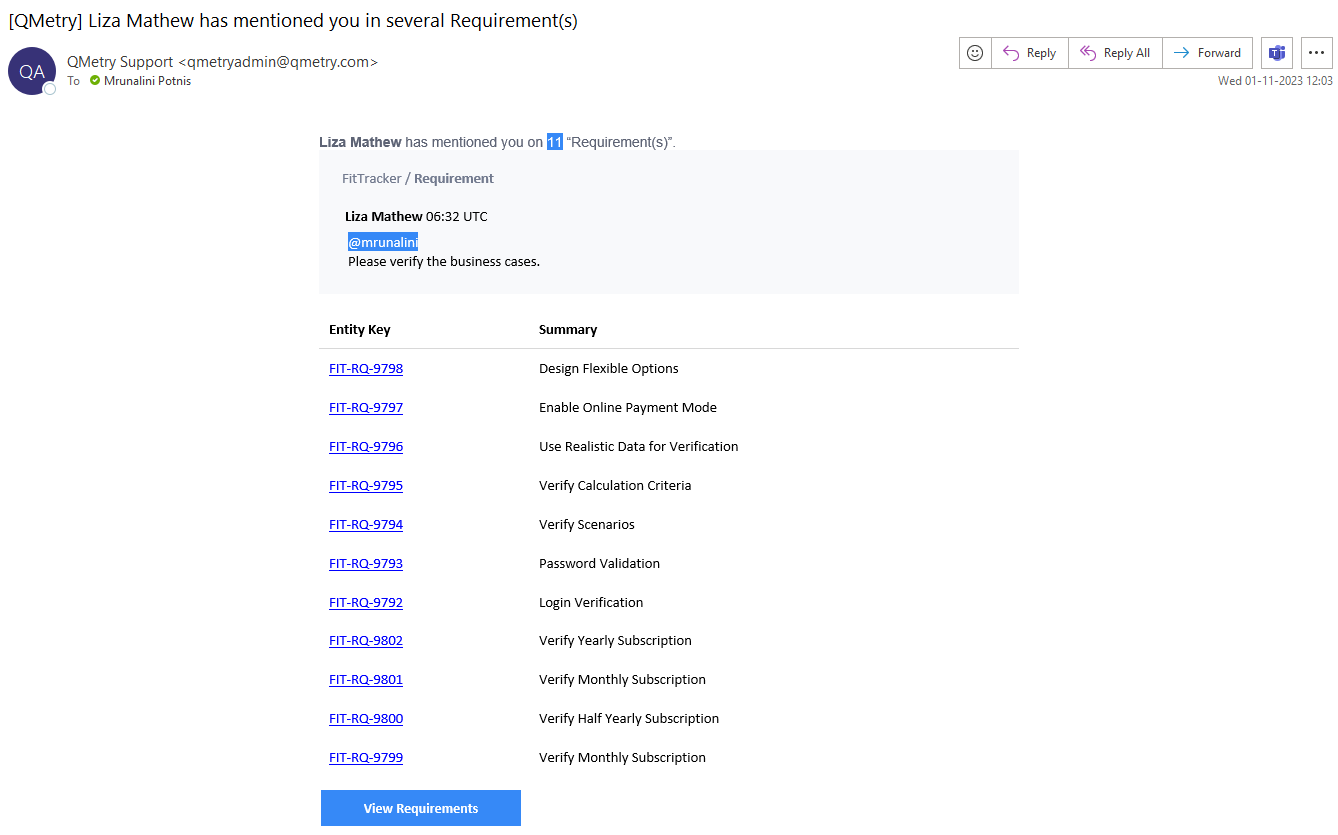 Image Added
Bulk Copy
Users can copy requirements within project and across project. The destination project should have the required user defined fields that are used in the source project.
A user can move/copy requirements to the destination folder or a root folder of destination project.
Requirement and specified version copy/move have the following options:
Go to Bulk Operations.
Step 1 Choose Operation: Select Copy as the operation to perform and click Next.
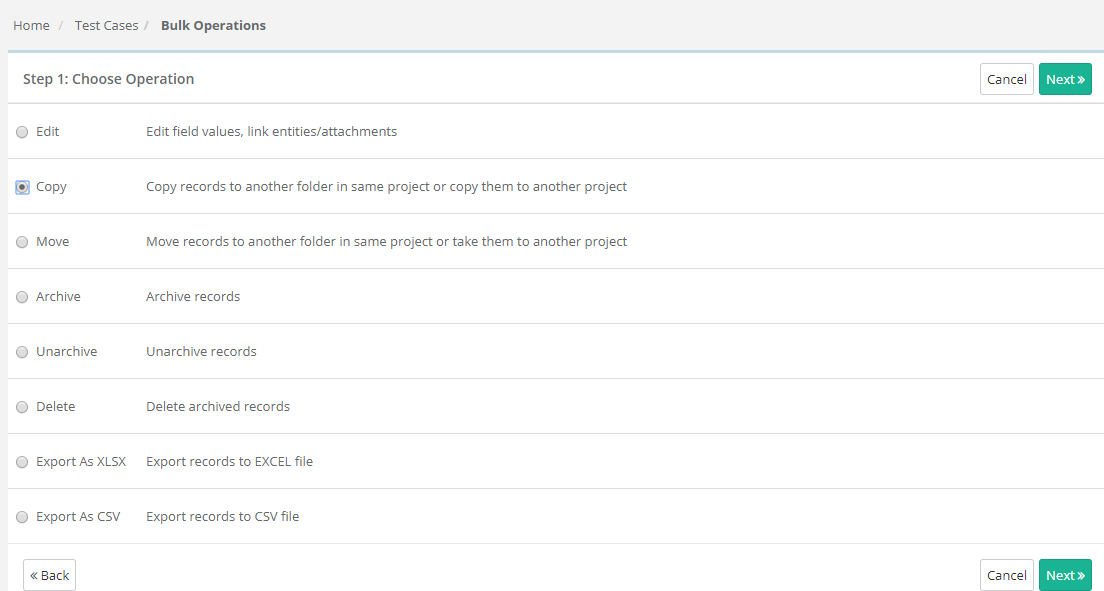 Image Removed
 Image Added
Step 2 Select records
1. Select test case records
whichthat are to be copied. If you want to copy all the test cases across pages then select the Select All (Across Pages) option. Maximum 1000 records can be selected at a time.
2. You can apply Filter to search specific records based on different criteria. It will help you pick required test cases and narrow down the test case count to be copied
.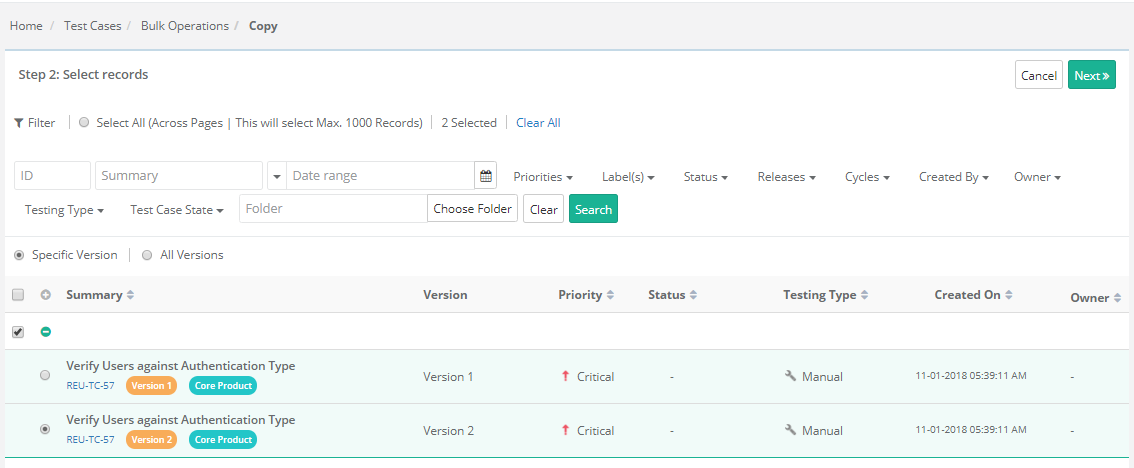 Image Removed
You can also view records of a specific folder by applying filter on Choose Folder.
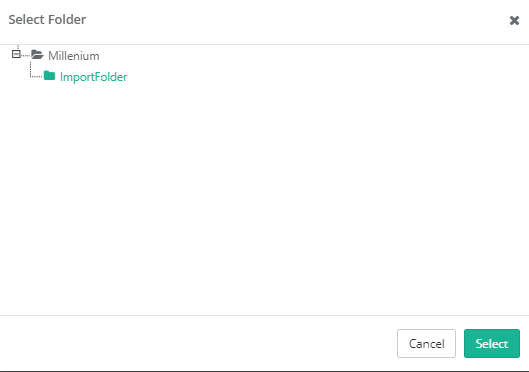 Image Removed
.
Select test case version options:- Specific Version: You can select a particular Version of the test case to copy. Test Cases with multiple versions are expandable and you can view all the available versions for the test cases.
Use Case: Each version of the test case is expandable so that users can view details of all versions at one place.
Expand the test case and select the required version you want to copy.
- All Versions: If this option is selected, then the Version button is disabled. Users can not select a particular version of the test case.
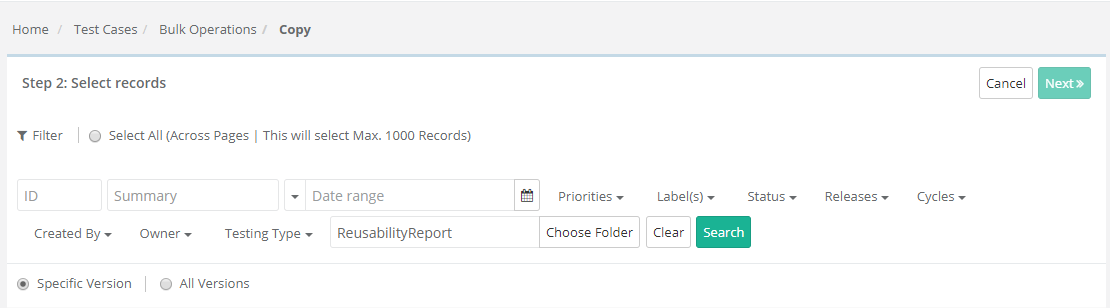 Image Removed
4. Click Next.
Step 3 Operation Details
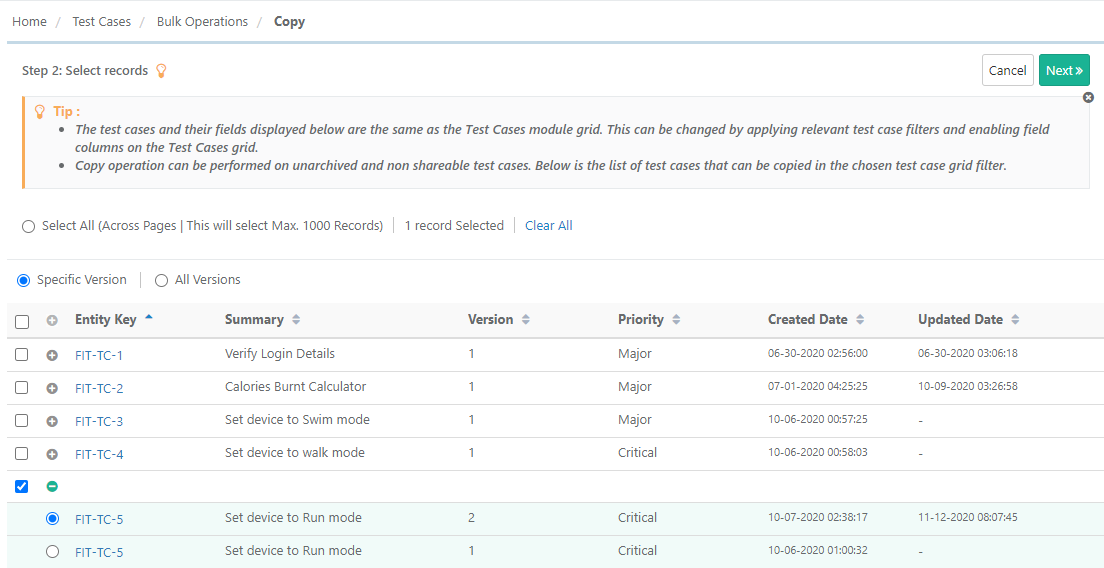 Image Added
- Project: You can copy test cases within same project and across projects. Select the destination Project you want to copy the selected test cases to.
- Owner: Select Owner of the requirements in the destination project. The Owner list is populated as per the Project selection.
- Folder: Select the folder in which you want to copy the selected test cases. To create a new folder in the destination project, enter folder name in the box and click on the Add Folder button. The new folder is added on the Folder tree.
- Destination Path: The Destination Path is displayed according to the Folder selection on the tree.
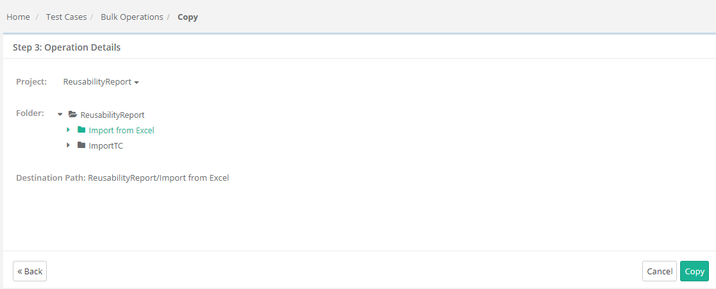 Image Removed
Count of copied entities is displayed in the Scheduled Task window that can be opened by clicking on the icon on the application header.
You can also create a new folder to add to the tree.
Click Copy.
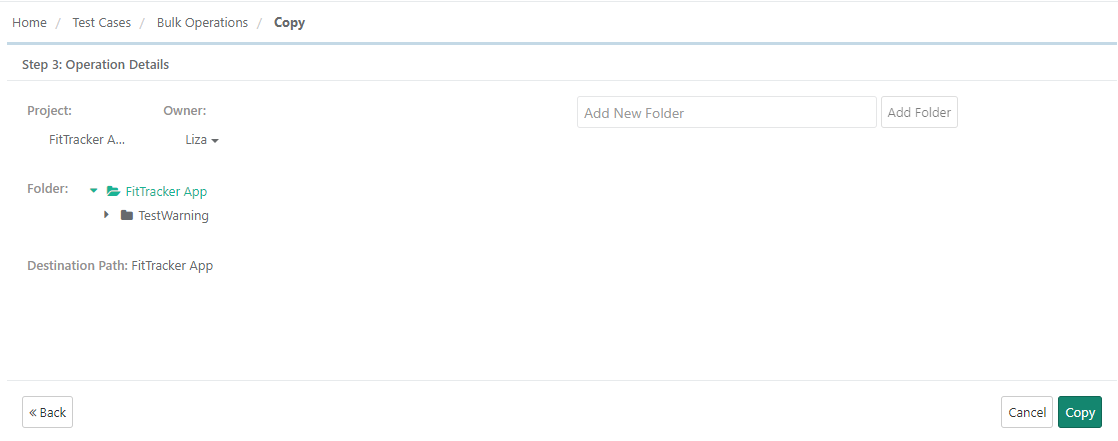 Image Added
Bulk Move
The process is same as Bulk Copy except the version selection. Test Assets will be moved with all their existing versions.
What will be copied/moved with test assets?
Operation | Same Project | Across Project |
|---|---|---|
| Copy | For the selected /all versions it will copy assets with all attachments, linkage of requirements, test cases, release, cycle , issues (linked with Requirement ) | For the selected/all versions it will copy assets with all attachments |
| Move | For the selected /all versions it will copy assets with all attachments, linkage of requirements, test cases, release, cycle , issues (linked with Requirement ) | For the selected/all versions it will move assets with all attachments |
Bulk Archive
Archive Requirements/Test Cases/Test Suites
Go to Bulk Operations.
Select Archive as operation to perform and click Next.
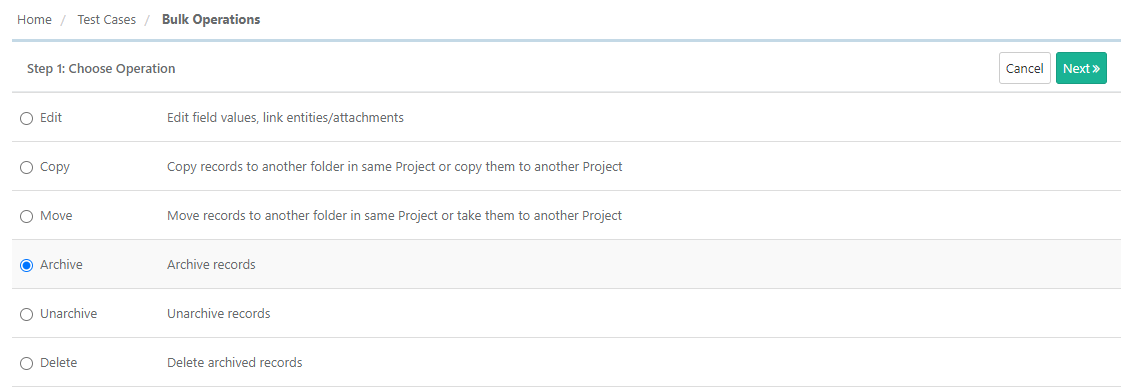 Image Added
Select test case records which are to be archived and click on the Archive button. Confirm the operation on the dialogue window.
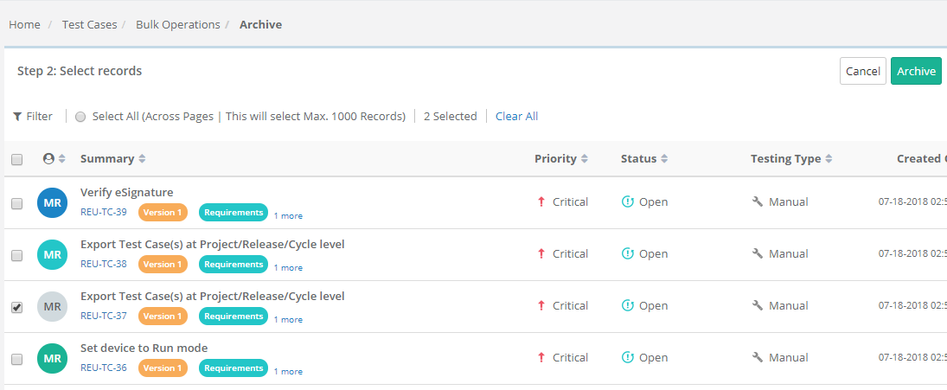 Image Removed
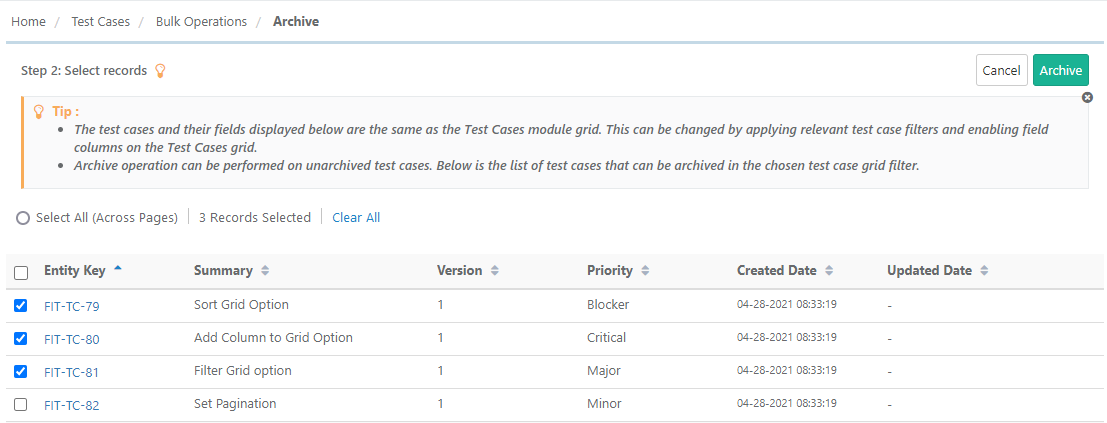 Image Added
To view archived records along with other records on the test case list view, apply Basic Filters on the tree pane.
Select the Show Archived check box.
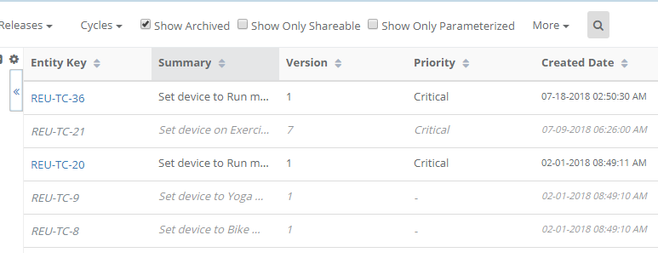 Image Removed
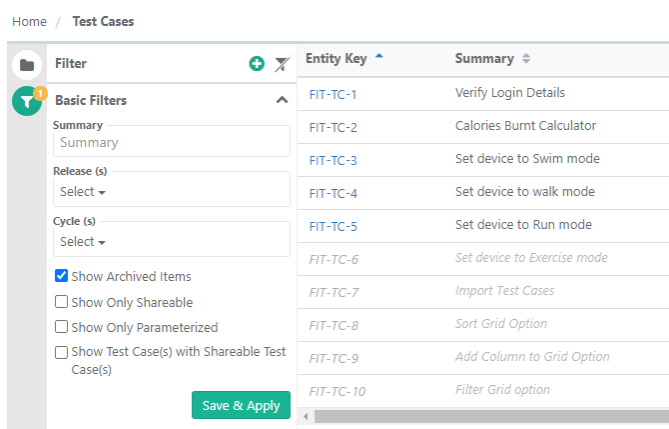 Image Added
The following operations will be available for archived assets:
- Unarchive: Unarchive selected test cases.
- Delete: Delete archived test cases.
Bulk Unarchive
1. Go to Bulk Operations.
2. Select Unarchive as the operation to perform and click Next.
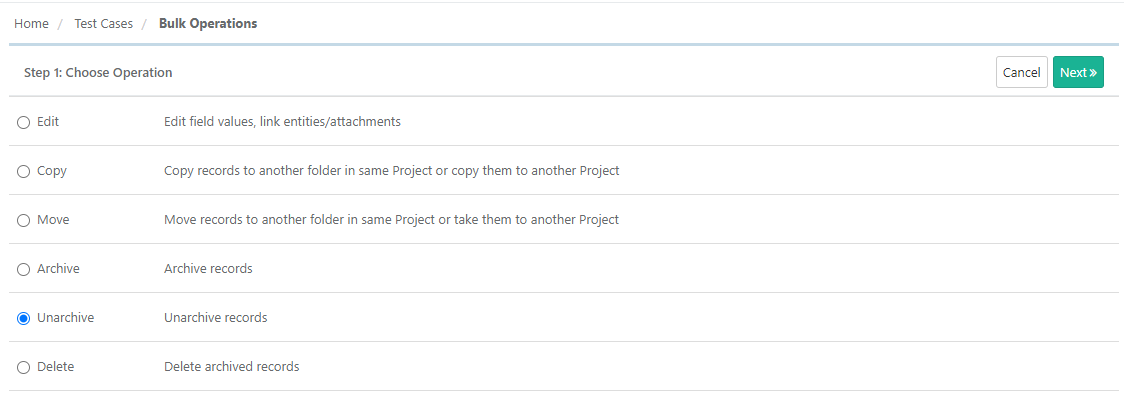 Image Added
The screen shows archived records.
3. Select the records you want to unarchive and click on the Uarchive button.
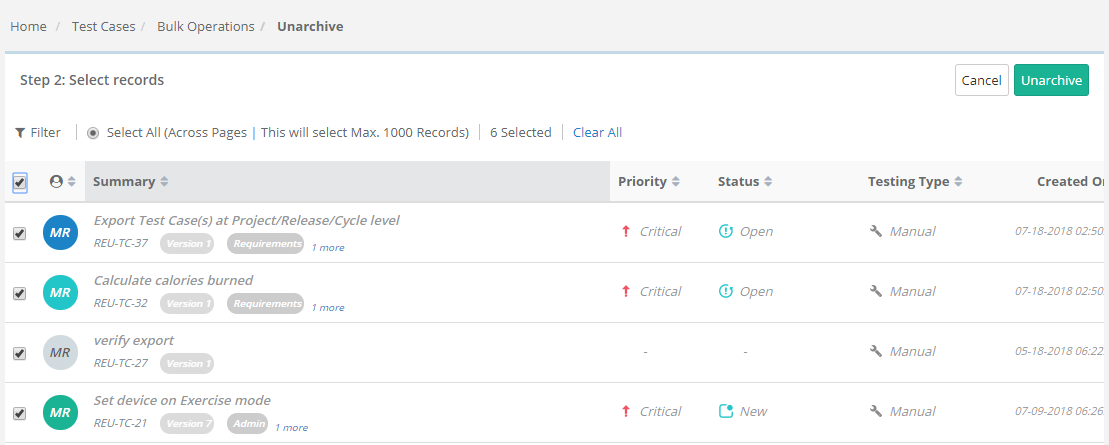 Image Removed
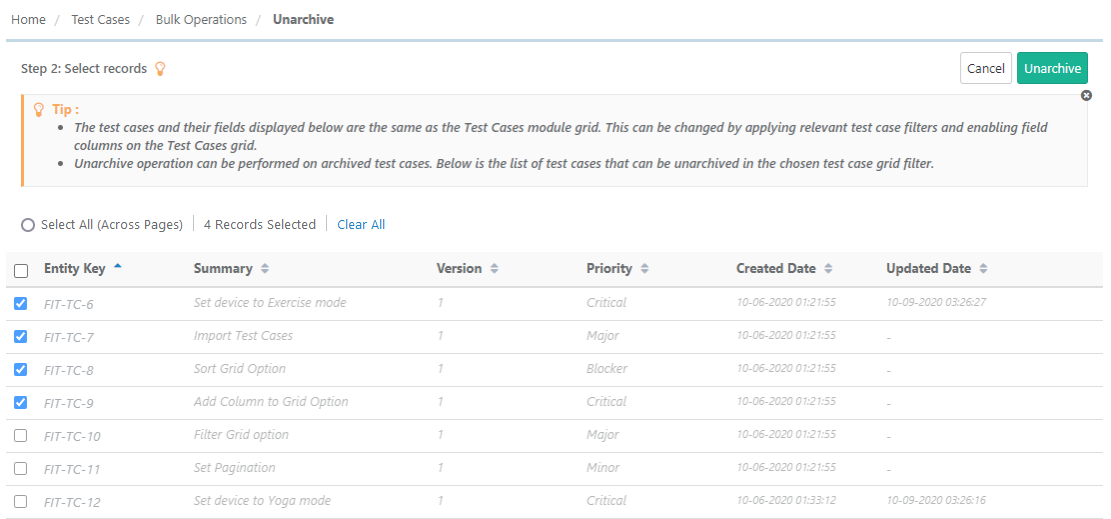 Image Added
Bulk Delete
All the versions of requirement/test case should be archived to delete that particular requirement/test case.
It is a two steps process:
- Archive assets
- Delete archived assets
Step 1 Choose Operation: To delete requirements, select Delete as operation on screen and click Next.
Step 2 Select records: The screen shows archived records. Select records you want to delete by checking check boxes. To select all the records across pages select the Select All option.
Once you are done with selecting the records, click on the Delete button. Confirm the operation on the dialogue window that pops up.
The success message appears with the options to:
- Go Back: It will navigate you to the module screen.
- Perform another operation: Clicking on the button will navigate you to the Step 1 of Choose Operation.
Bulk Export
You can export details of test asset in XLSX and CSV.
- Go to Bulk Operations.
- Select Export
- and click Next.
Select records you want to export and click Next.
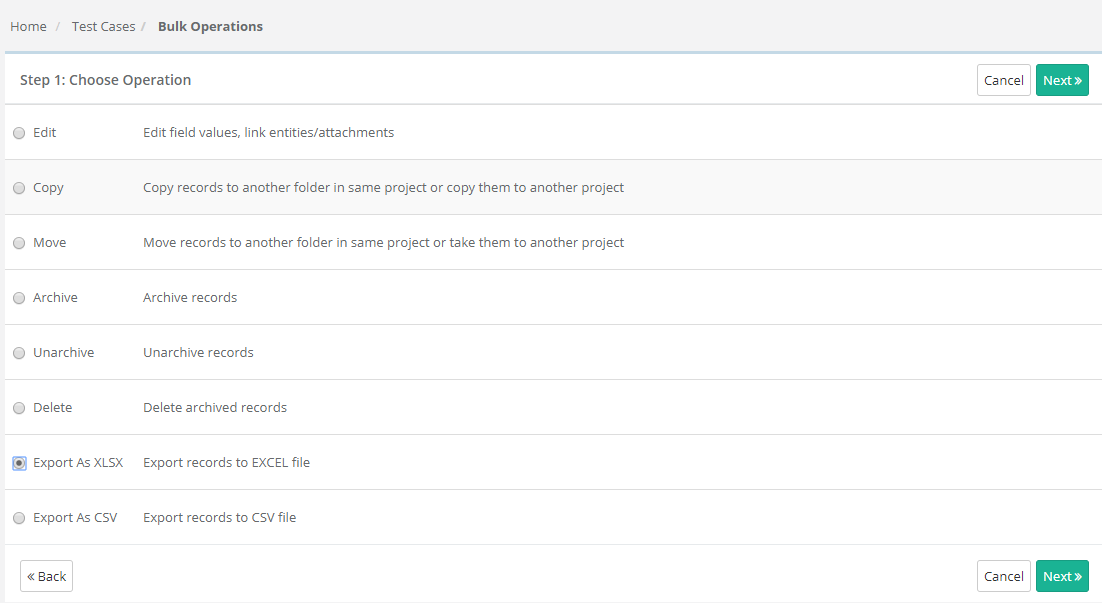 Image Removed
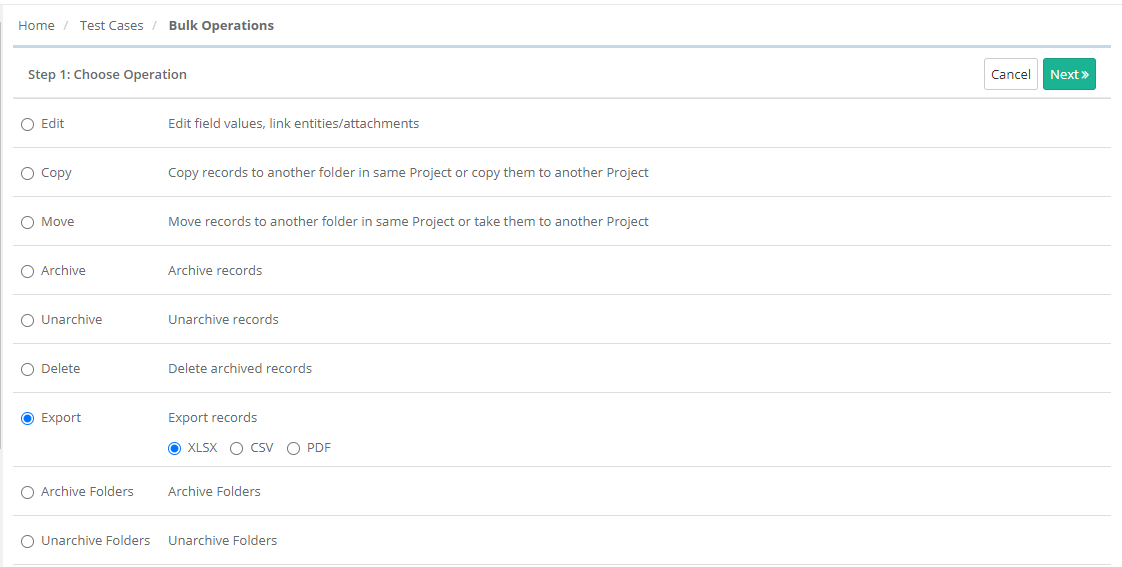 Image Added
Refer to Export from QMetry for more details on Export
.Bulk Approve
- Provided option to bulk approve (e-sign) test case & bulk approve/close (e-sign) test suite executions.
eSignature and Approval Workflow : Create a section - Bulk Approve - and provide link to this page.
Approve option of Bulk Operation is only available in Test Cases and Test Suites modules. Users can now approve test cases and approve/close test suites in bulk for e-Signature feature.
When QA Manager/Approver is confident about the test cases and test suites covered in the release & cycle, they prefer to approve them at a time instead of approving one by one.
- Go to Bulk Operations.
 Image Removed
2. Select Approve as the operation to perform and click Next.
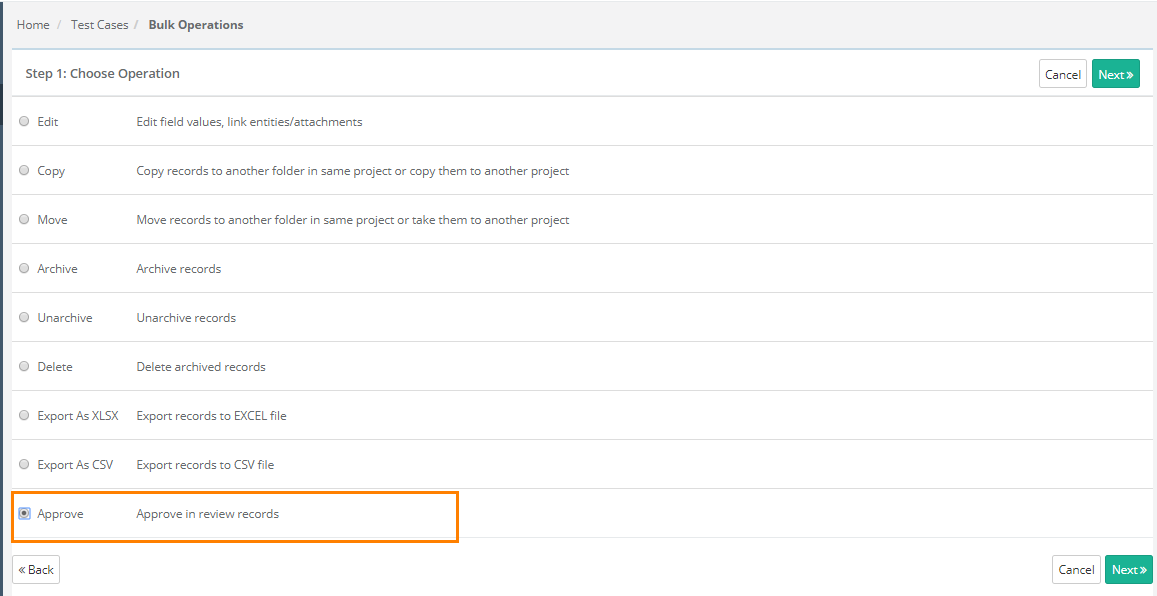 Image Removed
The screen shows entity records.
Select the test cases you want to approve or test suites you want to approve/close.
Then click on the Approve button.
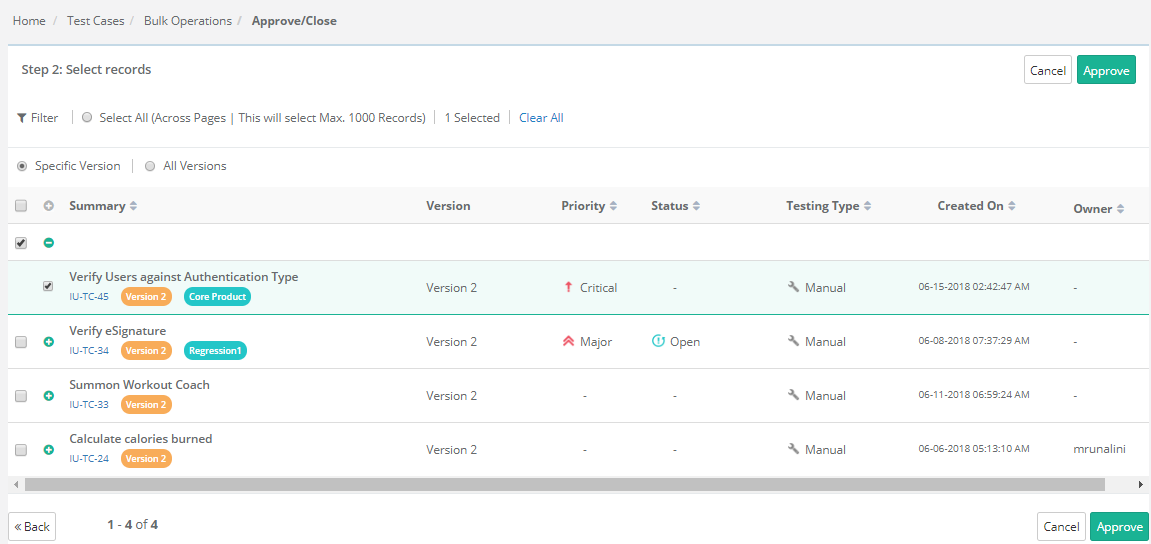 Image Removed
The confirmation message pops up. Click "Yes" to proceed.
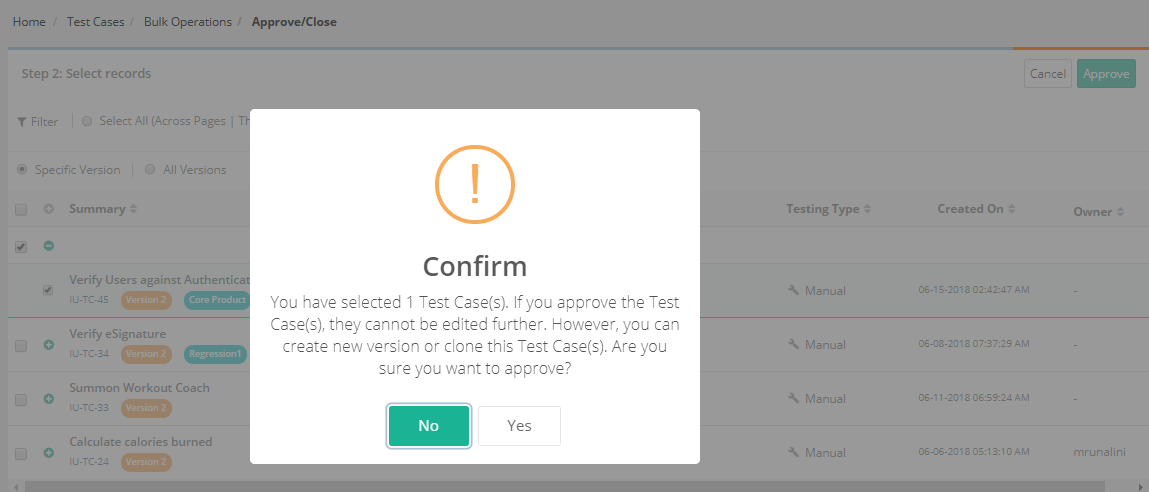 Image Removed
View the Progress of Bulk Operation
When you complete the bulk operations, the message pops up to view
notificationnotifications for the operations. You can view the progress in the notification window on the application header. This allows scheduled operations to run in the background and allows users to continue with their other work.
Check the notification window on the application header. It shows the list of Activities.
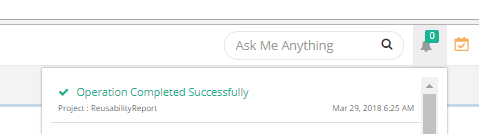 Image Removed
 Image Added
Scheduled Task
Click on the Scheduled Task  Image Modified icon the application header. The Scheduled Task icon turns Orange in color whenever any of the following actions is initialized. The icon color changes to original as soon as you click on it to view the task status.
- All bulk operations
- Import - IS, TC, TS, RQ
- Export - IS, TC, TS, RQ, Test execution
- Project clone
The screen shows all the activities completed or in queue.
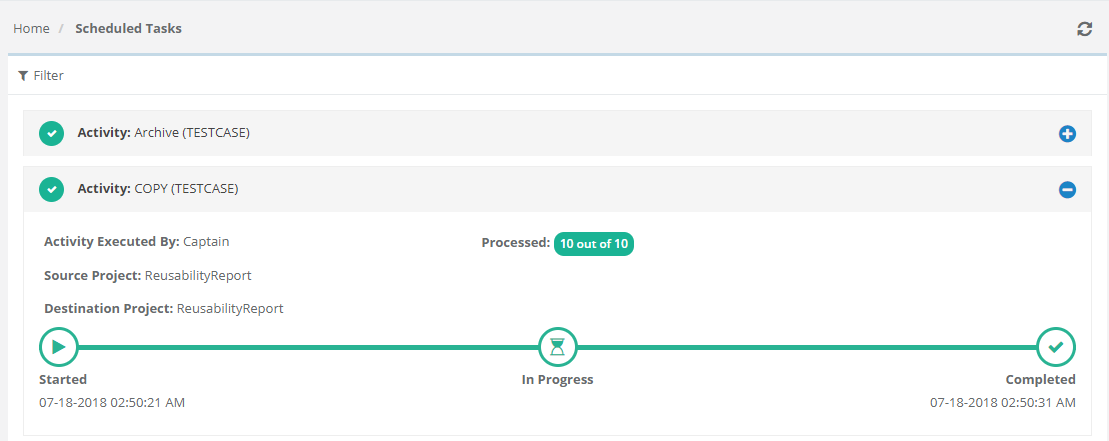 Image Removed
 Image Added