Enable QMetry permissions to manage user access for different modules like Test Case, Test Cycle, Test Plan or Configuration, Exploratory Testing, Import, Export, etc.
The QMetry permissions for the project are disabled by default. All the users who can view the project will be able to perform any operations in QMetry for that project.
Jira users possessing 'Administer Project' and 'Browse Projects' permissions for the project can enable QMetry permissions for that project.
For a team-managed project, if the Administrator does not have permission to the team-managed project (in case of private access) they will not be able to enable/disable permissions.
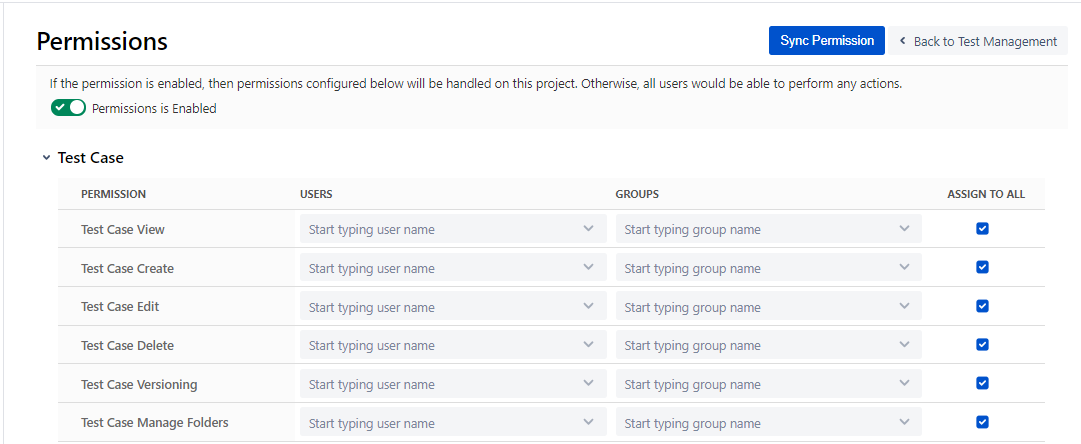
After enabling permissions, all permissions are assigned to All Users by default. Permissions can be assigned to users, groups, or everyone.
From the Projects drop-down on the Jira main menu, select the Project for which you want to enable the QMetry Permissions.
Click on the Project Settings at the bottom left on the navigation bar.
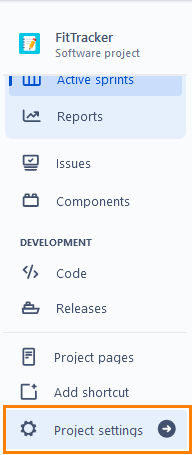
3. On the Project settings page, click on the QMetry Permissions at the bottom left on the navigation bar.
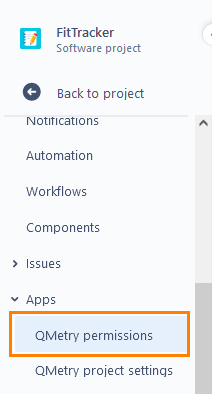
4. On the screen at right, enable the Permissions on the Permission tab to enable configuration setup for different modules. The Permissions flag remains disabled by default.

Module wise permissions are displayed once the Permissions are enabled.
The permissions are assigned to all by default.
Note: Jira users possessing 'Administer Project' and 'Browse Projects' permissions for the project can enable QMetry permissions for that project.
Module wise permissions can be assigned to users/groups. The permissions are described below.
Permissions | Implications |
|---|---|
View | It allows users to view the module. |
Create | It allows users to create new records for the module. |
Edit | It allows users to update the details of the module. |
Delete | It allows users to delete the records of the module. |
Test Cycle Execute | It allows users to execute the Test cycle. |
Import | It allows users to import test cases. |
Export | It allows users to export entities like test cases. |
Versioning | It allows users to create and manage versions of the Test Case. |
Manage Folders | It allows users to create and manage folders of the Test Case, Test cycle, and Test Plan. |
Testers in the team require test case permissions to perform Test Case related operations.
In the case of Automation, users with Test Cycle Create rights can create test cases through automation even if they do not have Create rights for the Test Cases.
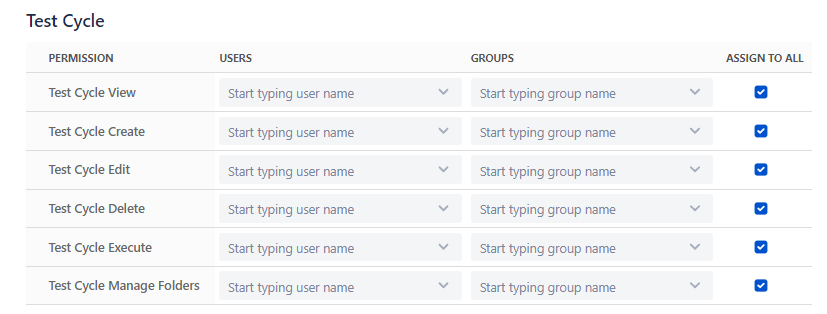
Testers who are executing test cases require Test Cycle permissions.
In the case of Automation, users with Test Cycle Create rights can create test cases through automation even if they do not have Create rights for Test Case.
QA Managers require Test Plan permissions to perform the operations on Test Plans.

If the user has View rights for Configuration, then they can only view the Configuration settings of the project. The user can also generate the Open API key and the Automation API key.
If the user has Modify rights, then they can change the Configuration. For example, Add, Edit, Delete custom fields, labels, components, execution results, updating preferences etc.

Testers and Business Analysts in the team require Exploratory Testing permissions.

QA Managers require Report permission.

Testers and Business Analysts require Requirement permission.
Linkages of test case with the story: If the user has Edit rights of Requirement, then they can link or unlink test cases with the story. If the user has View rights, then they can only view the linkages.

QA and Development teams require Defect permission.
Defect Traceability when the user has the View rights: The user can view the linkages of the Test Cases with Story issue, the associated bug on the Test Cycle Execution screen and view the Bug detail page in Jira.
Defect Traceability when the user does not have View rights: The user can view the associated bug on the Test Cycle Execution screen but they can not view the Bug traceability panel details on the Jira issue page.

Testers in the team require Import and Export permissions to import and export test cases.
Import Test Case: If users need to Import Test Cases, they need to have all rights under Test Case and Configuration sections enabled along with Import permissions. |


We need to provide Export access in the case when the user wants to export Test Assets into an excel sheet:

To modify the configuration and to calculate the Flaky Score and Success Rate, the users should have the relevant permissions of QMetry Intelligence section.

To modify the configuration of Project documentation, the users should have the following permissions in the QMetry Intelligence section:
Modify the Search configuration for “Ask me Anything”.

Change the Default "Assign to All" Permission
By default, all the users will have respective permissions as the Assign to All is checked.
To edit a permission, remove the selection of Assign to All checkbox. The permission record appears in editable mode.
Open the Users drop-down and assign users to grant respective permissions to the users.
Open the Groups drop-down and assign groups to grant respective permissions to the groups.
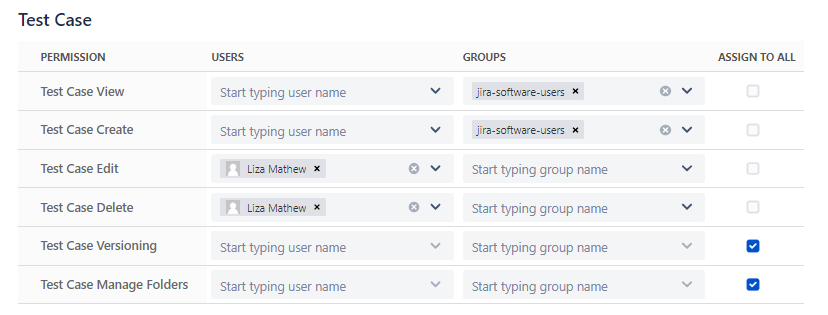
This way you can add/edit permissions to users/groups for each module.
Sync Permissions with Jira Permissions and Jira User Groups:
The changes made in Jira permissions, Jira users and Jira user groups do not sync immediately in QMetry. Sync Permission will sync these permissions for the following actions:
Addition or Removal of Jira permission. For example, Browse Project.
Addition of users in Jira Groups
Removal of users from Jira Groups
Deletion of Jira Groups
Deletion of user
Users' permission within the group in QMetry for Jira plugin will be impacted only after Syncing the permission.
View the Progress of Permission Sync
To view the status of the background process of permission sync, click on the Bell icon at the top right corner.
The Notifications panel opens. It displays the progress of the sync process.
