This document is applicable only when the QMetry project is configured with a Jira project. |
Issue module allows you to have bi-directional integration between QMetry and Jira, which means you can add and edit issues from QMetry to Jira. Issues added / edited in Jira will be reflected in QMetry. Users can create, view, and modify issues in the QMetry that will be synced in Jira.
Users can perform the following tasks in the Issue module:
View/ Add/ Modify Jira issue details, comments and attachments
Map Jira custom fields with QMetry
Issues logged from the execution screen while execution will be available in the Issue module.
After integrating QMetry project with Jira -
QMetry issues added from the Issues module before Jira integration will not be displayed on the Issue grid.
QMetry issues created and linked from the Execution screen before Jira integration will be displayed in read-only mode.
From the Execution screen, any internal issue is linked as an issue. If users click on the link of this internal issue, its detail window open in read-only mode.
Just click on the Issue Key in the grid view to open the issue detail page on the same page. To open the issue detail page in new tab/window, right click on the Issue Key in grid view. Opening issues in different tab/browser makes comparison between issues easier. It also provides quick reference while working on multiple assets. The detail page has one click access to different sections using organizable tabs.
Note: If a Jira project is integrated with your QMetry project -
Bulk operations are not allowed in the Issue module.
Column show/hide is not available in the Issue module, however; you can filter the records on required fields including Jira system and custom fields.

For Issue: There are individual tabs for
Details
Execution Runs
Requirements
Attachments
Comments
The Details tab will show you the details of the issue in Jira.
External Key: This is the Jira issue key number clicking on which takes users to the Jira issue page.
Summary: View the summary of the Issue.
Priority: View priority to the issue. The Priority list will be displayed as in Jira.
Issue Type: View the issue type synced with the Issue module while integration.
Assignee: This will be the Jira Assignee.
Status: View Jira workflow Status of the issue in QMetry. This is a Read-only field.
Reporter: Jira user who has reported the issue.
Components: View Jira components associated with the project.
Fix Versions: View Jira Fix Versions associated with the project usually added when the issue is resolved.
Affects Versions: View Affects Versions associated with the project usually this is applicable only for bugs and not for stories or epics. It denotes in which version the bug was found.
Labels: View the list of Jira labels in QMetry.
Resolution: This is a read-only field synced from Jira.
Environment: Enter environment details in which the issue was found e.g., Chrome, Firefox, Production, Staging, etc.
Description: Enter description for the issue in plain text.
Jira Custom Fields: View Jira custom fields like Sprint, Severity, etc.
Created Date: The date on which the issue was created in Jira.
Updated Date: The date on which the issue was updated in Jira.
Resolved Date: The date on which the issue is marked as resolved in Jira.
Note: Watcher, Owner and Assigned Release are not available for projects integrated with Jira.
Issues logged from the Test Executions module are displayed here.
View Archived Test Runs
An execution/test run is archived when either Platform/Release/Cycle/Test Suite is archived. When a test suite, platform or Release/Cycle is archived, the test executions having such test suite/platform/release/cycles associated with them will be hidden on the Execution Runs tab of the test case.
The Show Test Runs with Archived Platform(s)/Release(s)/Cycle(s)/Test Suite(s) check box is provided on the Test Executions tab. To view the test runs which are archived either due to platforms/release/cycles, select the check box in the filter.
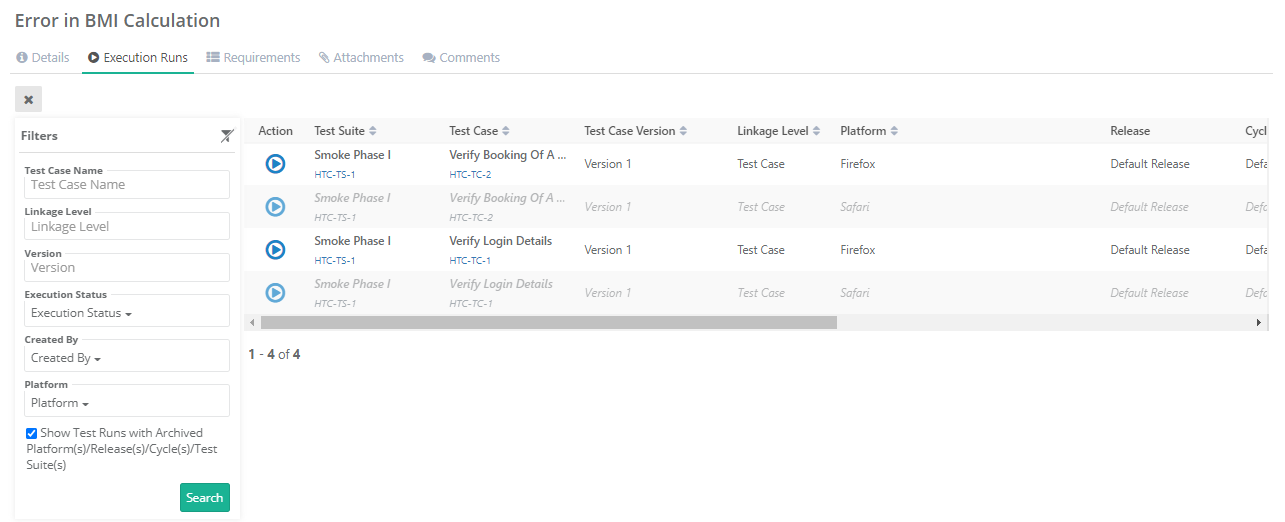
Execution Time and Remaining Time
Open the issue detail page and open the Execution Runs tab. Users can view Execution Time and Remaining Time calculated for Test Execution.
Use Case: Calculation of Execution Time and Remaining Time for test suite is useful for QA Manager in Test Planning as it gives accurate estimates for the test suite. These test case level estimates refine each time a test suite is executed. Testers can make recommendations to have the test estimates revised based on the last few executions in different environments.
Two columns Execution Time and Remaining Time are added on the grid at the following places in the application:
Test Suite detail page > Test Executions tab
Test Case detail page > Test Executions tab
Issue detail page > Execution Runs
Calculation of Execution Time of a test suite:
Execution Time of a test suite is calculated based on Estimate Time of all the test cases in that test suite.
Calculation of Remaining Time of a test suite:
Once the test suite is executed, the Remaining Time Is calculated of all “Not Run” test cases. Any test case with “Failed” or “Blocked” status will also be considered as the work still remains on it.
The Remaining Time will be reduced for test cases with “Pass” and “Not Applicable” status accordingly.
Link Requirements to Issue
You can link requirements with their relevant issues. You can link single as well as multiple requirements with an issue.
Requirements can be linked to the issue through the Requirements tab of Issue.
Steps
1. Open the Issue details page.
2. Open the Requirements tab.
3. Click on the Link button.
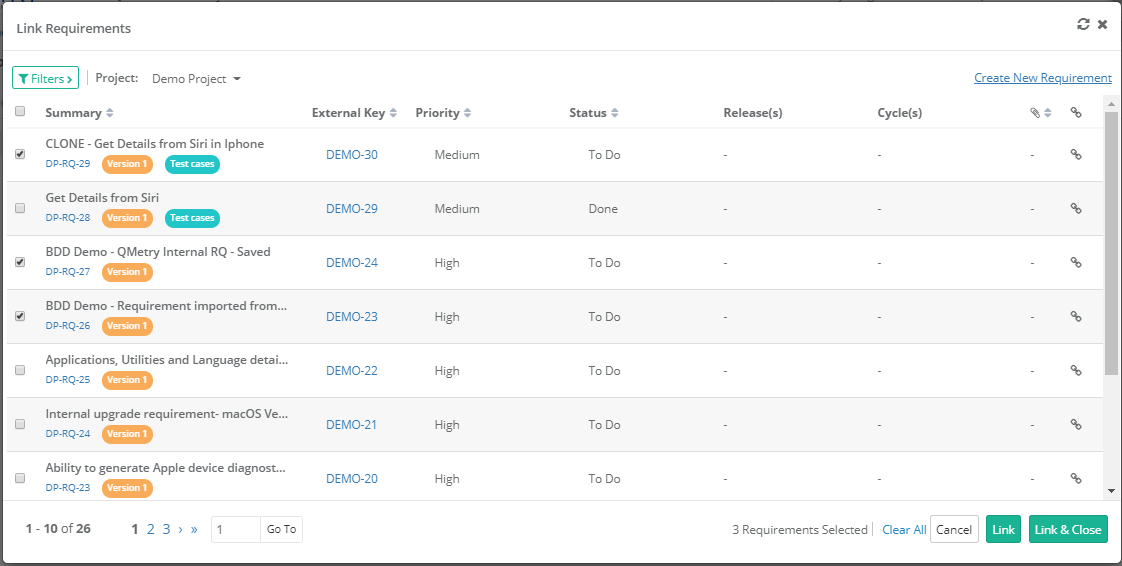
4. It opens the screen with requirements.
You can select requirements on the grid to link to the issue. You can filter requirement records to narrow down the list to select from. Labels and Folder path filters are also added for the ease of searching the records.
Project: You can link requirements from across projects. Select the Project the requirements of which you want to link with the issue. You can link requirements from multiple projects.
If you want to link requirements from multiple projects, then first select one project. Search records and link them before moving to other projects. For example, User A is in Project 1 and searches for some records and links them before moving to Project 2. Else, all the selection of Project 1 will be wiped off.
A. Linking a Single Requirement: Click on the ![]() icon to link the individual requirement to the test case.
icon to link the individual requirement to the test case.
B. Linking Multiple Requirements: Select requirements that you want to link and click either on the Link button or the Link & Close button at the bottom.
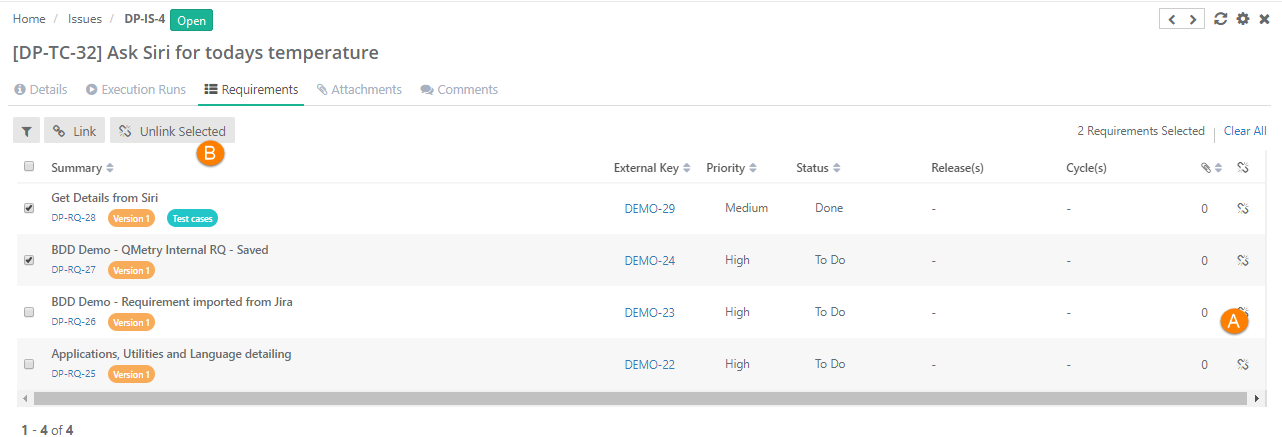
The selected requirements are linked to the issue. The linked requirement records are shown on the screen.
If requirements from other project are linked, then the requirements show the Entity Key of the corresponding project.
To view the requirement of other project, click on the Requirement Entity Key. It opens the test case detail page in the respective project and will change your current project.
Unlink Requirements
Go to the Requirements tab of the issue.
A. To unlink a single requirement, click on the Unlink icon for the requirement. The requirement is unlinked after confirmation.
B. To unlink multiple requirements, select the requirements you want to unlink from the issue and click on the Unlink Selected button.
Users can view, download, add, and delete Jira attachments in QMetry.

Users can view, add, edit, delete Jira comments in QMetry.

1. Open the Issue module.
2. Click on the New button on the toolbar.
Logging an issue for the First Time
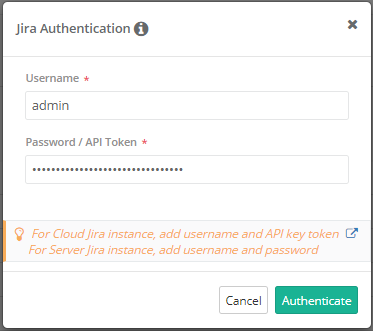
You will be asked for Jira authentication through pop-up.
Note: Enter Jira Username and Password (if Server Jira) or API Token (if Cloud Jira) to authenticate and modify the Jira entity based on provided user credentials.
Username: Enter Username.
API Token: Follow the steps mentioned in the article Login using API Token to generate API Token.
To Edit/Revoke Authentication
If your Jira credentials are changed, then follow Revoke Authentication to modify the credentials in QMetry.
4. The Create Issues screen opens next.
5. Select Jira Instance, Jira Project and Issue Types. The fields on the screen display as per the selected Issue Type.
The fields are shown as mandatory/optional as per their project configuration in Jira.
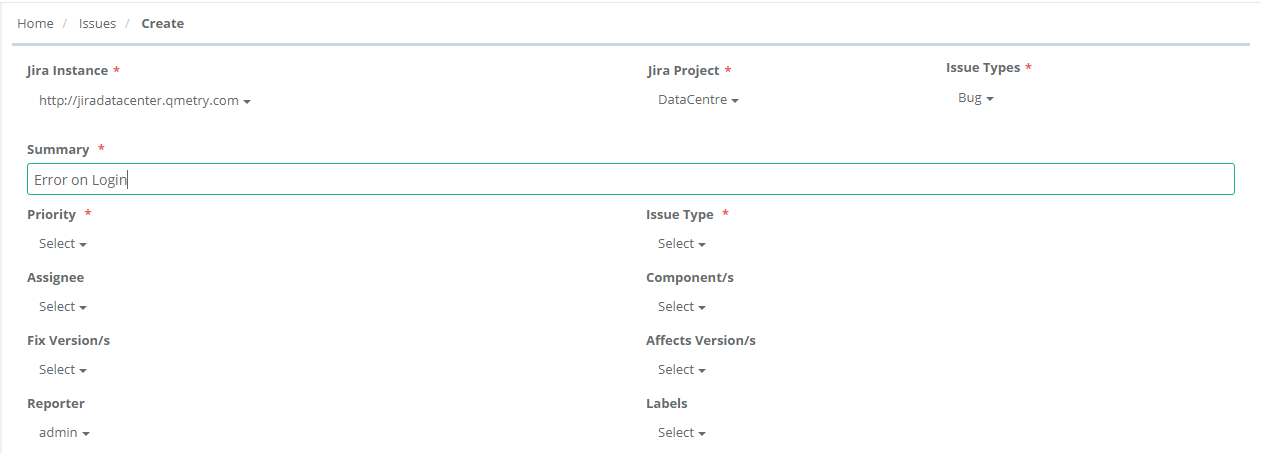
Issues added from the Issue module or from the Execution screen will be created in Jira only.
Users can click on the External Key in the Issue module, which opens the issue detail page in Jira, while the Entity Key opens the issue detail page in QMetry.
The issue details to enter depends on whether you are adding issues in the internal tracker of QMetry or in Jira.
If you do not have Jira configured with the project you are currently working on, then enter details in the QMetry fields.
If you have configured Jira with the project you are currently working on, then the add issue screen contains Jira issue fields that you need to enter. You can add defects from the Issue module as well as the Execution screen of QMetry.
6. Fill in the issue details.
Summary: Add the summary of the Issue.
Priority: Select priority to the issue. The Priority list will be displayed as in Jira.
Issue Type: Select the issue type synced with the Issue module while integration.
Assignee: This will be the Jira Assignee. Enter the first three letters of Jira user to populate the Jira users list.
Status: This field will not be available when you are creating an issue. Default Jira issue status will be auto-selected when the issue is created.
Reporter: Jira user who has reported the issue. Enter the first three letters of Jira user to populate the Jira users list.
Components: Select Jira components associated to the project.
Fix Versions: Select Jira Fix Versions associated to the project usually added when the issue is resolved.
Affects Versions: Select Affects Versions associated to the project usually this is applicable only for bugs and not for stories or epics. It denotes in which version the bug was found.
Labels: Select list of Jira labels in QMetry.
Environment: Enter environment details in which the issue was found e.g., Chrome, Firefox, Production, Staging, etc.
Description: Enter a description of the issue. You can use the text formatting notations in the field as per Jira Wiki Editor.
Jira Custom Fields: Enter Jira custom fields like Sprint, Severity, etc.
Link Attachments: You can link multiple attachments while creation of Jira issues from QMetry.
Steps
1. Go to the Link Attachments section on the Create Issue page.
2. Click on the Add Attachment button.
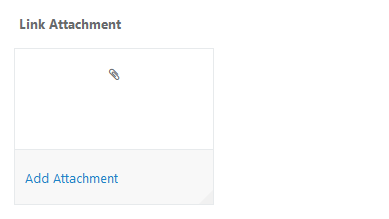
You can attach different types of attachments: files, images, and URL.
The Add Attachment pop-up allows you to upload multiple files at a time.
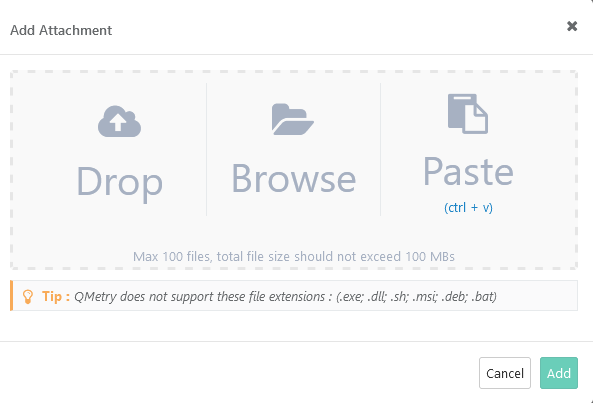
You can add attachments in three ways:
Drag and Drop: Drag the attachments and drop them into the specific area of drop documents.
Browse: Browse the file you want to add as an attachment and upload it by clicking on the Browse section.
Paste (ctrl + v): Add attachments to test assets by directly pasting them from the clipboard. This allows you to add screenshots without saving to local machine. Only .png files can be pasted directly into the Add Attachment pop-up.
Notes:
Maximum 100 files can be attached. Total size of attached files should not exceed 100 MB.
QMetry does not support these file extensions : (.exe; .dll; .sh; .msi; .deb; .bat)
You can also remove individual attachments at the uploading stage.
Edit Issues
QMetry provides inline editor to edit issue details.
Note: Jira issue Status and Resolution are read-only fields in QMetry and can not be edited.
Users can log issues at the test case as well as test step level. Users can also log issues in bulk.
Open the Execution screen and click on the bug icon for the test case/test step. Refer to Adding/Linking Issues to Test Case and Test Step for more details.
Creating Issues at Step Level for Automated Test Cases
If an error encounters while an automated test run, the generated Error Message and Trace are displayed in the respective columns on the test execution screen. When users create an issue at test step level from the execution screen, a .txt file containing this Error Message and Trace gets attached to the issue.

On opening the issue in QMetry, the Attachment tab in QMetry shows the .txt file attached to it which contains Error Message and Trace generated while the automated test run.

Users can not delete Jira issues from QMetry. If an issue is deleted from Jira , then it will get deleted from QMetry and its linkages to QMetry test case/test step will be removed as well.
On removing the integration of Jira project with QMetry project, all the issues that are created from QMetry Issue module into Jira will not be visible in the Issue module in QMetry.
For Jira issues logged while execution, the association of such Jira issues with respective test case/test step will be removed.
Issues created in QMetry internal tracker before Jira integration will start displaying in the issue grid.
The following columns are displayed on the list view:
The following columns are displayed on the list view:
Entity key
Summary
External Key
Type
Status
Priority
Fix Version
Component
Affected Version
Resolution
Assignee
Reporter
Created Date
Updated Date
Resolved Date
External Project
Resize Columns: The ability to expand and reduce column width. If you want to display the full content of the column, then you may want to change the column width. To change the width of one column, just place cursor in between the columns and drag the boundary on the right side of the column heading until the column gains the width that you want.

The detail page of QMetry assets has different tabs on it as described above. Users can customize the view of detail page by changing the order of tabs. The tab order is preserved per user.
For example, the tab order of Issues module is changed by user "A" for project "PRO1". Now "A" is switching to another project "PRO2". The tabs can be seen in the same order as in project "PRO1".

Users can easily filter test assets by any system/custom fields on all module grids. Filters placed horizontally above the grid earlier, are now placed on the tree panel at left.
External Key: You can search issues by External Key of Jira by adding comma-separated keys in the field.
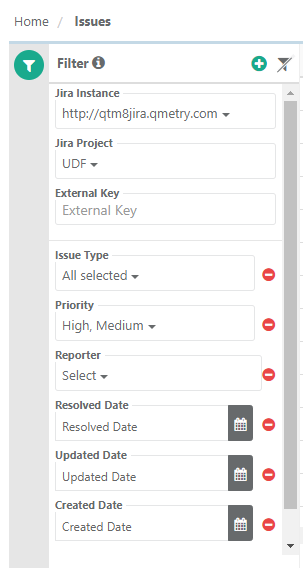
Apply Filter
Users can apply basic as well as advanced filters to the records.
A. Basic Filters: By default, basic filter fields are provided to filter the records.
B. Advanced Filters: If users need more fields to filter test assets then click on the '+' icon. It opens the drop-down with a list of additional system and user defined fields corresponding the module.
Select the field you want to apply filter on. The filter parameter is added as Advanced Filters. Apply filter as per your requirement.
User can click on the '+' icon and select the field Entity Key to search issues using comma separated entity IDs (i.e without specifying the complete Entity Key as described below).
Clear Filter and Sorting
Users can clear the applied filter and sorting to the records.
A. Clear Filter: Click on the Clear Filters button above the module grid or left pane. It will reset the view to default.
B. Clear Sorting: Click on the Clear Sorting button above the module grid.

System fields are mapped automatically and displayed as selected. These fields are displayed as read-only. Users can select custom fields they want to map. All the fields that are selected on this screen will be displayed in the Issue module.
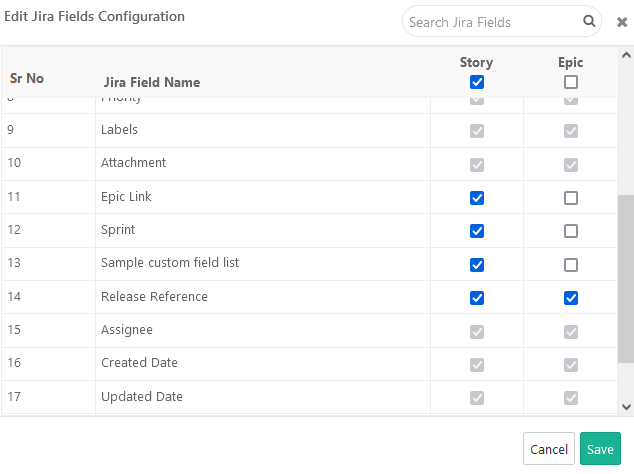
Issues logged from the execution screen while execution will be available in the Issue module. Refer to Adding/Linking Issues to Test Case and Test Step for more details.
If user wants a particular issue to be considered as requirement, then the user can add a new requirement from that issue. A requirement is created from the selected issue by copying common field values. This new requirement is created with the same name, which can then be changed as per requirement.
The Issue from where requirement is being created, also get automatically linked to the newly added requirement. On the Issue details page, the Requirements tab displays the requirement created from the issue. On the Requirement details page, the Issues section displays the issue the requirement has been created from. Users with “Create” rights for Requirement can create requirement from issue.
Use Case: User wants to create a requirement with the values similar to an existing issue or user wants to associate a requirement with an existing issue. Hence, users select the issue and create a requirement from it to create linkage between the two.
Steps
Follow either of the ways:
Select an issue on grid pane and click Add on the toolbar > point to From Issue > select Requirement
Right click an issue on the grid pane > point to From Issue > select Requirement
If you are adding an issue very first time, then Jira Authentication window pops up asking for Jira credentials to authenticate the operation. The pop-up does not appear next time.
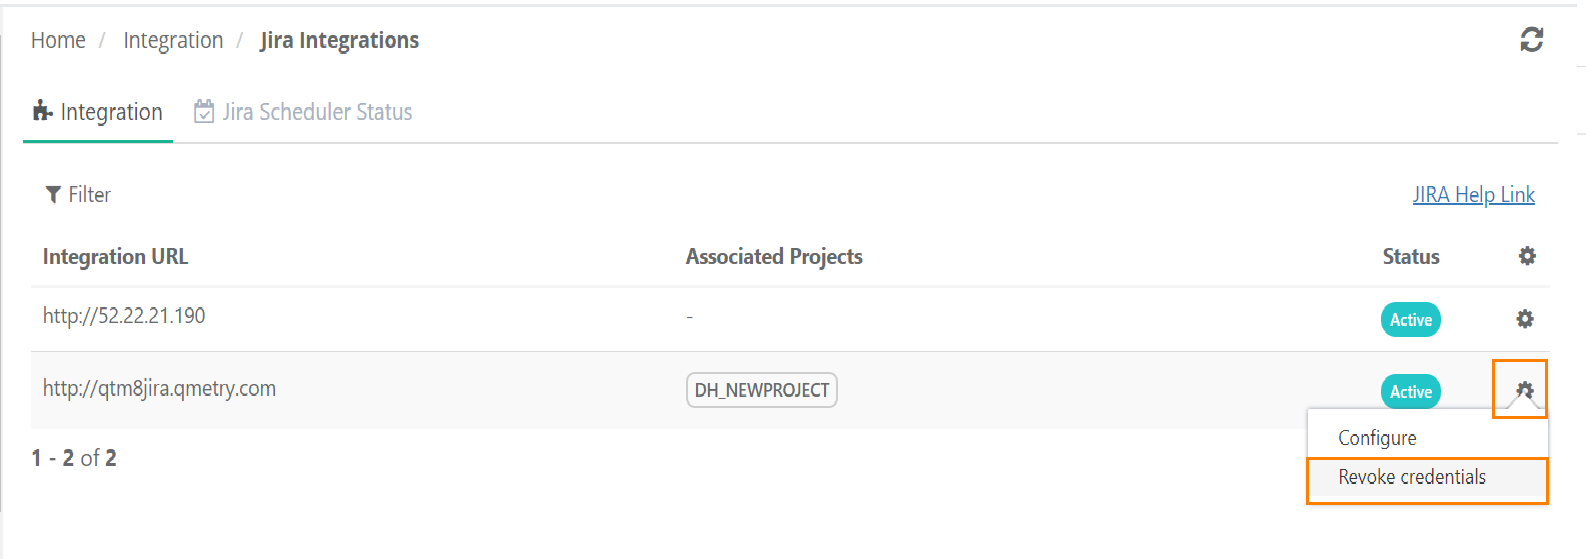
Now you have already provided Jira credentials very first time but you still wish to display the Jira Authentication window again while creating a new issue or editing an issue, then you can revoke the set Jira credentials.
Go to Integration > Jira Integrations.
Open the cog icon and click Revoke credentials.
Status:
Once the Issue is added, you can see the following tabs:
Details
Execution Runs
Requirements
Attachments
Comments
Edit Issue Details
Once the issues is added, open the Issue details page to view / edit the details.
Note: Users can not edit the field values of Resolution, Issue Type and Status fields of external issues.
Users can send the details of defect/issue to other QMetry users as well as to users outside QMetry. The issue details contain system fields of QMetry. Inclusion of issue attachments depend on the issue tracker.
External Tracker: If external tracker like Jira is integrated with QMetry project, the system field details will be sent in the pre-defined format without any attachments.
Steps
Open the issue details page the details of which you want to share with other users.
Click on the email icon at the top right. A pop-up opens to enter the recipient email addresses separated by comma and send it as an email.
