
In this guide we'll run you through installing QMetry Test Management application and QMetry Reports on your windows environment.
2 Tier Install
| Server 1 | QMetry App and MySQL DB |
| Server 2 | QMetry Reports |
| Installation | Ports that need to be enabled and should be available for use |
|---|---|
| QMetry Application | 80/443 & 3306 |
| QMetry Reporting Tool | 80/443, 8080 & 3306 |
Hardware Requirements
Supported OS : Windows 10
| Small Teams < 50 Users | Medium Teams < 500 Users | Large Teams 500+ Users | |||
| Min | Recommended | Min | Recommended | Min | Recommended |
| Stand Alone Server | |||||
CPU | 2 Cores | 4 Core | 8 Core | 12 Core | 16 Core | 24 Core |
Memory | 8 GB | 16 GB | 16 GB | 24 GB | 24 GB | 32 - 64 GB |
HDD (Free Space) | 100 GB | 250 GB | 100 GB | 500 GB | 100 GB | 500 GB |
This is the most straightforward way to get your production site up and running on a Windows server.
Step 1. Get the QMetry Test Management Application and Reports Install zip files.
Step 2. QMetry is installed on the same location where the installation is run from. Copy the QMetry-Windows-Install.zip to C:/ and unzip it. The install or QMetry folders should not be moved post installation.

| Options | Default Value | Comments/ Example |
|---|---|---|
| Do you want to upgrade an existing version of QMetry | No | Type - No |
| Set a password for QMetry admin login | - | Password Policy - it must contain minimum 8 characters with at least one special character, at least one alphabet and at least one number. Allowed special characters are !@#$%^&*() |
Re-enter the Password | - | Above Password |
| Set Email address for QMetry Admin | - | john.doe@qmetry.com |
| Set JVM Minimum Heap Memory in GB | 3 GB | 3 |
| Set JVM Maximum Heap Memory in GB | 6 GB | 6 |
Set DB Connection Pool Size | 100 | 100 |
Set Database Host | localhost | (Enter QMetry DB Server Public IP/DNS) or localhost in case QMetry DB is being installed on the same server. |
Set Database Port | 3306 | 3306 |
| Set Database Schema Name | qmetry | qmetry |
Set Database Username | - | root |
Set Database Password | - | qmetry |
Set Attachments Path | C:\attachments | C:\attachments |
Set SAML Config Path | C:\saml | C:\saml |
Once the process completes, a separate command line window with tomcat server will be launched. Once you see the message "INFO [main] org.apache.catalina.startup.Catalina.start Server startup in [n] milliseconds", you can proceed with the next step.

Step 3. Getting your QMetry License and Installing it.
Step 4. Restart QMetry Services
Step 5. Access QMetry application using the following address.
http://<Domain_URL>
Note : This installation installs QMetry over Apache Tomcat Version 9.0, MySQL 5.7.29 (64 bit) and Open JDK 11.
Step 6. After the above steps are completed, log into QMetry application.

Step 7. Additional Tomcat Configuration
QMetry is installed with a default configuration of minimum and maximum heap memory utilization. These settings need to be modified depending on your hardware configuration and number of users accessing QMetry. Refer Additional Tomcat Configuration (Windows) for more details.
If you have purchased Advanced Reporting then you will need a separate server for QMetry Reporting.
This step we'll run you through installing QMetry Test Management Reports in your windows environment.
Hardware Configurations Recommended
Supported OS : Windows 10
Server Configurations | Small Teams < 50 Users | Medium Teams < 500 Users | Large Teams 500+ Users | |||
| Stand Alone Server | ||||||
| Min | Recommended | Min | Recommended | Min | Recommended |
CPU | 4 Cores | 4 Core | 8 Core | 16 Core | 16 Core | 24 - 32 Core |
Memory | 8 GB | 16 GB | 16 GB | 24 GB | 32 GB | 32 - 64 GB |
HDD (Free Space) | 100 GB | 250 GB | 50 GB | 100 GB | 50 GB | 500 GB |
Download the QMetry-Windows-Report-Installer.zip to the C:/ drive of the Report server and unzip it. Under C:\ you should have the following folder structure. The install or Reports folders generated during install must not be moved.
C:\QMetry-Windows-Report-Installer\QMetry-Windows-Report-Installer

| Options | Details | Example |
|---|---|---|
Enter Mysql Database Host IP / DNS Name (Qmetry) | QMetry App DB Host Public IP or DNS Name | 10.10.11.100 |
Enter Mysql Database Port (Qmetry) | QMetry App MySQL DB Port. Enter 3306, unless QMetry DB port is different | 3306 |
Enter Mysql Database Schema (Qmetry) | QMetry App DB schema name. Enter : qmetry | qmetry |
Enter Mysql Database Username (Qmetry) | QMetry App DB username. Enter : root | root |
Enter Mysql Database Password (Qmetry) | QMetry App DB password. If it is unchanged from default, enter : qmetry | qmetry |
Enter Mysql Database Host IP / DNS Name (Reports) | (Enter QMetry Report Server Public IP/DNS) or localhost in case reports are being installed on the same server | localhost |
Enter Mysql Database Port (Reports) | Enter the port where reports DB is running. Enter : 3306 | 3306 |
Enter Mysql Database Schema (Reports) | Enter the database schema name of QMetry Reports DB - | qtmanalytics |
Enter Mysql Database Username (Reports) | Enter username of QMetry Reports DB | root |
Enter Mysql Database Password (Reports) | Enter password of QMetry Reports DB - qmetryreports@!Nf0# | qmetryreports@!Nf0# |
Enter Port To Start SyncJob (Reports) | Reports Sync Job runs from this port - 8080 | 8080 |
Do you want to Run Force Sync Now ? (y/n) | Enter y to sync all the QMetry data to Reports DB with the current script. Always enter y at the time of fresh reports install | Type : y |
Wait for the script to finish executing.
To restart report services, close the .jar command prompts to stop the reports services. Execute the run.bat batch file to start the reports services again from the below location.
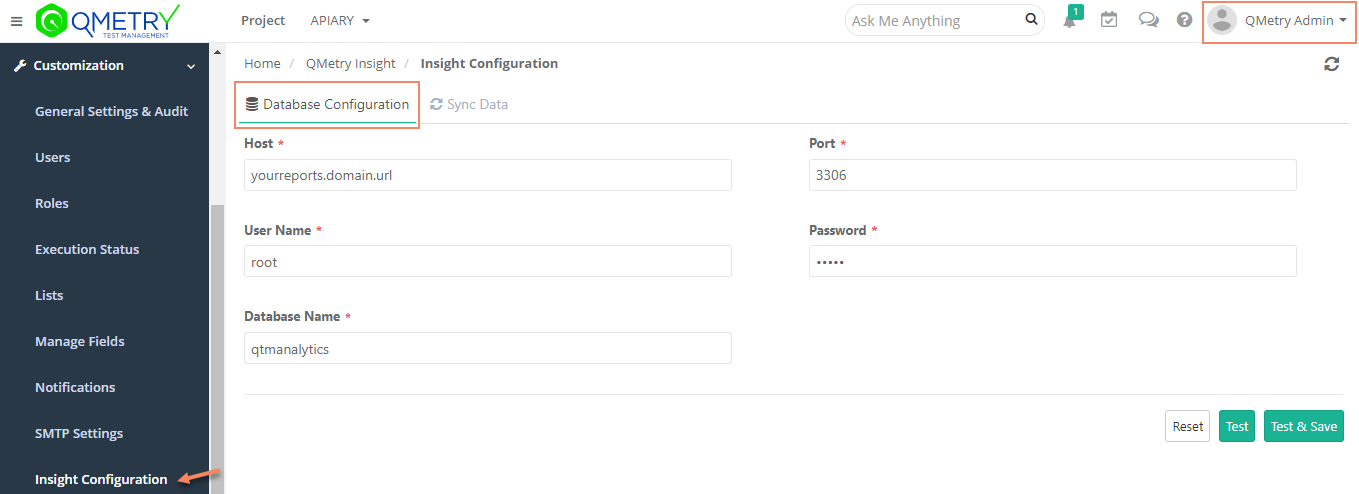
Go to QMetry > Customization > Insight Configuration
Enter Database Name : qtmanalytics
Click Test to ensure successful connection and then hit "Test & Save"

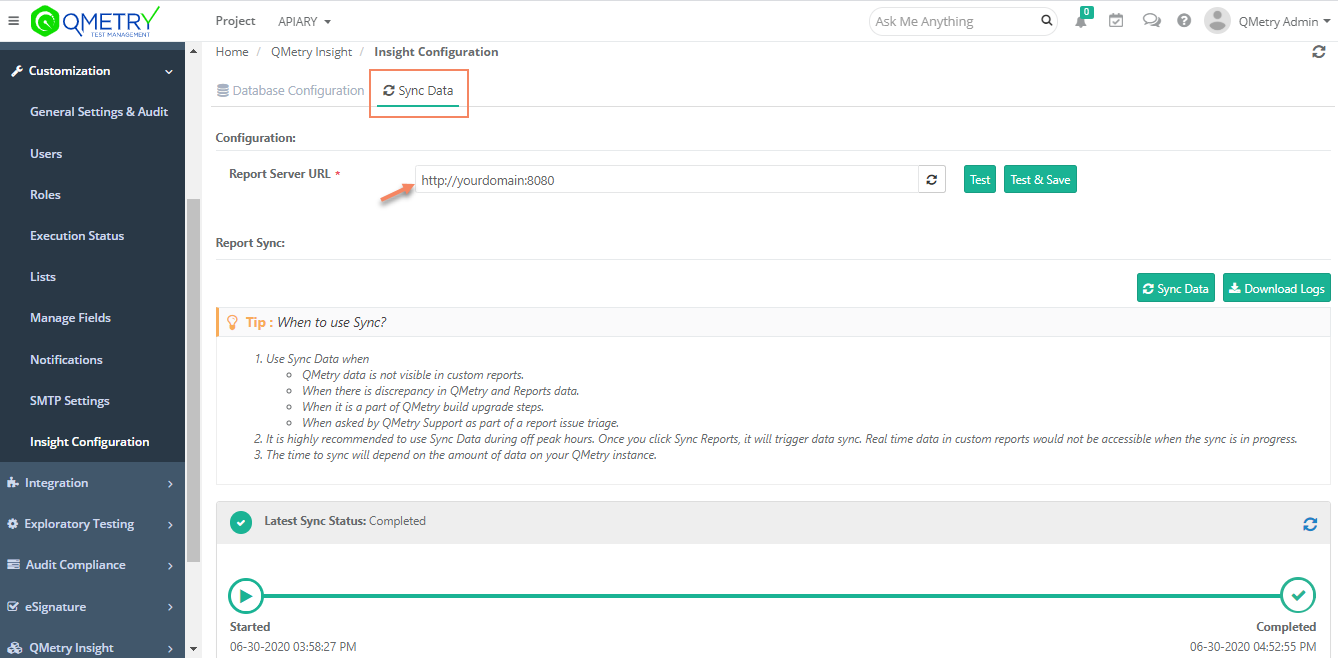
Note : "Sync Data" is required first time after reports installation. Time taken to sync depends on amount of data in QMetry. Sync Progress and Status can be monitored as shown in the below screenshot. QMetry custom reports remain inaccessible during a sync in progress and is recommended to be run only during off-peak hours.
Users can start using QMetry Reports when the sync is completed. QMetry remains available during this time.

If you are facing any issues during the installation process, write us at qtmprofessional@qmetrysupport.atlassian.net. This will automatically open a ticket with our support team and help you to follow the progress.