Admin can add users and assign them roles corresponding to their rights and responsibilities.
Expand Customization on the sidebar and select Users.
The Users screen opens with the list of users created in QMetry.
Base Platform allows you to do Basic Configurations like creation of users and assigning them Roles. Roles will only have "View" and "Modify" rights. Other advanced settings can be configured if Customization App is enabled.
To create a new user, click on the New button on the top right corner.

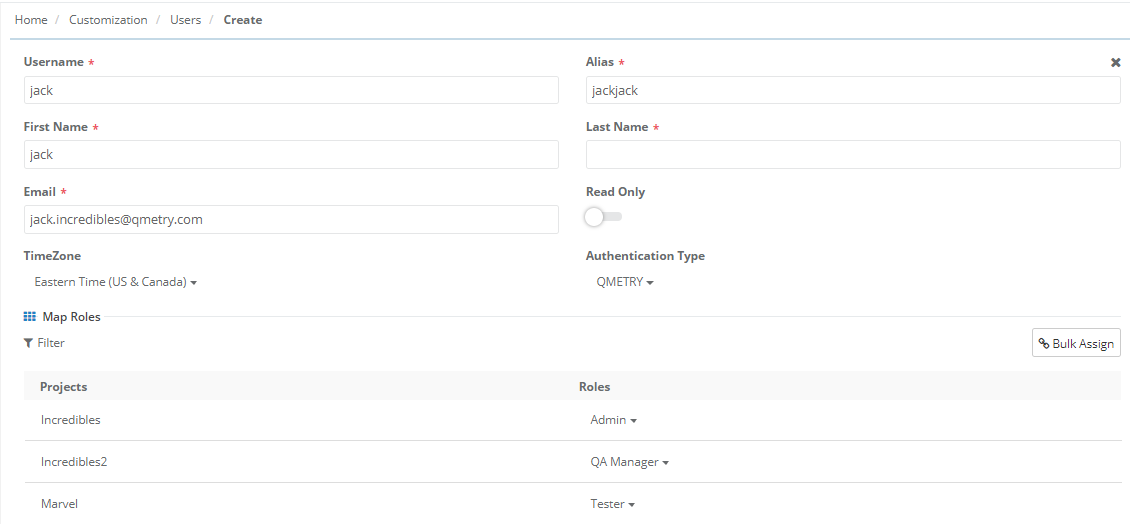
The Create Users screen opens.

Username: Mention the Username that the user needs to provide while logging into QMetry.
Alias: Mention a unique name to identify the user. This Alias is utilized as “Username” across QMetry modules wherever one needs to select user(s). For example, “Requirement Owner” field in the Requirement module.
First Name: Enter First Name of the user.
Last Name: Enter Last Name of the user.
Email: Enter Email address at which the user would like to receive all QMetry communications.
Timezone: Select the Timezone in accordance with the user region. If the region is under the influence of DST, then DST would be applied throughout QMetry.
Authentication Type: The drop down options are: (1) LDAP/SAML (2) QMetry. The Admin can set the Authentication Type to authenticate QMetry users either through LDAP/SAML or through QMetry database. You can authenticate QMetry users using the LDAP/SAML user registry that you set up. You can configure the server to use LDAP/SAML authentication when a user logs into QMetry. If necessary, the LDAP/SAML user can switch back to the QMetry database to check the user credentials. The Authentication Type drop down is provided to facilitate the Admin to specify login authentication of a specific user either through LDAP/SAML or through QMetry database. Select either of the following options from the drop down.
1. QMetry: QMetry database is the default Authentication Type unless it is changed to LDAP/SAML. So whenever a user logs into QMetry, the credentials are verified against QMetry database.
In case of an existing LDAP/SAML user switching over to QMetry database, the user is logging in as an LDAP/SAML user the first time with the Authentication Type “LDAP/SAML”. The user can then switch the authentication to QMetry database. The user has access over the default Project and default Role.
The user receives a link to update his Password manually if the user prefers to go through QMetry database for authentication. The user can then log into QMetry with the username and password defined for the QMetry instance.
2. LDAP/SAML: Keep the Authentication Type as LDAP/SAML if LDAP/SAML is configured and set to “Active” in LDAP/SAML Settings. LDAP/SAML is configured from Integration > LDAP/SAML. Whenever a user logs into QMetry, the credentials are verified against LDAP/SAML.
If an existing QMetry user switching over to LDAP/SAML, set the Authentication Type as “LDAP/SAML” manually on the User Management screen (Customization > Users) so that the user’s credentials will be verified against LDAP/SAML. Users with LDAP/SAML authentication type can not update or reset their own password.
|
Admin can assign Projects and Roles to the user that is being created.

A. To assign a single Project and Role at a time, select user's Role for the Project.
B. To assign multiple Projects to the user with the same Role for all the Projects, select the Projects and then click on the Bulk Assign button at right.
The Role drop-down appears.
Select a Role that will be assigned to the user for the Projects you selected on the grid.
Click Create.
A user is added to the users list.
QMetry admin can create project wise "Read only" access users. This can be done by assigning only "View" rights to a User Role. The "View" rights are provided to let customers grant QMetry access to a group of users while removing their ability to add, edit, execute, or delete the test assets. Users with Read Only rights will consume a regular license. Use Case: Customer has a group of users who need not have the authority to add, edit, or delete the test assets in QMetry. “Read Only” rights are sufficient for such users. The customer wants their users just to view the company data in QMetry. |
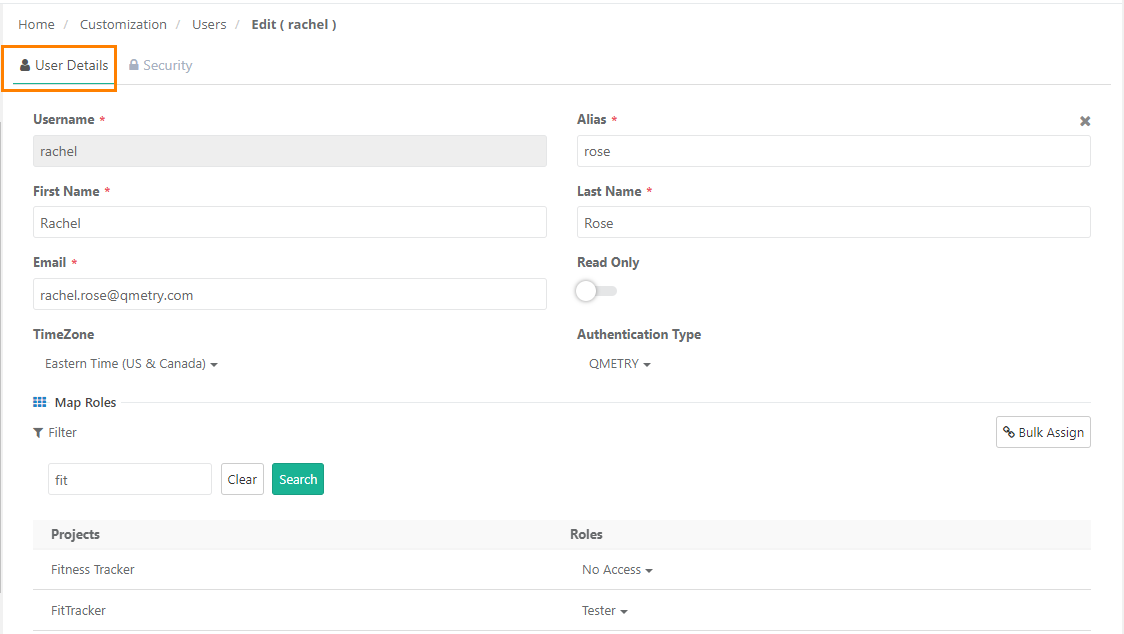
To edit the details of an existing user, click on the Edit button under the Action column.
It opens the Edit screen for User in editable mode. There are two tabs in the Edit User screen: User Details and Security.
The Admin can –
Update user details
Update User Role Assignment
Update user details: The fields on the Update User screen appear in editable mode to make any required changes in the user details.
Update User Role Assignment: You can assign new roles or unassign existing roles to the user.

The Admin can -
Update User Password: Open the user details page by clicking on the Edit icon. Go to the Security tab and click on Update Password. A pop-up opens to update the password for the user.
Reset User Password
Enable/disable Two-step Verification for QMetry

You can deactivate an active user. The deactivated users are not allowed to log into QMetry application.
Steps to deactivate a user:
Go to Customization > Users. The list of users is displayed.
Locate the user you want to deactivate and click on the Deactivate option under the Action column.

The confirmation message pops up.
While deactivating a user an option is provided to select another user who will be the co-owner of the deactivated user's dashboards.
All the private and public dashboards of the user that is being deleted will be shared with the user as a co-owner of those dashboards.
4. Select the user whom you want to be co-owner of the dashboards that are created by the user being deactivated.
5. Click Yes.
You can activate the deactivated users again and allow them to log into QMetry.
Steps to reactivate a user:
1. Go to Customization > Users. The list of users is displayed. The deactivated users do not appear on the list of active users.
2. To view the deactivated users, apply filter on the Active parameter with option “No” and click Search. The list of deactivated users is displayed.

3. Locate the user you want to activate and click on the Activate option under the Action column.

When a user is deleted from QMetry that user will be inactive and unable to log into QMetry. New users with the same name will not be allowed in QMetry. The deleted users will be shown as inactive in the users drop-down wherever applicable.
Steps to delete a user:
1. Go to Customization > Users. The list of users is displayed.
2. Deactivate the user as explained in the Deactivating a User section. Deactivated users do not appear on the list of active users.
3. To view the deactivated users, apply filter on the Active parameter with option “No” and click Search. The list of deactivated users is displayed.

4. Locate the user you want to delete and click on the Delete option under the Action column.
