On the Test Case module toolbar, click on the New button.
The Add Test Case screen has the following fields on it.
Summary: Enter the name of the test case.
Priority: Select an option from the list.
Labels: You can select multiple options from the list.
Status: Select an option from the list, which contains values like New, Approved, In Progress, Ready to Review, etc. The list is customizable. Users can add more list values from Customization > Lists.
Use Case: Tester writes a test case based on requirement specifications and assigns this test case to the Testing Lead with the status “New”. The Testing Lead then reviews the test case and assigns the status “Reviewed” or “Ready”, if the test case is written properly.
Owner: The drop-down list contains QMetry users having rights to the current Project. Select the owner of the test case who will be executing it.
Test Case Category: Select an option from the list e.g. Regression, Performance, Security.
Estimated Time (In Minutes): Mention the estimated execution time of the test case in minutes.
Description: Enter a description regarding the test case. Test Case Descriptions can be added in either Plain Text or Rich Text.
Rich Text:
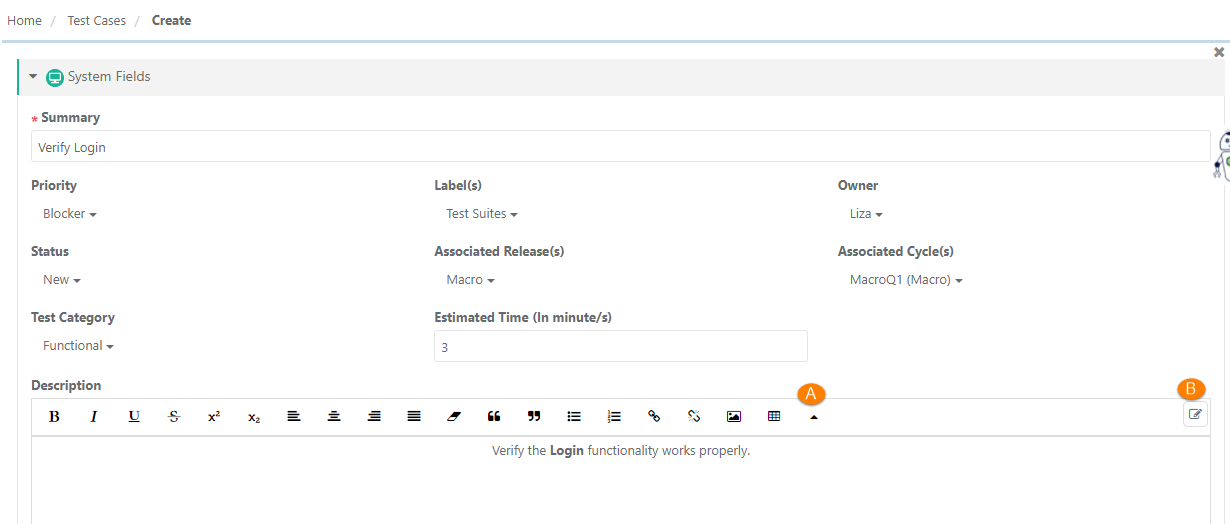
A. Use of Rich Text Editor allows users to apply text formatting for Test Case Description and reduces chances of missing important details. Users can also insert images, hyperlinks and tables to the field.
Image Upload Support in Rich Text Editor:
Users can add images to any Large Rich Text Editor field (System as well as Custom) up to 1 MB. The images can be uploaded in the fields (A) by browsing and uploading the image (B) by inserting the image through the URL. (C) by copying and pasting the image directly into the editor/text field without saving it first on the local machines. Multiple images can be copied and pasted at a time.
It is applicable to all the fields across QMetry wherever the rich text editor is available.
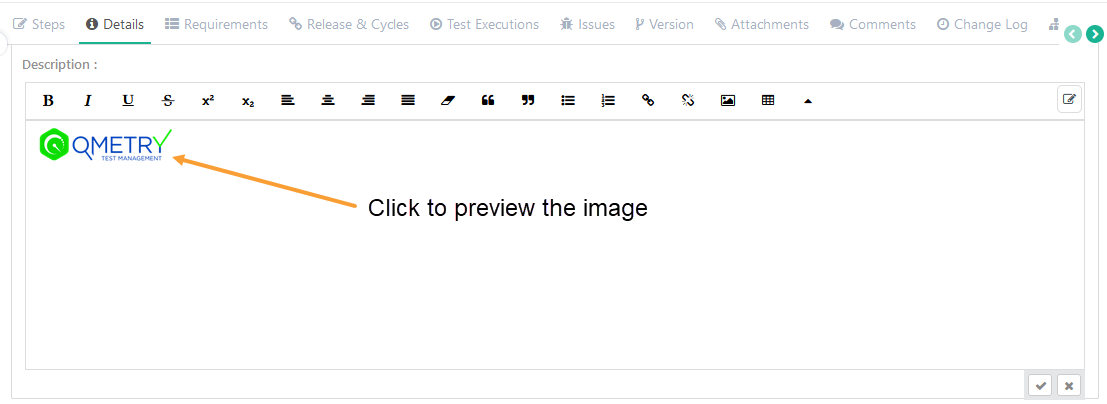
You can preview the image just by clicking on it.

To download the image, click on the image and then click on the Download icon at the top right corner.

Notes:
The supported file formats to upload/copy-paste the image are jpg, jpeg, png, and gif.
The maximum file size should be 1 MB (for images uploaded through browsing).
B. Users can paste the html/xml content into the Source editor of the "Large Text" field type and it auto-renders the code to show the text outputs on the screen.
Use Case: An organization is using Rich text for Description field, in which they copy-paste the content from their source in html/xml format.
Click on the Edit icon at the right to open the source editor.
Note: To enable a rich text editor, the Enable Rich Text parameter should be enabled for the Project (Projects > Project / Release / Cycle). Refer to Enable Rich Text Editor for more details.
Testing Type: You can see this field on the test case detail page once a test case is created. The field shows how the test case was created in QMetry: Manual or Automated. If a test case is created through UI or imported from Excel, then it is identified as a manual test case. Test Cases that are created through Automation APIs are identified as Automated test cases. The Testing Type field remains read-only.
User-Defined Fields: If UDFs are added for the test case module, then they are displayed on the Create Test Case screen and Test Case Details screen.
Enable Rich Text and Source Code Editor: Refer to the Description field above.
You can add test steps that are to be executed under the test case. View, Create, Edit and Delete rights for Test Case are allocated to user roles from Customization > Roles. Users can perform operations as per the permission granted to their user roles.
Steps
Go to the Steps section on the Create Test Case screen.
Follow either of the following ways to add a test step:
Hover the mouse over the Step Description cell and click on the Edit icon (pencil). You can also move using TAB on the keyboard.
Click on the "+" icon at the right and select the Insert Row option to insert a new step at the end.
Click on the settings icon for the test step and select the Insert Row option to insert a new step next to the current step.
A blank row is added to the grid with an auto-generated Step number. Enter Step Description, Input Data, and Expected Outcome in respective fields by clicking in the cell.
Repeat the same process to add other steps.

Rich Text Editor for Steps
There are two formats in which you can add test steps: Plain Text and Rich Text.
Enable Rich Text and Source Code Editor: Refer to the Description field of test case.
Note: To enable rich text editor, the Enable Rich Text parameter should be enabled for the Project (Projects > Project / Release / Cycle). Refer to Enable Rich Text Editor for more details.
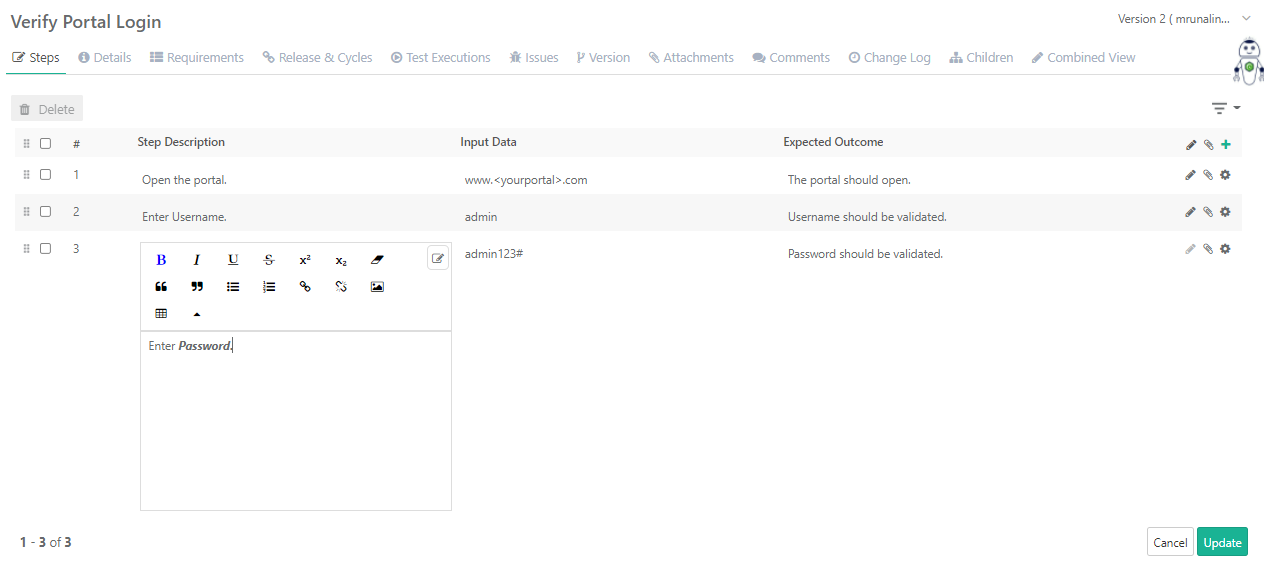
User-Defined Fields: If UDFs are added to the test step module, then they are displayed on the Test Steps section as columns beside the default fields of test steps.

Show/Hide and Re-arrange Test Step Columns
You can organize the test steps columns in the panel through drag and drop operation. You can also opt to hide/show Input Data, Expected Outcome and other UDF columns on the screen.
Click Save once you make any changes for the Test Steps panel.

Any changes in test steps column arrangement will reflect in other places where the test steps panel is used. For example, column arrangement changes on the Execution screen will reflect in the following places.
Test Case Create page
Test Case Detail Page
Create New Version page
Exploratory testing
Edit entered steps
1. Click on the Edit button.
2. Click in the cell to modify the steps. It opens the test case details page in editable mode.

It allows you to do inline editing in the field.

As an alternate way, you can click on the Edit icon for the step that you want to edit.

The step section opens in the expanded view with system fields (Step Description, Input Data and Expected Outcome) as well as custom fields.
You can switch between the fields.
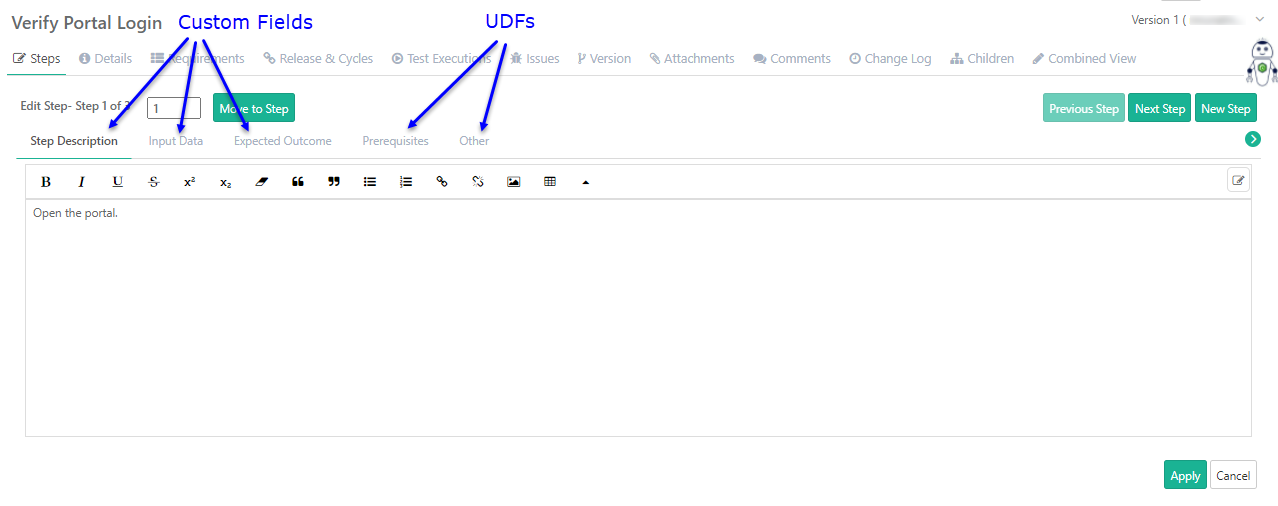
In the expanded view, the Large Text UDFs have separate tabs while all the other UDFs are combined in single tab named Other.
The Large Text type UDFs open in separate tabs for edit same as test step system fields.
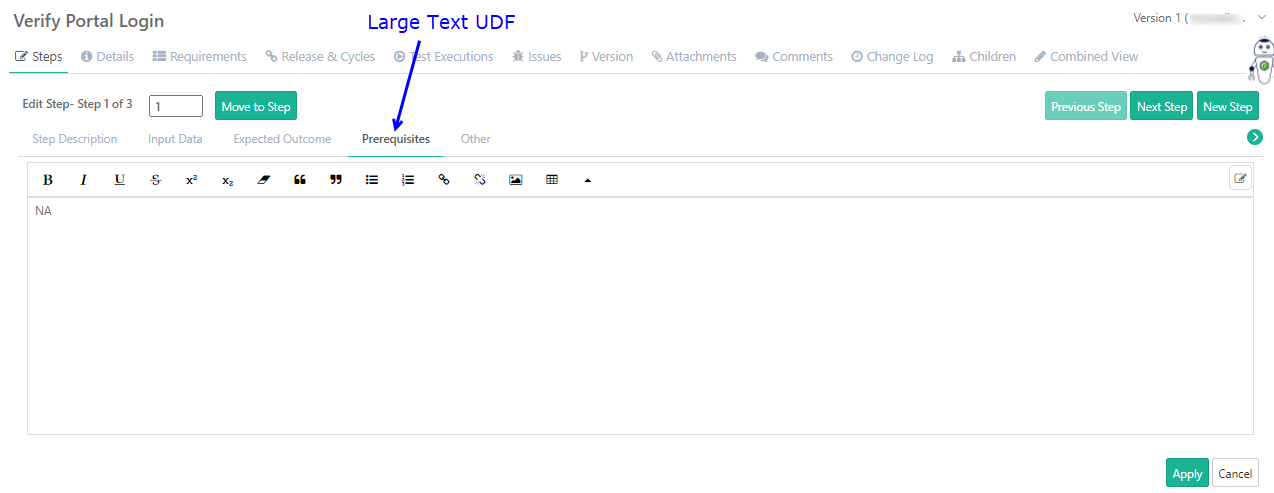
Other tab: UDFs other than Large Text appear in a combined view, where you can edit the fields inline.

To go back to the Step Description section, click on the Move to Step button.
You can use the Previous Step and Next Step buttons to navigate to the previous/next steps.
Use the New Step button to add a new step next to the current step.
Once you are done with editing the test step, click Apply to save the changes.
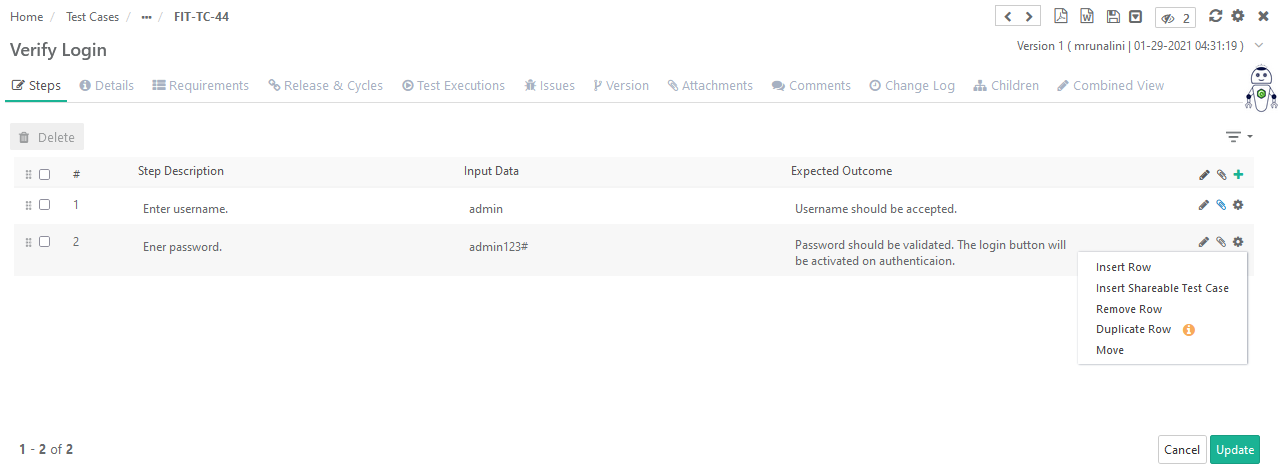
Actions on Cog icon
You can perform the following actions on the Steps grid:
Insert Row
Insert Shareable Test Case
Remove Row
Duplicate Row
Move: Select Index to move the step to.
Click on the Create a button to save the test case.
When you open the test case detail page, the Test Case Folder Path displays the path up to the folder the test case lies within.
Removing Test Case Steps
Open the test case details page in editable mode.
On the Test Case Step(s) grid, click the Con icon for the step you want to remove.
Select Remove Row.
Changing the Order of Test Case Steps
While executing test suite, the test case steps appear in the same sequence as you arranged them here for the test case.
You can easily change the order of test case steps through the following way:
On the Steps tab, click on the Con icon at right and select Move.
Select Index to move the step to.
Users can get more granular details by adding attachments at test steps. For example, a test step needs to be tested with different test data. The tester attaches an excel sheet containing the test data to keep it ready for execution.
Note: Attachments to test steps can be added on the test case detail page as well as on the test case edit page.
To add attachments to the test step level, follow the steps mentioned below:
Go to the test case detail page.
Open the Steps tab.
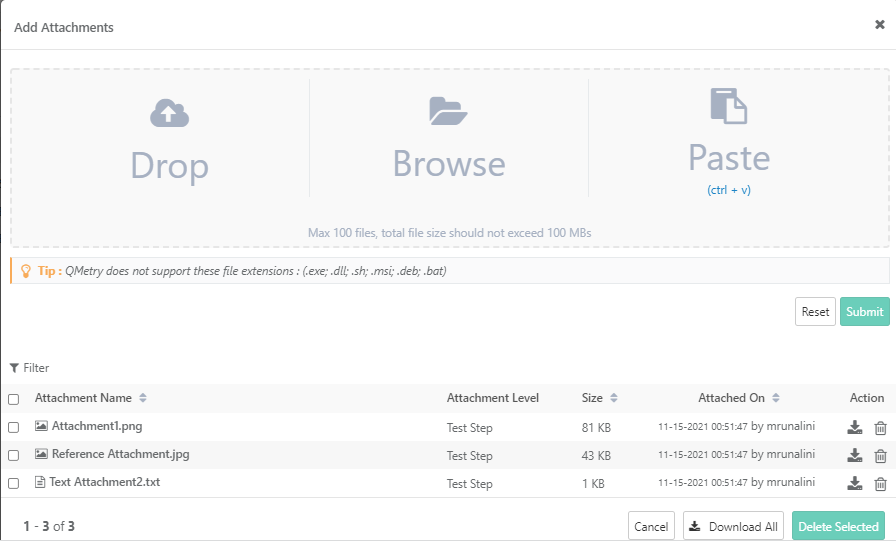
Click on the Attachment icon for the test step to which you want to add an attachment.

The Add Attachment screen opens. Attach required files to the step.
For attachments added from steps level, the Attachment Level shows “Test Step”.
Download Attachments:
To download a single attachment, click on the Download icon for that attachment.
To download all attachments at a time, click on the Download All button. You can download the zip from the Schedule Task section that can be accessed by clicking on the icon on the application header.
Delete Attachments:
To delete a single attachment, click on the Delete icon for that attachment.
To delete attachments, select and click on the Delete Selected button.
A test case can be edited in terms of its parameters and test case steps.
Users can save the test case without creating its new version. In-place editor is provided on the detail screens for all test assets. Just hover over the field and click on the edit icon.
It opens the field in editable mode. In case of text field, enter the value and save the details.
In-place edit will always update the test asset.
To create a new version of test asset, follow the steps mentioned below.
Edit Test Case Steps
Refer to the Edit entered steps section described earlier on this page.
Delete Test Case Steps
1. Go to the test case detail page.
2. Open the Steps tab and click on the Edit button.

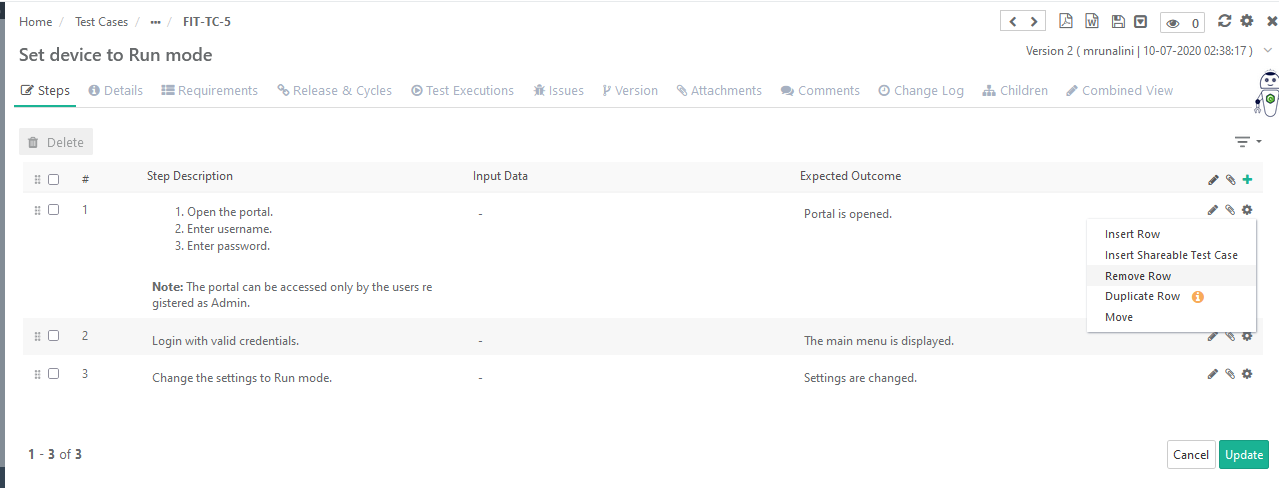
→ Delete/Remove a Single Test Case Step
On the Test Case Step(s) grid, click the Cog icon for the step you want to remove.
Select Remove Row.
Click Update.
→ Delete/Remove Test Steps in Bulk
Select the test steps that you want to delete. The Delete button gets enabled on the selection of test step(s).
Click on the Delete button.
Click Update.
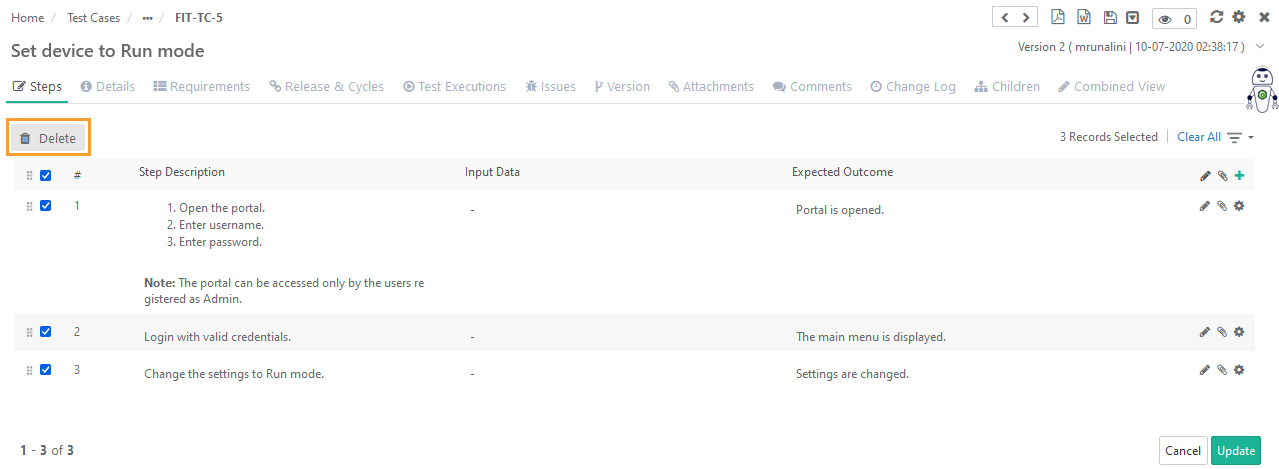
If test case steps are added or edited in the test case, which is already executed, then it is recommended to save the test case with Save as New Version.
If the User Role has Versioning rights (in Customization > Roles), then the button will be visible to the user. When you edit test case details, you can save the details with a new version of that test case.
Follow either (A) or (B) as mentioned here.
A. Click on the Con icon for the test case and select Create New Version.
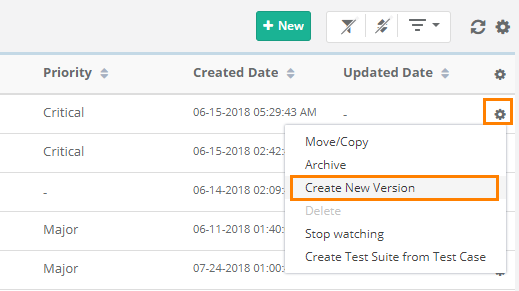

The next screen opens in editable mode.
Make the required changes and click on the Save as New Version button to create a new version of the test case with updates.
If you add/edit test steps within a test case, it will ask you to create a new version of the test case to save the content of steps along with test case parameters. The associated test suite will still be associated with the previous version of the test case.
If the test case was executed before, then the following option is provided while saving the new test case version.
Auto sync latest version of Test Case in all executions: If the option is selected, then the test case version gets updated and its execution status is reset to “Not Run” on the Test Run screen.
Example: TC1 has execution status “Passed” in TS1. User modifies TC1 details and selects this option to reset the test case execution status while saving TC1. Now TS1 will show TC1 execution status as “Not Run”.
If the above option is not selected, then on the Test Run screen the sync icon appears beside the current version of the test case. On the Test Execution screen, to execute the latest version of the test case, click on the sync button.
The confirmation message pops up confirming the reset of execution status. The synced version will not show previously linked issues.
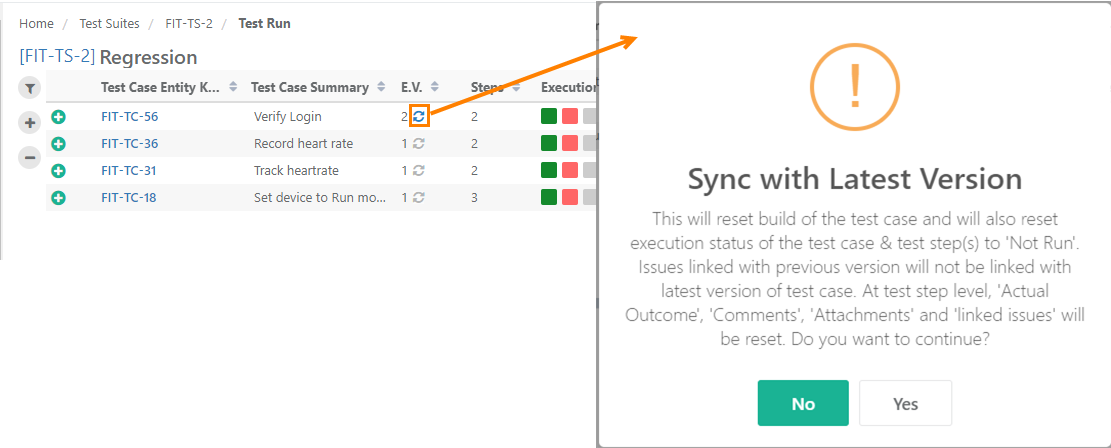
After syncing the test case with its latest version, its Execution Status changes to "Not Run".
If test steps were added in the latest version of the test case, then these test steps will also be added on the execution screen.
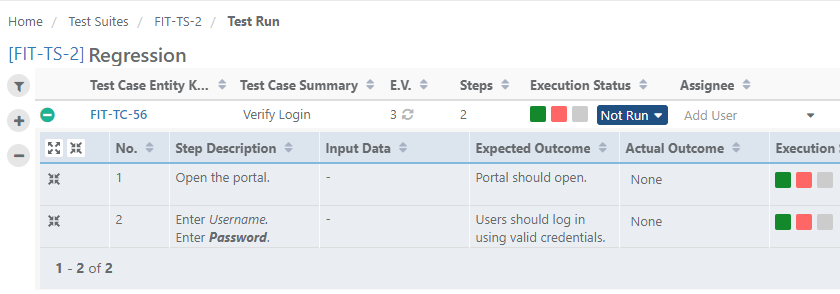
Note: QMetry allows you to use different versions of a test case for testing. Read more about it on the Managing Test Case Versions page.
All the versions of the test case should be archived to delete that particular test case.
You can not carry out further operations like adding attachments, linking test cases, issues, and release - cycles on an archived test asset.
A. Archiving from Test Case detail page
B. Archiving from Test Case module list view
A. Archiving from Test Case detail page
Open the test case details page by clicking on the test case.
Click on the Archive icon on the top right corner of the page.
It will archive all the underlying versions of the test case.

B. Archiving from Test Case module list view
Open test cases module.
The test case list view opens with list of existing test cases within the project/folder.
Click on the Cog icon for the test case you want to archive and select Archive. The test case is archived after confirmation.
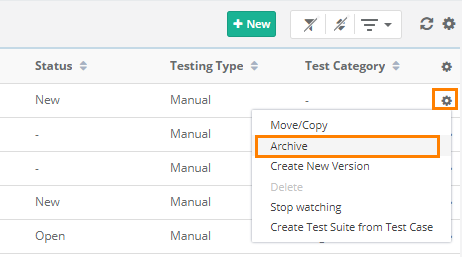
To unarchive an archived test case, click on the Unarchive icon at the top right corner.
Read Archiving a Specific Test Case Version
To delete a test case, first you need to archive it. All the versions of the test case should be archived to delete that particular test case.
It is a two step process:
Archive a test case (All the versions of the test case will be archived.)
Delete a test case (The test case will be deleted including all its versions.)
All the versions of the test case should be archived to delete that particular test case.
A. From Test Case detail page
B. From Test Case list view
A. From Test Case detail page
Open the detail page of the archived test case. Use the filter on the tree, to view the archived test cases.
Click on the Delete icon at the top right corner of the screen.
Once the test case is archived, it looks like below.

The Delete icon now appears at the top right corner of the page.
Confirm the operation on the pop-up.
B. From Test Case module List view
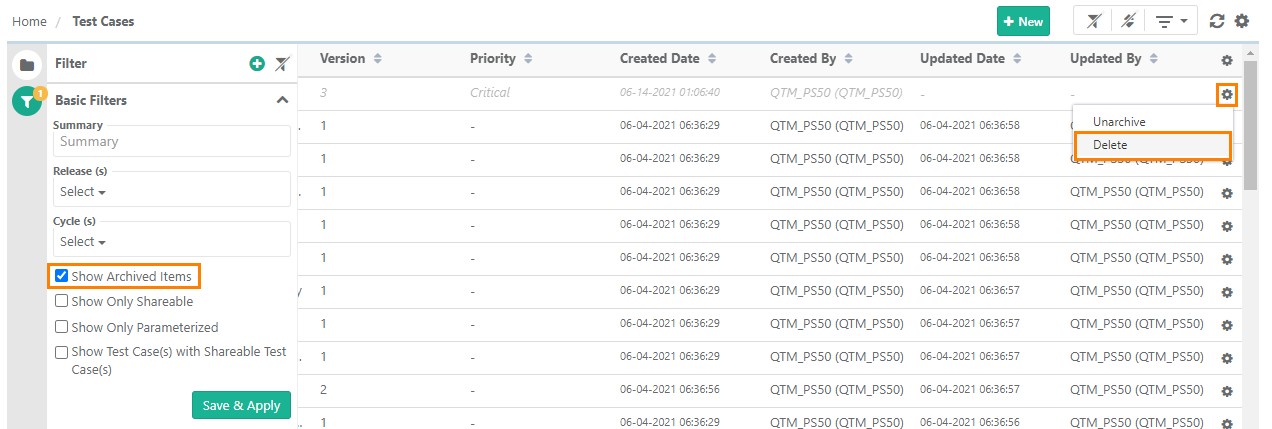
To view the archived test cases on the screen, select the Show Archived Items check box above the grid.
It displays archived test cases along with other test cases.
Click on the Cog icon for the archived test case and select Delete.
Read Deleting a Specific Test Case Version