Back to QMetry All Products Help Page
Execution Status Management
Introduction
Execution Status is the status that testers assign to test cases by looking at their results while executing. QMetry provides System Default Statuses: Passed, Failed, Blocked, Not Run, and Not Applicable.
Users can add new statuses as per requirement.
Users can edit and archive only those statuses which are added in addition to the default statuses. System Default Statuses are not allowed to be edited or archived.
Steps:
- Expand Customization on the sidebar and select Execution Status. Permissions for Customization are allocated from Customization > Roles.
- The Execution Status screen opens.
Users can add new statuses and corresponding icons. They can also edit name and icon of existing statuses.
If Jira is configured as an external tracker, then changes in status icon also reflect in Jira for the entities.
Renaming/Editing Execution Status Names
User can add new Execution Status and rename default Execution Status. The nomenclature set here is maintained at Domain level. User will find the same status names across all Releases and Cycles under one Domain.
Look at the Execution Status grid pane on the screen.
- User can customize the execution status list by adding new status to it.
- Note: User can add new Execution Status only before any entity or folder creation in Requirement, Test Case, and Test Suite module.Once an entity/folder is created in the aforesaid modules, new execution status could not be added. Also, user cannot reset to Default Run Status after any entity/folder is created.
- User can edit an existing status name on the Execution Status Management grid pane.
- Default Run Status represents generic names of execution status that testers assign to test runs in general. QMetry allows its users to name Execution Status anew. Users have flexibility to call test status by its terminology they are more familiar with.
- Names under Default Run Status are fixed ones. Run Status Names are user defined names that users give to Default Run Status in order to identify the status more clearly.
- To rename an Default Run Status, click the edit icon under the Edit column for the row.
- A text field appears for the cell with Save and Cancel buttons on it.
- Enter name you want to identify the status with.
- Click Save.
The status names set here will reflect on the Test Suite Execution screen in the Test Suite module. The names will also be applied in other applicable places like graphs, reports, etc. throughout QMetry wherever it refers to test case step/test case/test suite status.
Example:
The execution history shows test suite TS1 with status “Blocked”. Now the user changes the Status Run Name from “Blocked” to “Super Blocked” and also changes the icon.
As a result, the Execution History of TS1 shows its status as “Super Blocked” with the new icon.
The edited value of the status immediately reflects in the execution history.
Reset to Default Run Status
Default Run Status column displays default status provided by QMetry. Status Run Name column displays user defined names of status. Now if you prefer to use the original terminology for status that has defined by QMetry, then just click the Reset to Default Run Status button on the toolbar. All the execution status will reset to the default status (i.e name and icons) defined by QMetry. On resetting to Default Run Status, all the user defined statuses will get archived.
Note: The Reset to Default RunStatus button will be accessible if the user has Status Management rights of create, update, and delete.
Default Status Priority
The status priority defined here is applicable for test case steps and will ultimately determine the status of a test case.
For example, the following table shows a test case that contains four test steps and demonstrates how the status of each test step affects the status of the test case.
| Test Step 1 | Blocked | Failed | Passed | Not Run | Failed |
| Test Step 2 | Failed | Not Run | Passed | Passed | Passed |
| Test Step 3 | Not Run | Passed | Passed | Passed | Failed |
| Test Step 4 | Passed | Passed | Passed | Passed | Passed |
| Test Case | Blocked | Failed | Passed | Not Run | Failed |
From the above table we can see that –
- The first preference is given to “Blocked” status.
- If one of the test case steps is “Blocked”, then the test case will have the “Blocked” status.
- The second preference is given to “Failed” status.
- If one of the test case steps is “Failed”, and no test steps exist with the “Blocked” status, then the test case will have the “Failed” status.
- The third preference is given to “Not Run” status.
- If a test case steps is not executed yet, and no test case steps exist with either “Blocked” or “Failed” status, then the test cases will have the “Not Run” status.
- The last preference is given to “Passed” status.
- If all the test case steps of a test case is “Passed”, then the test case will have the “Passed” status.
Adding a New Status
Click on the New button on the header.
Fields to add execution status are displayed on the screen.
- Status: Enter name of the new status.
- Select Background Color and Text Color for the status.
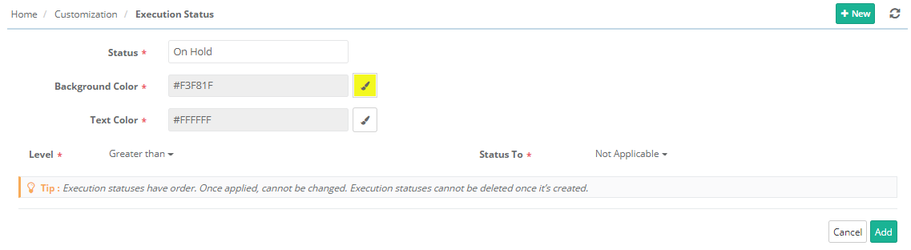
Setting Level/Priority of a New Status
The sequence of the system default statuses i.e. Blocker, Fail, Not Run, Pass, and Not Applicable represents their priority, which is not changeable. User can add New Status anywhere in between the system statuses.
For example, a new status “Partial Pass” is added in between the “Pass' and “Not Run” status.
The screen displays two selection drop-down lists to define the priority of the new status that is being created.
- The first drop down has two options: Greater than/Less than
- The second drop down has all the statuses (including the archived statuses) on it
It is mandatory to set priority of the new status. Once the priority is assigned, it cannot be changed.
Archiving an Execution Status
User can archive execution status which are no more in use. When a status nomenclature becomes unusable, user can not delete it but he can mark it as "Archive" to stop showing it on the execution status list.
Only user defined status can be archived. System default status can not be archived.
- To mark a status as "Archive", turn the Archive flag "ON" for the status. The status name stops appearing on the status list wherever applicable. But the execution history preserves the old status for older executions.
- To un-archive a status, just turn the Archive flag "OFF" for the status. The status is available for use again.
To view archived status, check the Show Archived check box.

Custom Configuration of Execution Status for stopwatch timer
Note: This feature is only available if you have purchased the Customization App of QMetry Test Management.
Prerequisite: The Derive Test Case Execution status from Test Case step status option in Project Settings should be enabled.
Auto Stop Timer: The option is provided to enable/disable the auto-stop timer when the execution status of the test case step is set as particular execution status. By default, the “Failed” and “Blocked” statuses are selected. It means whenever the test step status is assigned the status of Failed/Blocked, the test case status will also change to Failed/Blocked. Once the test case status is assigned, the timer will auto-stop. You can enable/disable the option for required execution statuses.
→ Required Permission: Project Admin/ users who have Customization “Modify” permission can edit this project-level Execution Status setting.
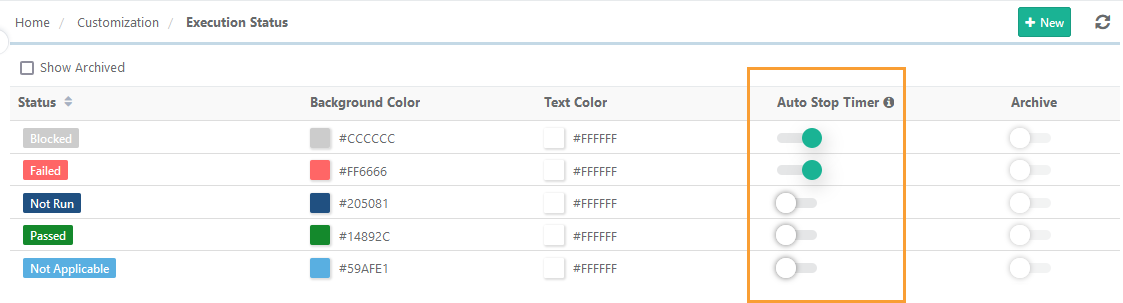
Note : You cannot modify the above setting if the customization package is disabled on your QMetry instance.
Back to QMetry All Products Help Page