Back to QMetry All Products Help Page
Configure SAML in QMetry
Pre-requisites
- A default project should have been assigned for SAML users from Projects > Project/Release/Cycle. The "Add in LDAP/SAML by Default" flag should be On for the project.
- A default role should have been assigned for SAML users from Administration > Roles. The "Make this the default role for new LDAP/SAML users" flag should be On for the role.
Steps
1. Go to Custom Configuration > LDAP/SAML.
2. Select SAML as Integration System.
- IDP Provider Name: Enter the IDP Provider Name of your preference.
- Select IDP metadata file: Browse and upload the SAML Metadata file in XML format that you downloaded in the previous step.
- Active: Select "Yes" to keep the SAML State "Active". Select "No" to keep the SAML State "Inactive".
- Default Access Type: Select the Default User Access Type for SAML User.
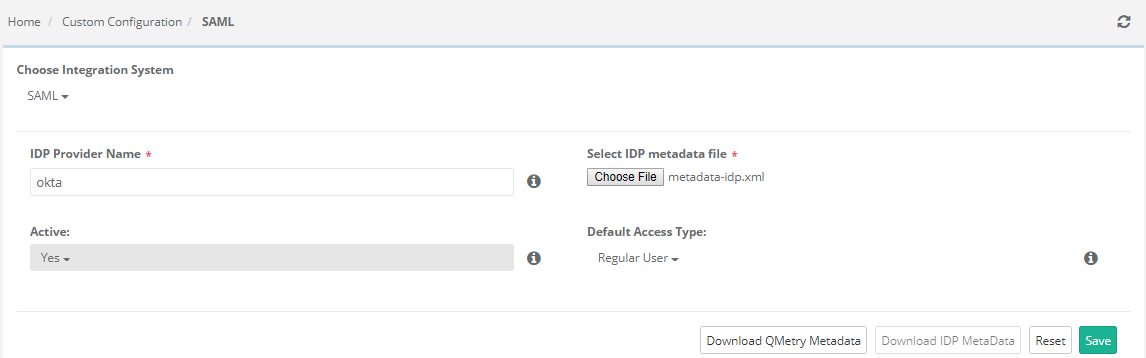
3. Save the configuration details and log out of QMetry.
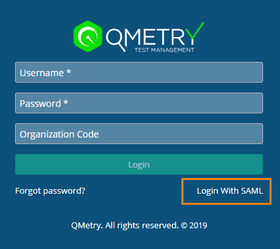
4. Now check the QMetry Login screen. If the SAML Settings are configured successfully, then the SAML Login link appears on the QMetry Login screen.
5. Click on the SAML Login link.
For Cloud :
On the next login screen provide the Organization Code you received in the email of login details.
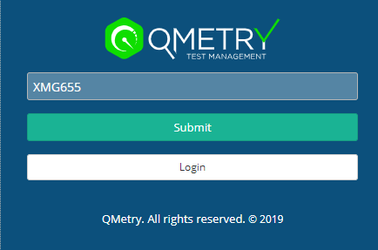
Click Submit. It navigates you to the IDP Provider site.
The login screen of Identity Provider opens. Provide your Username and Password here. Once your credentials are authenticated, you are navigated to QMetry application as a user with SAML authentication.
Back to QMetry All Products Help Page