Back to QMetry All Products Help Page
Migrating from Zephyr Squad to QTM4J using Migration Tool

In this guide, we will run you through the steps to migrate your data from Zephyr Squad to QTM4J. This documentation enlists all the information on migration process like what can be migrated, and what are the assets/data that may not be migrated, features of the migration utility along with system requirements and pre-requisites to be taken care before proceeding with migration.
What Zephyr Squad assets are migrated?
| Zephyr Squad Assets | QTM4J Assets |
|---|---|
| Test | Test Cases |
| Test Cycle | Test Cycle |
| Execution Status | Execution Status |
Capabilities of the Migration Tool
- Migration will include Test Cases, Test Steps and all their fields along with Test Data in Test Steps, Test Cycles, Test Executions.
- Additionally, it will also include rich text from testcases and teststeps.
- For all the assets, utility will migrate custom fields along with their values
- Migrates linkages between the assets and comments.
- Utility will also migrate the folder structure of the test cycles
- URL links and attachments will also get migrated.
- Utility will support mapping of Zephyr Squad enumerated fields and their values with QTM4J fields.
- Reporter, Assignee fields of Testcase will be assigned to Project Lead.
- Executed By, Executed Assignee fields of test execution will get assigned to the respective user of the source.
System Requirements
- JDK 1.8.0 needs to be installed.
- MySQL services and MYSQL workbench 5.7 or above needs to be installed.
- Operating Systems: Windows 10, Linux - Cent OS 7, RHEL
- CPU: 8 Cores, RAM: 16 GB
- TestRail Professional cloud version 7.5.6, TestRail Professional server version 7.5.3.1000 (Utility is tested on)
- Get your Migration Tool (migrate2qtm.war) and its license (qmetry-license-version-1.0) from Professional Services team.
- Jira and TestRail should be running on your system with valid license.
- Set UTC Time Zone in Jira as all the dates from TestRail will be migrated in to QTM4J as per UTC time zone.
Pre-requisites
- The source and destination instances should be in same time-zone.
Jira Migration:
- All the jira projects and their respective entities should already be migrated from source-jira to the destination-jira instance.
- Entities such as Users, Fix Versions, Boards and Sprints should have the same names in both the instances.
- Project-key and issue-keys for a particular migrated-project should be same as that of source-project.
Migration Steps
Run the migration utility from its dedicated machine.
- Open the command prompt and go to the migrate2qtm.war directory.
- Put license file "qmetry-license-version-1.0" besides migrate2qtm.war file.
- Run the following command by giving the path of the migrate2qtm.war file : PATH_TO_WAR_FILE>java -jar migrate2qtm.war --spring.datasource.username=<DB USERNAME> --spring.datasource.password=<DB PASSWORD>
- cd <PATH_TO_WAR_FILE>
- java -jar migrate2qtm.war --spring.datasource.username=<dbusername> --spring.datasource.password=<dbpwd>
The application should be accessible from the same machine using the URL : http://localhost:8080/migrate2qtm . Once you're on the source selection page of the Utility, select Zephyr Squad and proceed with steps below:
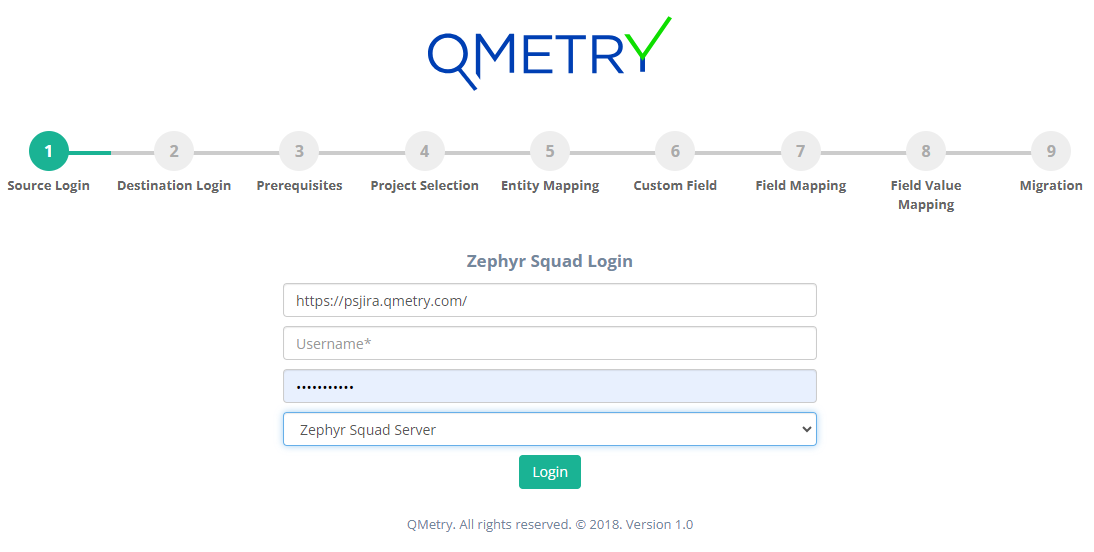
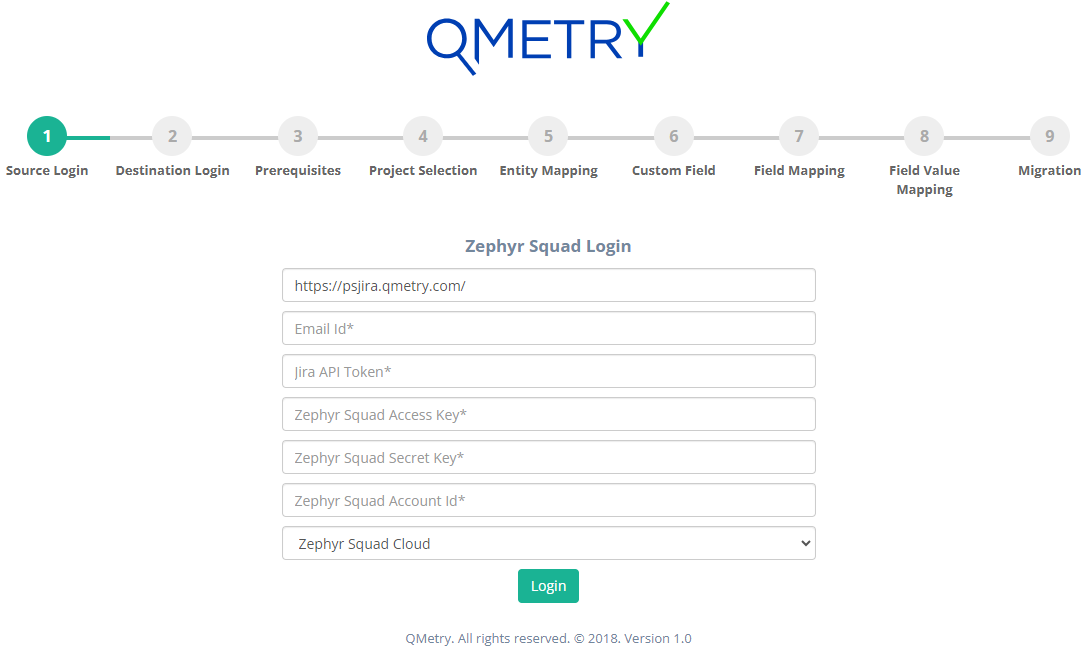
Step 1: Source Login
We recommend logging in Zephyr Squad using admin credentials so that the projects available for migration are not restricted by a user's permissions.
Select Zephyr Squad Instance: Cloud or Server/Data Center.
For Zephyr Squad Server/ Data Center:
- Base URL: Jira URL in the format: https://<IP Address/URL>
- Username: Jira user's username
- Password: Jira user's password
For Zephyr Squad Cloud:
- Base URL: Zephyr Squad URL in the format: <http://<IP Address/URL>
- Email Id: Zephyr Squad User Email address
- Jira API Token: Atlassian Jira API Token
- Zephyr Squad Access Key: Generated from the API Keys page
- Zephyr Squad Secret Key: Generated from the API Keys page
- Zephyr Squad Account Id: The ID of the user
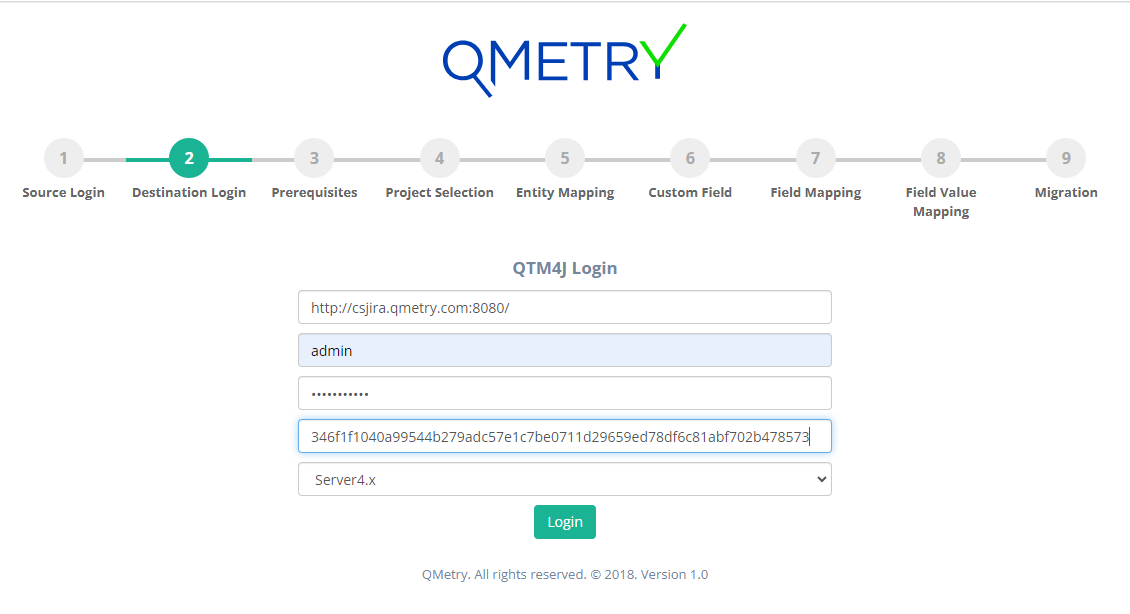
Step 2: Destination Login
Select the destination as QTM4J and move forward for login page. We recommend logging in using admin credentials so that the projects available for migration are not restricted by a user's permissions.
a) For Jira server:
- Base URL: Your Jira server URL.
- Username: Jira username
- Password: Jira password
- QMetry API Key: Get the API from: QTM4J > Configuration > Others > Open API
b) For Jira cloud:
- Base URL: Your Jira server URL.
- Email ID: Email id used for Jira login
- API token: Get the API token from: Atlassian Account settings > Security > Create and manage API token > Create API token
- QMetry API Key: Get the API from: QTM4J > Configuration > Others > Open API
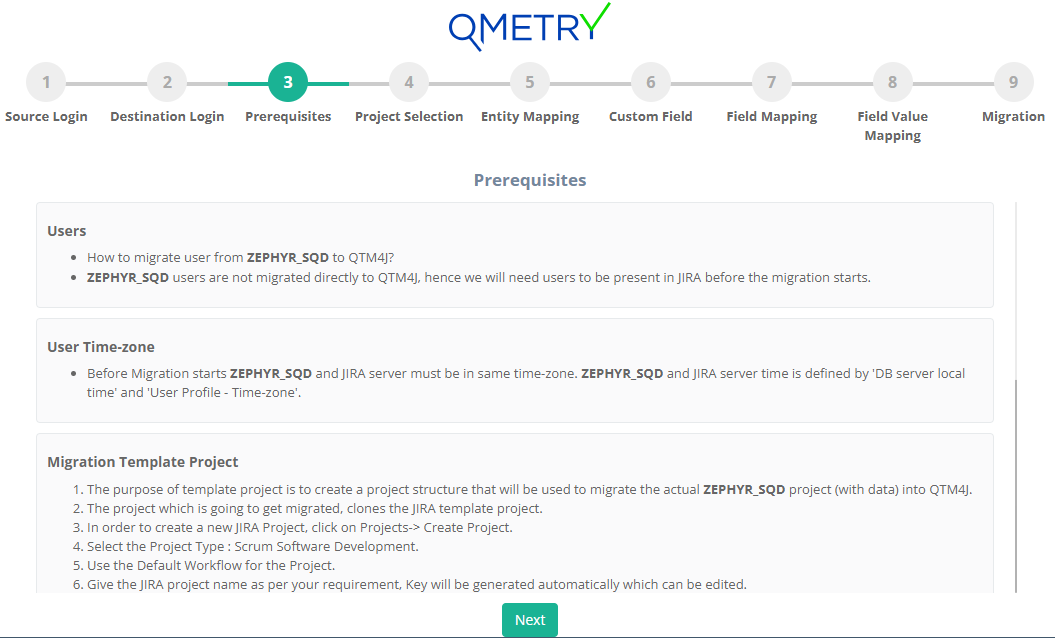
Step 3: Pre-requisites
Make sure you comply with the pre-requisite mentioned on the screen.
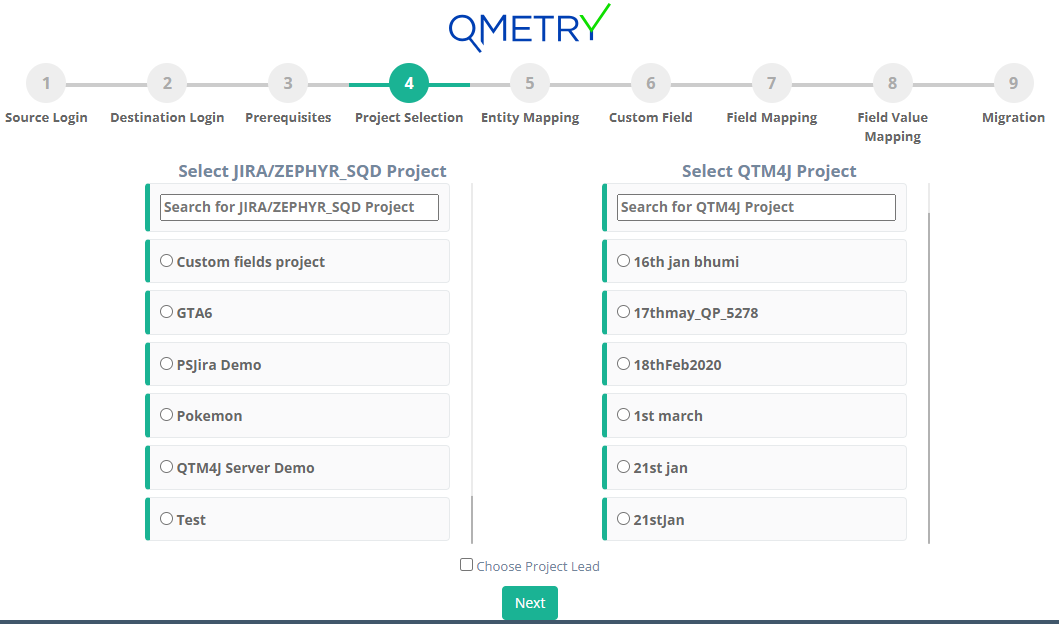
Step 4: Project Selection
Zephyr Squad project and QTM4J project:
- Zephyr Squad project: Select the Zephyr Squad project template which needs to be migrated.
- QTM4J project: Select the QTM4J project in which you would like to migrate.
- Project Lead can be chosen by selecting the ''Choose Project Lead" checkbox.
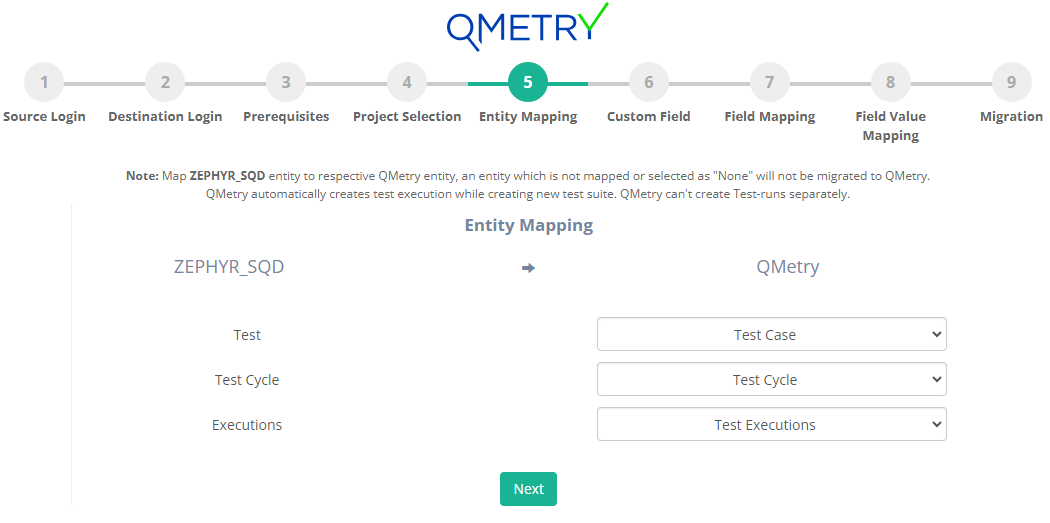
Step 5: Entity Mapping
Zephyr Squad → QTM4J Entity Mapping:
Under this section, map your Zephyr Squad assets which need to be migrated into relevant QTM4J assets.
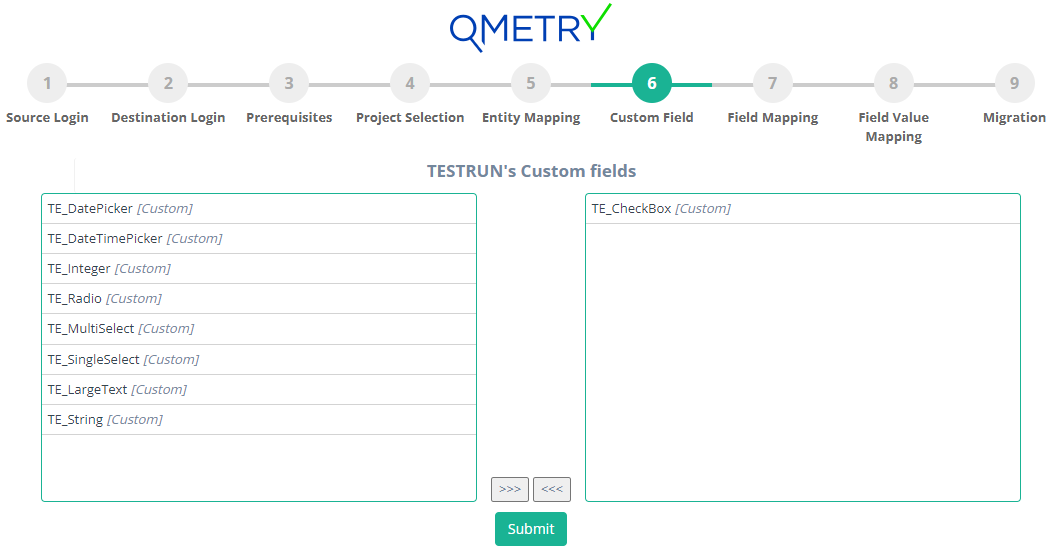
Step 6: Custom Fields
You can select system fields and user-defined fields that are part of your Zephyr Squad project that needs to be migrated to QTM4J.
Note: This is an important step to ensure there is no data loss when the project is migrated to QTM4J. Make sure all the required fields are selected correctly. Once migrated, the data cannot be reverted.
Selected fields will be converted as custom fields in QTM4J and will be auto mapped with the appropriate fields in the field mapping page.
a) Custom field for Zephyr Squad's Testcases

b) Custom field for Zephyr Squad's Test cycles

c) Custom field for Zephyr Squad's Test runs
Step 7: Field Mapping
Field mapping helps you to map the fields of your Zephyr Squad assets to respective QTM4J fields. Complete the field mapping for all the fields to get their data migrated to QTM4J.
Note: Any mandatory field of Zephyr Squad should be mapped to mandatory field of QTM4J. The field type of the mapped fields of Zephyr Squad and QTM4J should be same.
a) Field mapping for Zephyr Squad Test Case → QTM4J Test Case

b) Field mapping for Zephyr Squad Test cycle → QTM4J Test cycle

c) Field mapping for Zephyr Squad Test executions → QTM4J Test executions

Step 8: Field Value Mapping
You can map the values of your different enumerated fields of Zephyr Squad to that of QTM4J.
Migration Tool provides an option of "Add value" if user wants to create a new field value in QTM4J same as that of Zephyr Squad. To create the new values > Click on the checkbox beside the field value > Click on "Add value" button below > Now map the Zephyr Squad field values to the newly created QTM4J fields values.
Note: The Add Value option is not available for test execution status and test step execution status. For that you need to manually create the execution status in the project of QTM4J before beginning the migration process.
a) Field value mapping for Test cases

b) Field value mapping for Test Run

Step 9. Migration
Click on the Migrate Button to start the migration process.
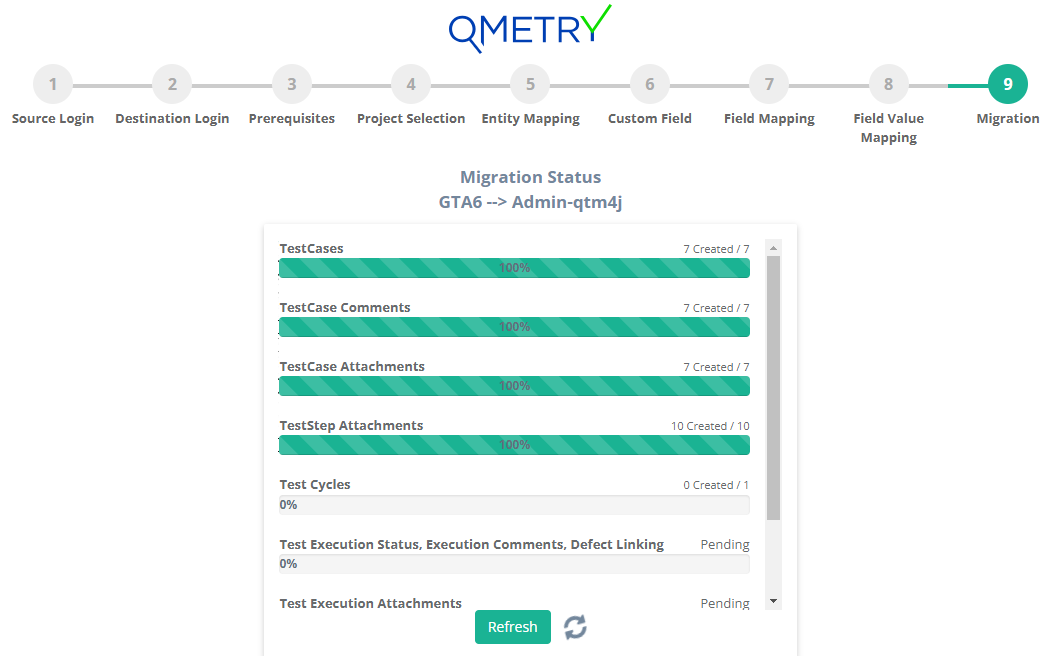
The migration progress can be monitored until it is completed.

Once the migration is completed, you can log in to QTM4J and verify all the migrated data in your migrated project(s).
Post-requisite
The migration utility is designed to support resumption of the data migration from the same point in case an error is encountered due to data issues or other reasons. In such cases re-migrating the project is not necessary. At times when you run into errors, you can try to resume the migration after capturing the logs as follows.
Capture Migration Logs
The logs should be present in the logs folder of the migration utility directory containing the .war file. Zip the logs folder and send it to Professional Services team for investigation.
Resume the Migration
The migration can be resumed by refreshing the existing page or clicking "Resume" on the migration page.
Important Notes & Limitations
- Dashboards, Reports of projects, Overview, Activities, Graphs, History logs will not be migrated.
- Attachments greater than 25 MB(for QTM4J cloud) or 10 MB(for QTM4J server) in size are not migrated. Such attachment details will be added to the 'skipped_attachments.log' file.
- QTM4J Testcase: Estimated time maximum value is 99:59 [HH:MM]; the value will be skipped for Estimated time > 99:59 [HH:MM].
- Updated on and Updated by fields in QTM4J are non-editable hence such field will not get migrated.
- For assigning users to the migrated assets:
- If the user is found in Jira, the entity assigned to him in ZS, gets assigned to that user in QTM4J.
- If the user is not found in Jira, but the selected Project Lead user is present in Jira, the assets of ZS are assigned to that user.
- If the user and Project Lead are not found in Jira, the assets are assigned to user who is conducting the migration.
- If the user is inactive in Jira then such assets will get assigned to the Project Lead.
- Customization at Teststep level is not supported in QTM4J. Hence, custom fields at Teststep level in Zephyr Squad will not get migrated.
- Comments in Testcases will have the name of the user who is conducting the migration. There is not parameter in QTM4J to add/edit user of comment.
- Zephyr Squad allows linking same testcase to a Testcycle multiple times whereas QTM4J does not allow. Hence, if the testcases are linked multiple times to a Testcycle in Zephyr Squad then it will be ignored and linked only once in QTM4J Testcycle.
- If the Sprint names are duplicated among the boards then such sprint will not get associated to the Testcase.
- For sprints linked to ZS testcase:
- If an Active sprint is linked to 'Sprint' field of ZS testcase, then that sprint will get added to 'Sprint' system field of QTM4J.
- If a closed sprint is linked to 'Sprint' field of ZS testcase, then that sprint will get added to 'Sprint' custom field of QTM4J.
- If more than one sprints are linked to a ZS testcase then the active sprint will get added to 'Sprint' system field of QTM4J and to avoid any data loss all the sprints will get added to 'Sprint' custom field of QTM4J.
- In Jira if any custom field does not contain screen of any issue type then such custom field will not get migrated for that issue type.
- Fix versions, Sprints, Issues of any type won't be migrated if Jira migration(mentioned in the pre-requisite) isn't completed for the projects containing Zephyr Squad data.
- The ZS API response to get the TestCycle fields does not give the value of the following fields: Total Executions, Total Executed and Total Defects. Hence, post migration in QTM4J also these fields have value as 0.
- The ZS API response to get the TestCycle fields does not give following fields in response total execution time, total logged time and executions not tracked. Hence, they won’t get migrate.
Need Assistance?
If you run into any questions or concerns during your migration, you can reach out to Professional Services by raising a ticket directly on our Support Portal. We would be happy to assist you!
Back to QMetry All Products Help Page