Back to QMetry All Products Help Page
How to link Issues to requirement?
You can links issues with their corresponding requirements.
Use Case: An organization is using Jira for managing defects in their system/product. The requirement itself needs to be analyzed and checked for dependencies/limitations etc. These could be filed as defects and linked with the requirement itself.
Issues can be linked to requirements through the Issues tab available on the Requirement details page and Requirement edit screen.
Steps
- Go to the Issues tab of the requirement details page or requirement edit page.
- Click on the Link button.
- It opens the Link Issues pop-up with the list of issues.
Users can apply Basic Filters as well as Advanced Filters on the Link Issues screen, which allows quick filter of test cases to link with the requirement.
Users can easily filter test cases by any system/custom fields for the ease of narrowing down the search for required issues.
Basic Filters: By default, basic filter fields are provided to filter the records.
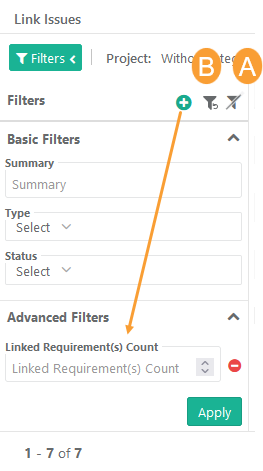
Advanced Filters: If users need more fields to filter test assets then click on the '+' icon. It opens the drop-down with a list of additional system and user-defined fields corresponding to the module.
Select the field you want to apply the filter on. The filter parameter is added as Advanced Filters. Apply filter as per your requirement.
A. Clear Filter Values
The Clear Filter Values option provides users with improved flexibility, efficiency, and usability in managing and reusing Advanced Filters for important data that may not be easily accessible by default. This option only clears out the values in the filters without removing the fields themselves. It enables users to start fresh with the same set of fields, allowing them to adjust their filter criteria without having to recreate the entire filter setup each time. It preserves empty fields in the filter just like fields with values and allows users to easily modify and refine the filter criteria without losing the content of the set fields. Here, empty fields in the filter will consider all records.
B. Reset Filters
The Reset Filters option will reset the filter to default. All the selected fields for Advanced Filter will be removed from the filter.
Selecting Issues Across Projects:
Users can link issues from other projects as well.
Project drop-down is provided to select the project. The issues for the project are displayed on the screen.
Select issues that you want to link to the requirement.
The Filters will populate only for the selected Project.
If you want to link issues from multiple projects, then first select one project. Search records and link them before moving to other projects. For example, User A is in Project 1 and searches for some records and link them before moving to Project 2. Else, all the selection of Project 1 will be wiped off.

If test cases from other project are linked, then the test cases show Entity Key of the corresponding project.
To view the issue of other projects, click on the Issue Entity Key. It opens the issue detail page in the respective project and will change your current project.
Create New Issue: The link is available when you have selected the current project on the drop-down. To create a new issue click on the Create New Issue link at the top right corner of the pop-up. It opens Issue module in a separate tab, wherein you can create more issues. Then refresh the Link Issues pop-up to view the newly created issues on the list.
Select issues you want to link and click on the Link Selected Issues.
The issue is linked to the requirement and is displayed on the Issues tab on the details page.
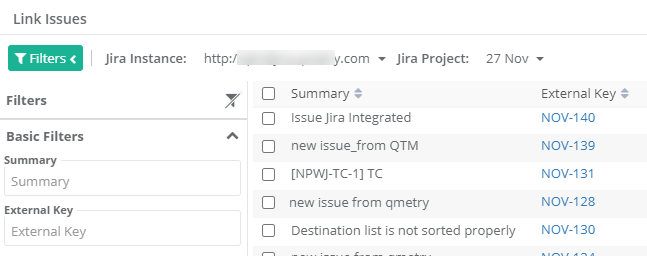
When Jira is configured with QMetry
When Jira project is configured with QMetry project, you have to select the Jira instance and its project from which you want to link Jira issues to requirements in QMetry.
You can apply Filters which allow quick filter of issues to link with the requirement.
How to Unlink Issues Linked to a Requirement?
- Go to the Issues tab of the requirement details page or requirement edit page.
- It shows a list of issues linked to the requirement.
- Select issue/s you want to unlink and click on the Unlink Selected button.
- The issue is unlinked after confirmation.
Back to QMetry All Products Help Page