Components
Introduction
Components add categorization to your test assets, categorizing them into features, screens, teams, modules and more. Components provide an easier way of grouping your test assets. Using components, you can search Test assets, generate reports, collect statistics, e.t.c.
QMetry allows you to create customized Components at the project level. A user can assign it to a Test Case, Test Cycle and Test Plan for grouping.
Permissions Required :
Jira Permissions : Browse Project permissions are required.
QMetry Permissions :
- If Enabled then below permissions are required.
- Configuration View
- Configuration Modify
Searching a Component
Consider that you need to create custom component 'logout' . So, we will be searching it using below steps:
- Navigate to QMetry > Configuration menu > Select Project.
- Click on components and type the keyword in text box at right side of the page title.
- If you will get below search result as "No Data Available" then it means component named 'logout' doesn't exist and we can proceed with component creation.
It is a good practice to search for a component before creating it. It will avoid creation of duplicate components.

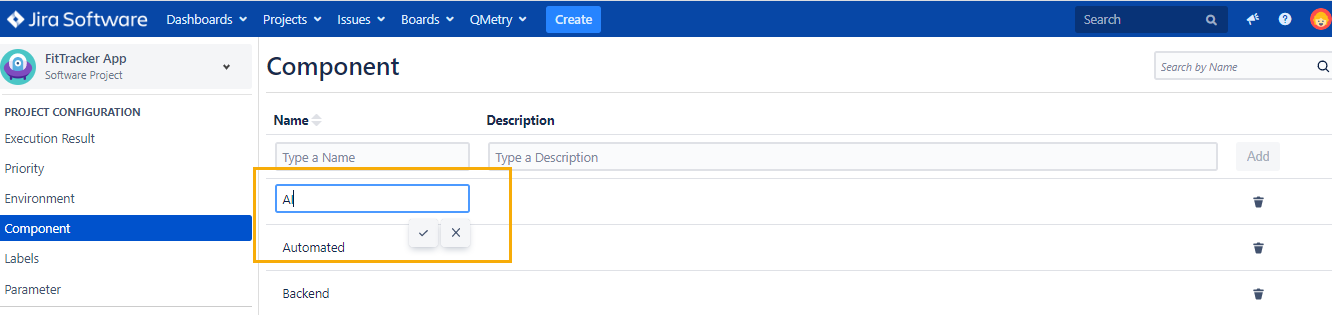
Creating a Component
'Configuration modify' access to the project is needed to create a customized component.
Example: QA manager has to create a component 'login'. Below are the steps for component creation:
1. Go to QMetry menu > Configuration > Select your Project.
2. Under Project Configuration select Components.
3. Enter a meaningful component name and its relevant description. Click Add.

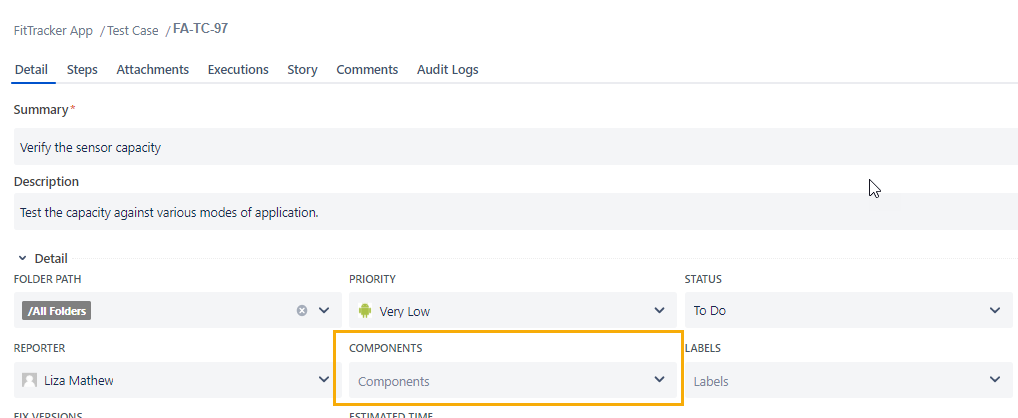
The Components are available for linking them with Test Case, Test Cycle and Test Plan.
Adding a Component
Below are the steps to link components. These are generic steps for all 3 Test assets mentioned above.
Example: Considering scenario for Test Case
- Go to QMetry menu > Test Management > Test Case tab.
- Create a new Test Case or open detail page of an existing Test Case.
- Check the Components drop-down and you will get list of all components that can be linked to the Test Case.

Editing a Component
User with 'Configuration modify' access to the project can edit a component that is already created. Below are the steps to edit a component:
- Click on the component name , and a text box appears to enter the new component name as shown in below screenshot.
- After typing the new name, click on the tick mark symbol. Also, editing description field can be done on similar lines.
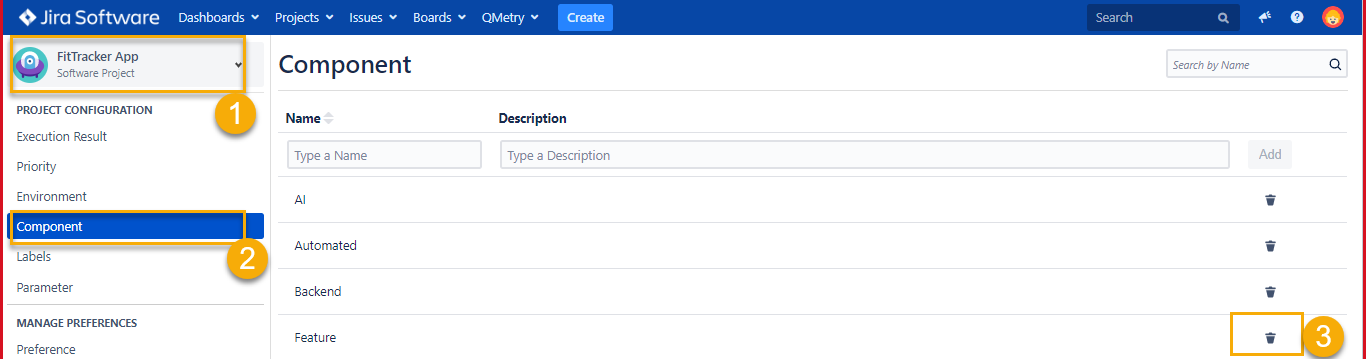
Deleting a Component
User with 'Configuration modify' access to the project can delete a component which is now not in use.
Note: A deleted component will lose all it's linkages with test assets it was previously linked with and it will also affect the reports if they were fetched based on component filter.
The Test asset's component field will appear blank once component gets deleted and linkages can't be recovered.
Below are the steps to delete Component:
1. Go to QMetry menu > Configuration > Select your Project
2. Under Project Configuration select Components. The Component list is displayed on the screen.
3. Click on the Delete icon of the Component that you want to delete.
Deleting components that are linked to any Test Asset will give below warning message:

After deletion, as shown in below screenshot, the components field becomes blank: