Back to QMetry All Products Help Page
Test Execution
Test Run Detail
The Execution screen displays Test Case records. Pagination is available when the test case count exceeds fifty. You can directly jump onto a specific page by entering the page number in the box.
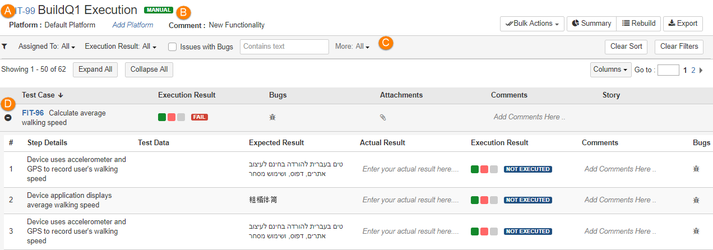
A. Platform: The value is editable. Just hover the mouse over it. You can even add new platform from the screen by clicking on the Add Platform link.
B. Comment: It is editable. Just hover the mouse over it.
C. You can filter out test case records by applying different criteria.
- Assigned To
- Execution Result
- Issues with Bugs
- Label
- Version
- Component
- Sprint
- Project
Filters will be preserved user wise. When the user opens the execution screen, they see the same filters applied on the screen.
D. Test Cases are expandable to view test step details.
The grid on the Test Run Detail screen includes the following columns:
- Test Case
- Execution Result: The field is editable and each row has all statuses on it.
- Assigned To: The tester to whom the issue has been assigned to execute. The field is editable. You can change the assignee from the screen. The user name populates as you start typing in the field.
- Defects: Click on the icon to link defects to the test scenario/test case either from the existing ones or by creating new defects and linking them directly. Read more about Log Defects.
- Attachments: Click on the icon to attach files to the test scenario/ test case. Read more about File Attachment.
- Comment: You can add or edit comments here. Read more about Comments and Actual Result.
Story
Test Scenario
- Automation Result: Click on the icon to view Automation Test Results for the test scenario/test case. Read more about Automation Details.
- Test Data, Expected Result: It displays details entered for Test Steps.
Sorting Test Cases
You can now sort test cases ascending/descending based on the Issue ID. It helps users arrange test cases in sequence for ease of operation. The sorting is not preserved for future.
Clicking on the Clear Sort button will remove the sorting and test cases will be displayed in the sequence they were executed.
More Options
The following buttons are available on the screen:
- Bulk Actions
- Summary
- Rebuild
- Export
Rebuild Test Run
Users can apply rebuild to test assets.
- Partial Rebuild: This rebuild is applied to particular test cases selected by users. It will update only selected test cases, instead of updating all the test cases within the test run.
- To rebuild test cases, click on the Bulk Actions drop-down and select Refresh Test Cases.
- Select test cases and click Apply.
- Full Rebuild: This rebuild is applied at Test Run level. All the test cases within the test run will be synced and updated to the latest ones.
Clicking on the Rebuild Test Run option, reconciles the story within the test run to bring it to its updated status. Read more about Update Test Run Snapshot.
Assign Testers
You can assign tester who will execute the test run. You can assign one tester to the entire story or different testers to different test cases under the story. Read more about Assign Testers.
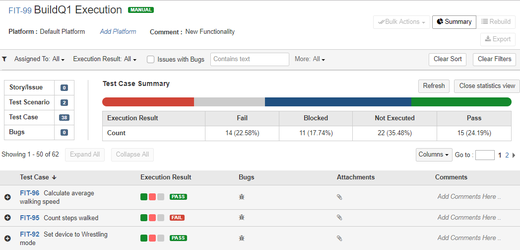
View Summary/Statistics
To view the Test Case Summary, click on the Summary button at top right corner. To close the view, click on the Close Statistics View button.
The summary shows count of Story/Issue, Test Case, Test Scenario and Bugs.
The status bar displays status wise count.
Customize Execution Screen View
Hide and Show Columns:
On the Test Run Execution screen, users can show/hide test case columns.
For example, QA Manager wants to view only selective fields for test case, for the reason, they hide column they don't want to view on the grid.
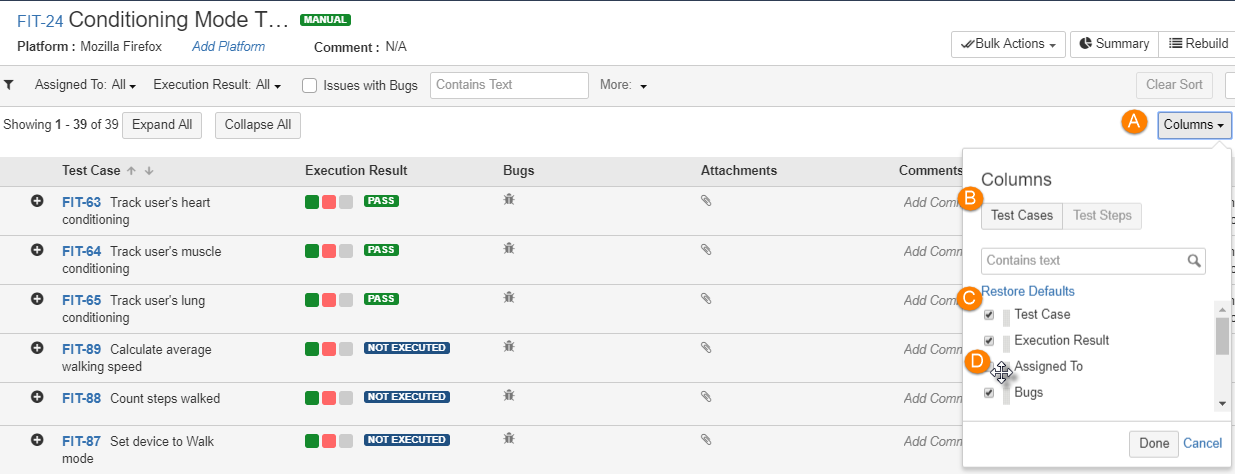
A. On the Test Run Execution screen, open the Column drop-down.
B. Select Test Cases/Test Steps the columns of which you want to hide.
C. Remove the check box selection of the column you don't want to view.
D. Drag and drop: You can also drag and drop column to rearrange them.
The columns will be displayed as per the visibility and sequence set.
View Test Step Details
Users can have a distraction-free view of test step details on the test execution screen even the test step content is lengthier. The View Details icon turns visible when the content size within the field goes beyond purview. The icon is provided with Test Summary, Test Data, Expected Result, Actual Result, and Comments fields of test step.
Click on the View Details icon for the field. It which opens a pop-up window with complete details on it.

Bulk Update
User can update test run results of multiple test scenarios, test cases and test steps in one go. Read more about Bulk Update Execution Status.
Export
Test Execution Results can be easily exported with Test Scenarios, Test Cases and Test Steps. Read more about Export.
Back to QMetry All Products Help Page