Back to QMetry All Products Help Page
QMetry and Reports Installation on Linux - 2 Tier

In this guide, we'll run you through installing the QMetry Test Management application and QMetry Reports on your environment. This installation installs QMetry over Apache Tomcat 9.x, MySQL v5.7.29 and Open JDK 11.0.11 in a docker container.
2 Tier Install
| Server 1 | QMetry App and QMetry DB |
| Server 2 | QMetry Reports |
Pre-requisites for QMetry Application
For additional information on verifying pre-requisites refer this article.
- QMetry Installation is supported only on Linux - CentOS 7 and 8, and RHEL 7 and 8. No other OS is certified for QMetry Installation.
- Two Linux Servers are required: One for QMetry Application and the other for QMetry Reporting.
- Refer QMetry Deployment Document for the hardware requirements.
- All the servers should have the support of these commands: unzip, yum and curl.
- Internet access should be enabled on both servers to install using docker.
- Firewall and selinux must be disabled on the server while installing QMetry and Reports.
- Ensure Proxy Servers are not blocking downloads from the Internet.
- Application and Report servers should be in the same network. Report Server should be able to communicate with Application Server over 80/443 and Database Server 3306/DB Port. Ports 8080 and 33061 should be enabled/open on Reports Server to allow connections from the QMetry application server.
- Docker installation requires root user access. To install using a non-root user, follow the steps specified here before starting the install on both QMetry and Report servers.
- By default, docker is managing storage under “/var/lib/” directory on the host machine. It will also ask for storage location of QMetry application’s file related data during the installation of QMetry. Hence, make sure that both directories have required disk space available as per usage requirement of QMetry application.
- Get the following files from QMetry Support : QMetryApp.zip, QMetryReport.zip & docker credentials required for installation.
- Post installation, QMetry Application and QMetry Report both should be configured either on https or http.
- If you are planning Jira integration with QMetry and Jira is running on https, make sure your QMetry is also running over https protocol. QMetry and Jira should run on the same protocol.
- Following Ports should be open:
| Installation | Ports that need to be enabled and should be available for use |
|---|---|
| QMetry Application | 80/443 & 3306 |
| QMetry Reporting Tool | 80/443, 8080 & 33061 |
Install QMetry Application
Follow the steps mentioned below.
Step 1. Copy the QMetryApp.zip installation file received from QMetry Support to your server. Navigate to the directory where this file is kept and execute the following commands.
- unzip QMetryApp.zip
Step 2. Execute the following commands.
- cd QMetryApp
- sudo su
- chmod +x qmetry.sh
- sh qmetry.sh
You will be asked for credentials. Enter docker credentials shared as a part of the installation package.
Step 3. Next, the installation process will prompt for directory path on the host machine to store QMetry application’s file related data like attachments, license, import, export files etc. You can enter any path of the host machine to store QMetry application’s file related data. If the mentioned directory does not exist on the given path, it will get created automatically during the installation process.
Options | Comments/Example |
|---|---|
| Please enter QMetry application directory | /opt/qmetryapp |
Note: It is highly recommended to take periodic backup of the directory which is specified as a location to store QMetry application’s file related data to prevent any data loss in case of any disaster.
Step 4. Once the script finishes executing, it will prompt to enter the following parameters:
| Options | Details | Default Value | Example |
|---|---|---|---|
| Enter QMetry Database Schema | QMetry Application Database schema name. | qmetry | qmetry |
| Enter QMetry Database Password (root user) | Enter QMetry Application Database Password for the root user. | - | QMetry@123 |
| Enter QMetry User (admin) Email (admin user) | Enter QMetry user email address for Admin. | - | admin@qmetry.com |
| Enter QMetry User (admin) Password | Enter QMetry user password for Admin. | - | Admin@123 |
| Enter Min. Heap Memory for the webserver | Enter Heap Memory in GB(s) | 2 | 2 |
| Enter Max. Heap Memory for the webserver | Enter Heap Memory in GB(s) | 4 | 4 |
| Enter QMetry Database Connection Pool Size | Enter Pool Size in number format | 100 | 100 |
The installation may take a while.
After successful installation of QMetry Application, you will see the message "QMetry Application Installation is complete".
Once the installation is complete, execute the following command.
- docker ps
The docker containers installed will be shown along with their container IDs and names.

Step 5. Getting your QMetry License and Installing it.
- For users evaluating QMetry
- You should have received an evaluation license valid for 30 days along with the installation.
- For users requiring a commercial license
- Server's domain name and mac address are required to generate your QMetry License. Follow the below steps to get your server mac address and send this information along with the domain name to QMetry Support to get your QMetry License generated. Send an email to qtmprofessional@qmetrysupport.atlassian.net to reach QMetry Support.
- Execute the below command to get your server's mac address. Then send the MAC address to QMetry Support to receive license file.
- ifconfig (MAC address of Ethernet card e.g. eth0/eth1 )
- Once you receive license.key from QMetry Support, you can follow the Steps to Apply License file.
- Execute the below command to get your server's mac address. Then send the MAC address to QMetry Support to receive license file.
- Server's domain name and mac address are required to generate your QMetry License. Follow the below steps to get your server mac address and send this information along with the domain name to QMetry Support to get your QMetry License generated. Send an email to qtmprofessional@qmetrysupport.atlassian.net to reach QMetry Support.
Step 6. Access QMetry application using the following address.
http://<your IP Address OR Domain Name>
Default QMetry login credentials.
- Username: admin
- Password:<user specified password in Step # 4 >
Note: With installation, MySQL 5.7.29 will be installed on port 3306. Below are the details
- Username: root
- Password: <user specified password in Step # 4 >
- Schema: <user specified Schema in Step # 4 >
Note : This installation installs QMetry over Apache Tomcat 9.x, MySQL 5.7.29 and Open JDK 11.0.11 in a docker container.
Step 7. After the above steps are completed, log into QMetry application.
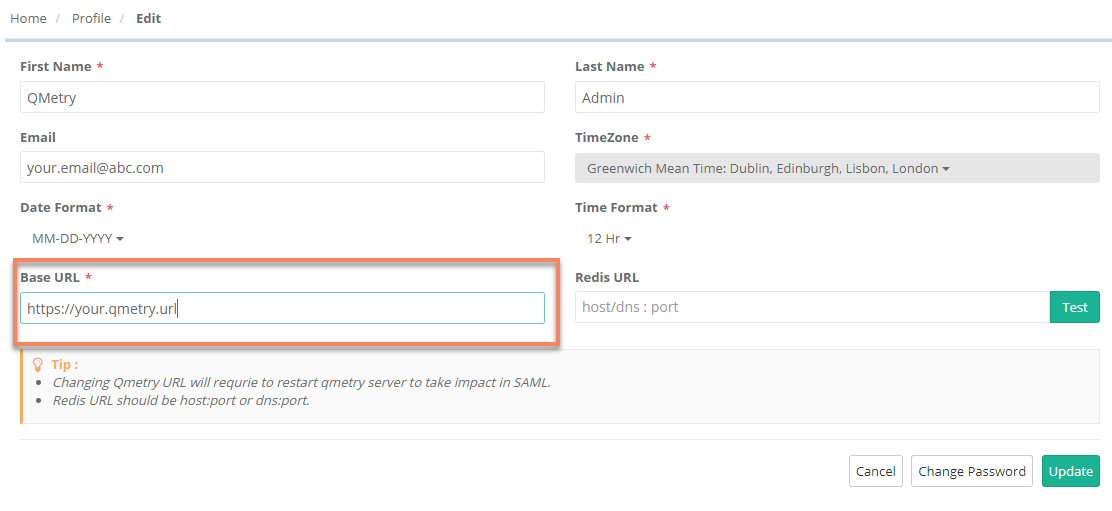
- Go to "Admin" Profile and Edit the Profile.
- Update Email of Admin in the Email field.
- Enter the Base URL as your QMetry URL.
Step 8. Additional Tomcat Configuration: QMetry is installed with a default configuration of minimum and maximum heap memory utilization. You can modify these settings depending on your hardware configuration. Refer Additional Configuration for more details.
Install QMetry Report
If you have purchased Advanced Reporting then you will need a separate server for QMetry Reporting.
Follow the steps mentioned below.
Step 1. Connect to Report Server and Download the file.
Upload the QMetryReport.zip to the /opt directory of the Report server and unzip it
- sudo su -
- cd /opt
- unzip QMetryReport.zip
- cd QMetryReport/
Step 2. Run the reports installer file
- chmod +x qmetry.sh
- sh qmetry.sh
You will be asked for credentials. Enter docker credentials shared as a part of the installation package.
Step 3. Once the installation initiates, it will prompt to enter the following parameters:
| Options | Details | Default Value | Example |
|---|---|---|---|
| Enter Report Database Password (root user) | Enter password for QMetry Reports Database. | - | QMetryreports@!Nf0# |
| Enter Report Database Schema | Enter Database schema name for QMetry Reports Database. | qtmanalytics | qtmanalytics |
| Enter Number of CPU's to allocate | Allocate 3/4th of the available CPUs. For example, if CPU has 8 cores, enter 6 To check total CPUs, run the command : lscpu | 4 | 6 |
| Enter Memory to allocate in GB(s) | Entered memory would be used by the sync job while running full sync of data. Enter 3/4th of total memory available on the server. For example, if the memory on the server is 24 GB, enter 18 | 4 | 18 |
Wait for the script file to finish executing.
Once the script finishes executing it will prompt to enter the following parameters.
| Options | Details | Example |
|---|---|---|
Enter Mysql Database Host IP / DNS Name (Qmetry) | Enter Database Host Public IP/DNS of QMetry application. | 10.10.11.100 |
Enter Mysql Database Port (Qmetry) | Enter Database Port of QMetry application. If it is unchanged, use "3306" as Database port. | 3306 |
Enter Mysql Database Schema (Qmetry) | Enter Database schema name of QMetry application. | qmetry |
Enter Mysql Database Username (Qmetry) | Enter Database username of QMetry application. If it is unchanged, use "root" as username. | root |
Enter Mysql Database Password (Qmetry) | Enter Database password of QMetry application. | QMetry@123 |
Enter Mysql Database Host IP / DNS Name (Reports) | Enter Database Host Public IP/DNS of QMetry Report. If it is unchanged, enter 'qmetry-reports-db' as Database Host. | qmetry-reports-db |
Enter Mysql Database Port (Reports) | Enter Database Port of QMetry Report Database. If it is unchanged, enter "3306" as Database Port. | 3306 |
Enter Mysql Database Schema (Reports) | Enter Database schema name of QMetry Reports Database. | qtmanalytics |
Enter Mysql Database Username (Reports) | Enter Database username of QMetry Reports Database. If it is unchanged, use "root" as username. | root |
Enter Mysql Database Password (Reports) | Enter Database password of QMetry Reports Database. | QMetryreports@!Nf0# |
Enter Port To Start SyncJob (Reports) | Reports Sync Job runs from this port - 8080 | 8080 |
Do you want to Run Force Sync Now? (y/n) | Enter y to sync all the QMetry data to Reports Database with the current script. → Always enter y at the time of fresh reports install | y |
Enter Memory to allocate in GB(s) to Spark | Entered memory would be used by the sync job while running full sync of data. Enter 3/4th of total memory available on the server. For example, if the memory on the server is 24 GB, enter 18 | 18 |
After successful installation of QMetry Report, you will see the message "QMetry Report Installation is complete".
Note: In cases when you need to force sync to re-sync any missing data, just repeat step 3, and skip all parameter details (by hitting enter) and just enter y when prompted for force sync.
Wait for about 2 minutes - docker ps command should give output as follows:

Step 4. Restart Reports Services
- docker restart qmetry-reports-db qmetry-reports
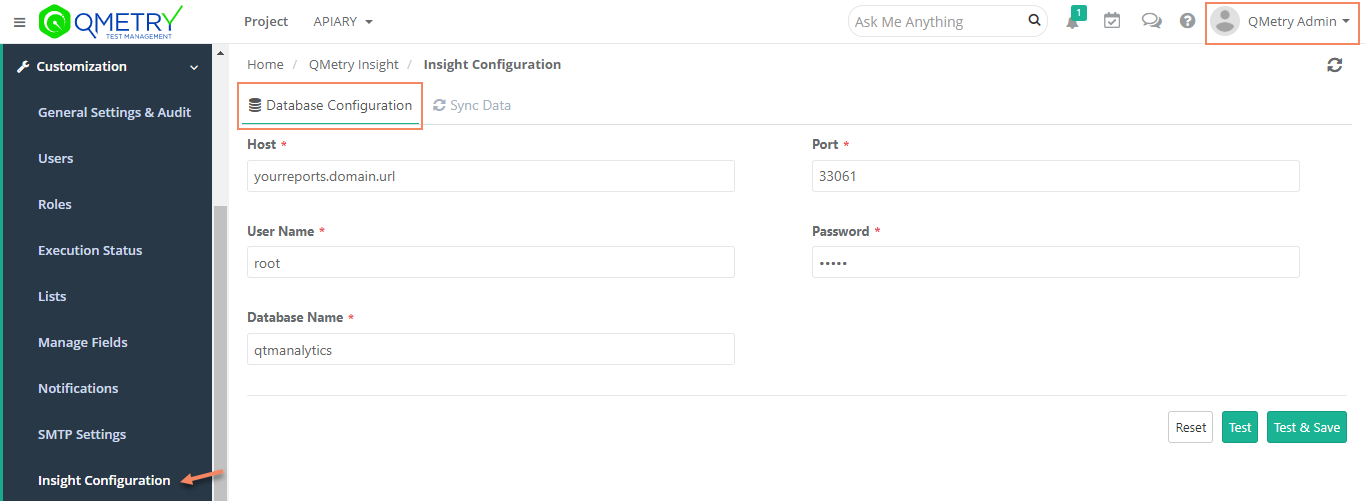
Step 5. Login to QMetry with 'admin' user login, and configure the reports server URL in the configuration menu
Go to QMetry > Customization > Insight Configuration
- Under Database Configuration tab
- Enter Host: Reports Server Host Public IP/DNS
- Enter Port: 33061
- Enter Username: root
- Enter Password :<user specified password in Step#3>
Enter Database Name: <user specified Database name in Step#3>
Click Test to ensure successful connection and then hit "Test & Save".
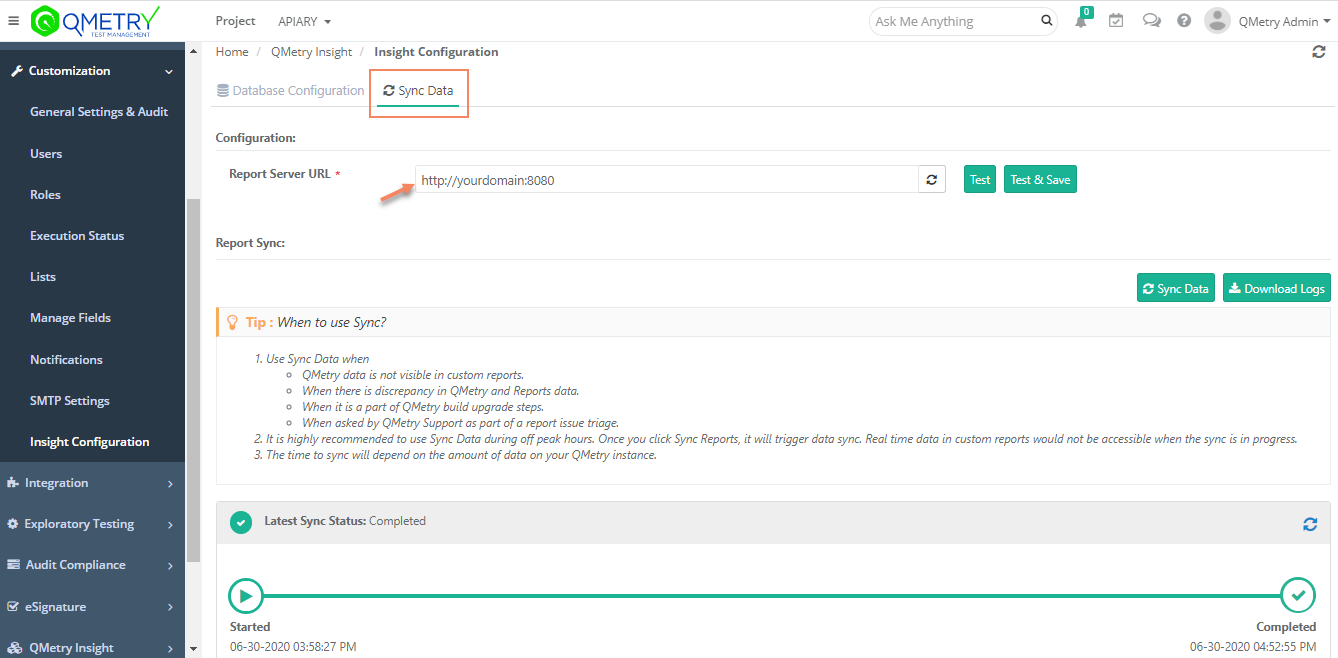
- Under Sync Data tab, setup the Report Data Sync from your reports server to QMetry Reporting.
- Report Server URL : This should be set to your report server domain URL followed by port 8080 as shown below. Ensure port 8080 is open on the reports server.
- Click on Test to ensure successful connection and then hit "Test & Save".
- Hit "Sync Data" to start Reports Data Sync.
Note : "Sync Data" is required the first time after reports installation. Time taken to sync depends on the amount of data in QMetry. Sync Progress and Status can be monitored as shown in the below screenshot. QMetry custom reports remain inaccessible during sync and It is recommended to be run only during off-peak hours.
Users can start using QMetry Reports when the sync is completed. QMetry remains available during this time.
Install Redis Caching Server
QMetry is providing the capability of installing the Redis server. Overall performance and scalability can be improved using Redis caching. To install the Redis Server, refer to Installing Redis Caching Server.
If you are facing any issues during the installation process, kindly generate a support ticket on Support Portal for assistance.
Back to QMetry All Products Help Page