Back to QMetry All Products Help Page
QMetry Reports Upgrade

QMetry v8.6 introduces a brand new reporting module. In this guide we will run you through upgrading QMetry Test Management Reports in your environment. These steps are to be followed on your QMetry Reports server hosted on the linux machine.
Pre-requisites
- Proceed with this upgrade only if your existing QMetry is above 8.6
- As a part of this upgrade - which introduces reports sync via QMetry UI, it is required to open port 8080 on the reports server to accommodate the changes as per upgrade steps 8, 9 and 10.
Upgrade Steps
Step 1: Download Required Files
Please write to QMetry Support by sending an Email at qtmprofessional@qmetrysupport.atlassian.net, to get the latest version of QMetry reports.
Download the QMetryReports8633.zip file on your report server's /opt directory once you receive the report upgrade package.
Step 2. Check the running containers using the following command
- sudo su -
- docker ps
.png?version=1&modificationDate=1593673130033&cacheVersion=1&api=v2&width=1000&height=94)
If they are not seen running start them using command : docker start qmetry-reports-db qmetry-reports
Step 3. Remove the older QMetry Reports zip and unzipped folders from the docker's /opt directory.
- docker exec -it qmetry-reports bash
- cd /opt
- rm -rf QMetryReports8631.zip QMetryReports8631
- exit
Step 4. Copy the QMetryReports8633.zip into the docker container from server's /opt directory using the following commands and get into the container.
- cd /opt
- docker cp QMetryReports8633.zip qmetry-reports:/opt
- docker exec -it qmetry-reports bash
Step 5. Unzip the new reports upgrade zip QMetryReports8633.zip copied under docker's /opt directory and go to the unzipped folder.
- cd /opt
- unzip QMetryReports8633.zip
- cd QMetryReports8633
Step 6. Execute the Report Upgrade .jar file
- java -jar LiveReportUpgrade.jar
Step 7. Upon executing the LiveReportUpgrade.jar with above commands, you will be asked below questions:
| Do you want to upgrade QMetry Reports (Y/N) | type - Y |
| Enter QMetry Reports Installation Path | type - /opt |
- Wait for the .jar to finish executing.
- Type exit to exit the docker.
Step 8. Update Port from 8000 to 8080 (Post Upgrade Step)
- cd /var/lib/docker/volumes/spark_report_spark-apps/_data
- sh ConfigureSyncApp.sh
- You will be prompted for several options.
- Hit `enter` repeatedly to skip all those and wait for the below options:
- When prompted : Enter Port to Start SyncJob (Reports) - type 8080
- When prompted : Do you want to Run Force Sync Now ? (y/n) - type n
- Hit `enter` repeatedly to skip all those and wait for the below options:
- Wait for the script to finish executing.
Step 9 - Restart Reports Services
- docker restart qmetry-reports-db qmetry-reports
Step 10. Configure Force Sync of Reports and Trigger a Sync (Post Upgrade Step)
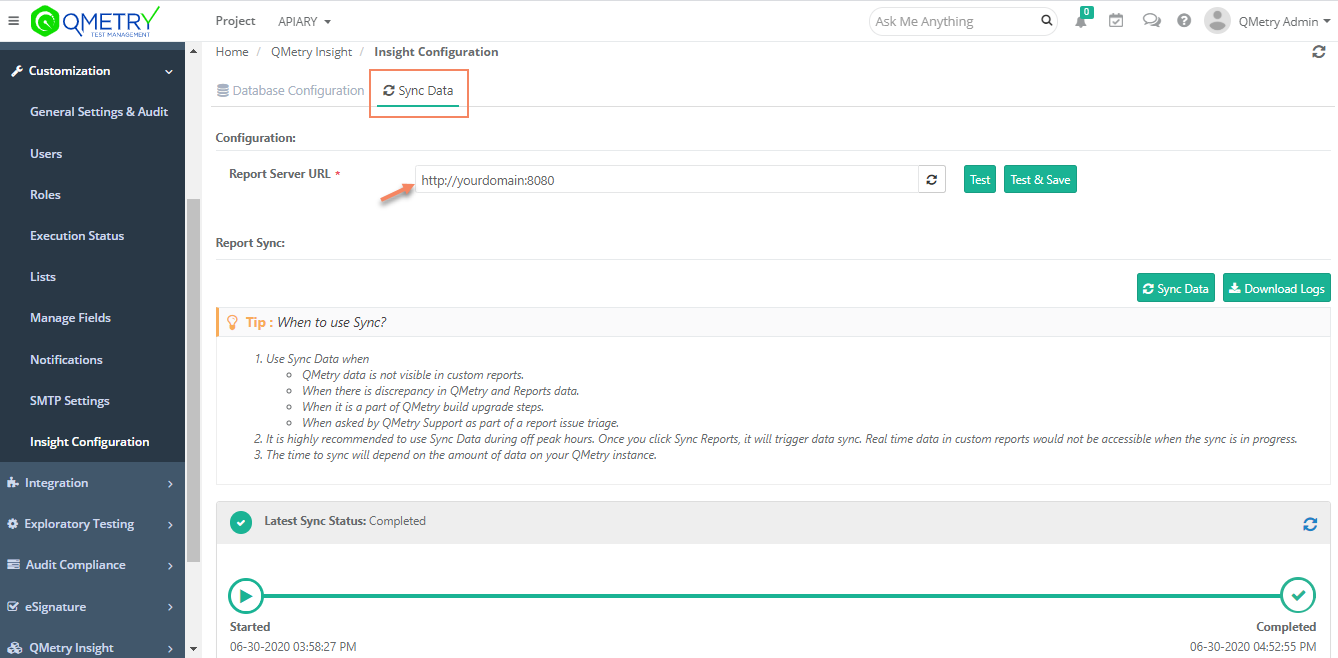
- Under Sync Data tab, setup the Report Data Sync from your reports server to QMetry Reporting.
- Report Server URL : This should be set to your report server domain URL followed by port 8080 as shown below. Ensure port 8080 is open on the reports server.
- Click on Test to ensure successful connection and then hit "Test & Save".
- Hit "Sync Data" to start Reports Data Sync.
Note : "Sync Data" should be run after the upgrade. Time taken to sync depends on amount of data in QMetry. Sync Progress and Status can be monitored as shown in the below screenshot. QMetry custom reports remain inaccessible during a sync in progress and is recommended to be run only during off-peak hours.
Users can start using QMetry Reports when the sync is completed.
Depending on your data this process can take ~1 hour. Users can continue to use QMetry during this time.
If you are facing any issues during the upgrade process, write us at qtmprofessional@qmetrysupport.atlassian.net. This will automatically open a ticket with our support team and help you to follow the progress.
Back to QMetry All Products Help Page