Back to QMetry All Products Help Page
QMetry Upgrade Document (without Docker)

Steps to upgrade existing QMetry to latest version
Below are the steps to be followed to upgrade your existing QMetry installation :
Step 1 : Download Required Files
Please write to QMetry Support by sending an Email at qtmprofessional@qmetrysupport.atlassian.net, to get the latest version of QMetry installer.
Once you receive the installer package in zip, unzip it under home directory separate from your current installation e.g /home/qmetry/QMetry84x/
Step 2 : IMPORTANT : Backup your existing QMetry Database
Take the backup of your existing “qmetry” database. You can replace username, password, location of backup file as per your configuration.
Backup in MySQL Enterprise: sudo /opt/mysql/meb-3.12/bin/mysqlbackup --port=3306 --protocol=tcp --user=root --password=qmetry --incremental-base=history:last_backup --with-timestamp --backup-dir=[BACKUP_DIR] backup-and-apply-log > /root/mysqlerror.txt
(NOTE : Set [BACKUP_DIR] as per the appropriate path)Backup in MySQL Community: sudo mysqldump -uroot -pqmetry --triggers --routines --hex-blob --single-transaction --lock-tables --no-create-db qmetry > /opt/qmetry_backup_<date>.sql
Verify that your database has been backed up properly and is available for later use at /opt directory.
Step 3 : Stop tomcat services
Go to .../QMetry/bin and stop the existing tomcat services using below commands:
- cd /home/qmetry/QMetry/bin
- ./shutdown.sh
- Note : Wait for about 15 seconds and then run command : ps aux | grep tomcat , if any tomcat process is seen running, identify the process ID and kill the process with command : kill -9 <processID>, run the command ps aux | grep tomcat again to ensure no tomcat process is found running.
Step 4 : Run the QMetry Upgrade Utility
Extract the ZIP file in the directory along-side ../QMetry install folder but in a separate directory from your existing QMetry installation. unzipped e.g /home/qmetry/QMetry84x/.
Post upgrade, your current existing tomcat installed path (e.g /home/qmetry/QMetry) remains unchanged.
Open the command prompt:
Give permission to qmetry.sh file through the following command: replace x with version number
cd /home/qmetry/QMetry84x/
sudo chmod +x qmetry.sh
Enter the following command and then pass the parameters mentioned.
sudo ./qmetry.sh
Utility will confirm if you want to upgrade, type Yes, and then specify the path of existing QMetry installation.
Wait for the process to complete.Options Type Default Value Comments/ Example Do you want to upgrade the Existing version of QMetry? Mandatory [No]
type - yes
Specify path of existing version of QMetry
Mandatory - e.g - /home/qmetry/QMetry/
Step 4 : Additional Tomcat and MySQL Configuration (Mandatory)
QMetry is installed with a default configuration of minimum and maximum heap memory utilization. You should modify these settings depending on your hardware configuration. Refer Additional Configuration for more details.
Step 5 : Restart Services
- Stop MySQL : sudo service mysql stop
- Start MySQL : sudo service mysql start
- Go to QMetry bin directory: cd /home/qmetry/QMetry/bin
- Restart Services in below sequence:
- Stop Tomcat : sudo ./shutdown.sh
- Start Tomcat : sudo ./startup.sh
- Restart Services in below sequence:
- Note : In case you have configured Redis Caching for QMetry installed on same server OR a separate server - connect to that server and run the below commands :
- To view existing containers : docker ps
- Replace the container name seen in above command : docker exec -it container-name redis-cli FLUSHALL
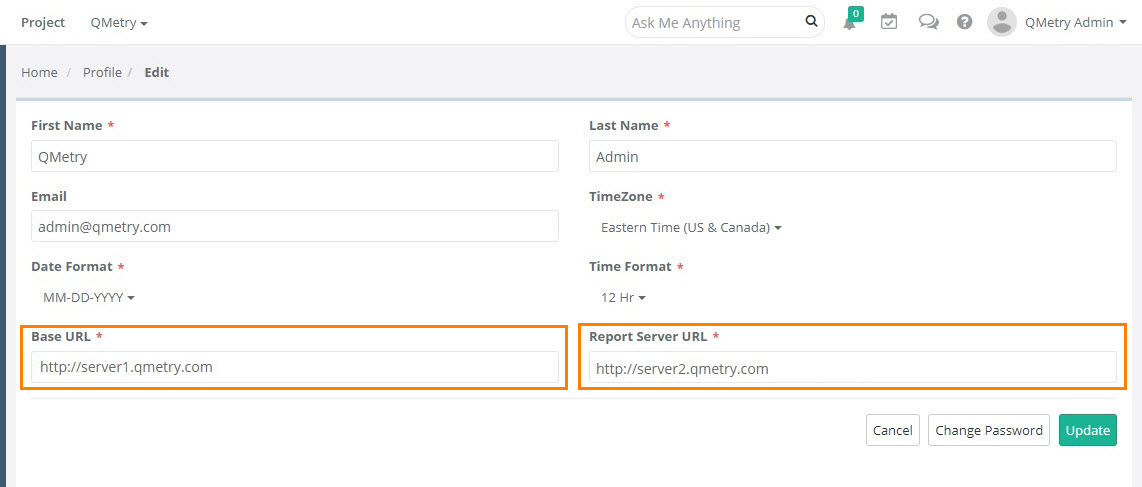
Step 6 : Set up report configuration
At this point you should be able to login to the QMetry application. Verify your data. You should be on the latest version of QMetry.
If you have already set up the QMetry reporting server, the following settings are required to be done once.
- Login using "Admin" User >> Go to Profile and Edit the Profile.
- Update QMetry Base URL and Report Server URL
Step 7 : Installing / Upgrading Jira add-on for Integration of QMetry and Jira.
Note: It is important to have correct version of Jira add-on installed in Jira based on your upgraded and current QMetry version. Refer below table for the right version of "Jira Integration - QMetry Enterprise".
| QMetry Version | Jira-addon version required |
|---|---|
| Below v8.5.2.6 | 1.6.8 |
| Above 8.5.2.6 and below 8.5.3 | 1.7.0 or above |
| On v8.5.3 and below 8.5.4 | 2.0.0 |
| On v8.5.4 | 2.0.1 |
If you are having any issues during the upgrade process, write us at qtmprofessional@qmetrysupport.atlassian.net. This will automatically open a ticket with our support team and help you follow the progress.
Back to QMetry All Products Help Page