Test Suites Module
Introduction
A test suite contains a set of the test cases organized in a specific order to be executed. It is usually created to test a complete end to end test case scenario. A test suite may also be created to test a complete set of test cases by type like a BVT, smoke test, regression, etc.
In QMetry, test suites are part of a specific cycle; however, you can copy test suites from one cycle to the next. This allows QA groups to plan out testing for a specific development cycle. Test Suites are executed against a platform which provides any needed environmental or configuration information. This is to help QA understand not just what functions were tested, but against what hardware and/or software it was tested.
Test Suites Module UI
The Test Suite module screen has the following UI.
Manage Grid Columns
All grids within Requirements, Test Cases, Test Suites, and Issues module have Arrange Columns option that allows users to create a customized view of their test assets.
The view is saved for future use.
The following customization can be applied:
- Show More Columns: The ability to add columns in view. If there are other columns that you think important to display on the module grid apart from the default view, then you can just select those columns to add them to the view.
- Hide Columns: The ability to remove a column from view. If you do not want to include columns of less important on the module grid view, then remove column selection to hide those columns on the view.
- Re-arrange: The ability to arrange the columns in a different order through drag and drop functionality.
You can search for a specific column through the search box.
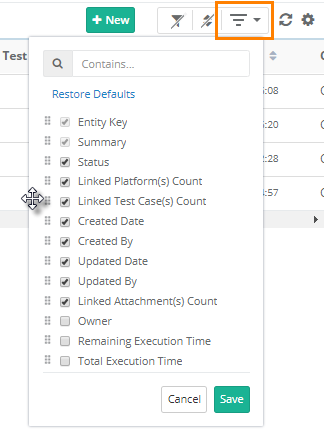
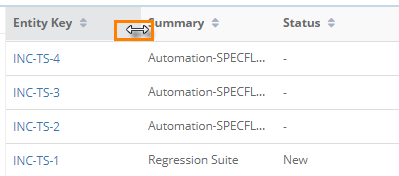
- Resize Columns: The ability to expand and reduce column width. If you want to display the full content of the column, then you may want to change the column width. To change the width of one column, just place cursor in between the columns and drag the boundary on the right side of the column heading until the column gains the width that you want.
Test Suite Detail Page
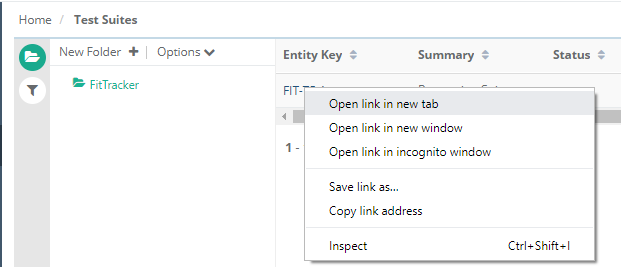
Just click on the Test Suite Key in the grid view to open the test suite detail page on the same page.
To open the test suite detail page in new tab/window, right click on the Test Suite Key in grid view. Opening requirements in different tab/browser makes comparison between test suites easier. It also provides quick reference while working on multiple assets.
The detail page is redesigned that allows one click access to different sections using organizable tabs.
Organize Tabs
The detail page of QMetry assets has different tabs on it as described above. Users can customize the view of detail page by changing the order of tabs. The tab order is preserved per user.
For example, the tab order of Test Suites module is changed by user "A" for project "PRO1". Now "A" is switching to another project "PRO2". The tabs can be seen in the same order as in project "PRO1"
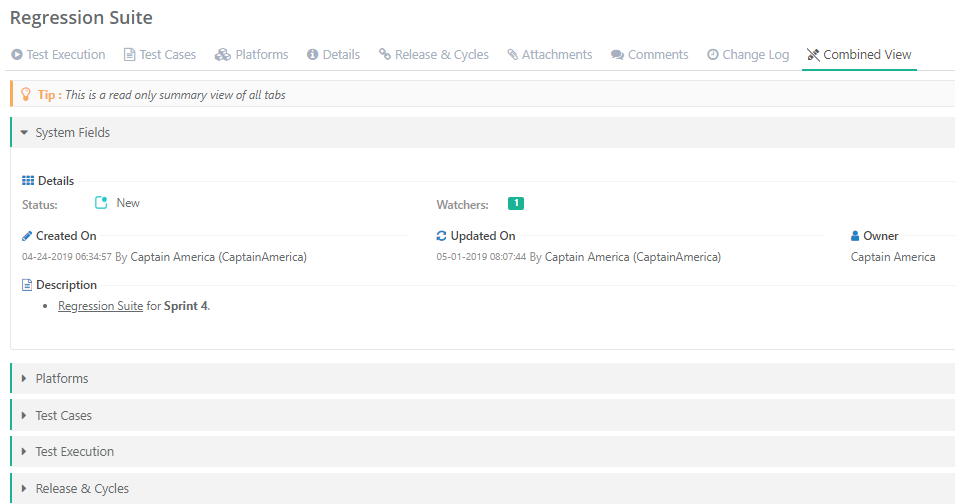
Combined View vs. Grouped View
A. Individual Section Tabs
B. Combined View (Read Only View)
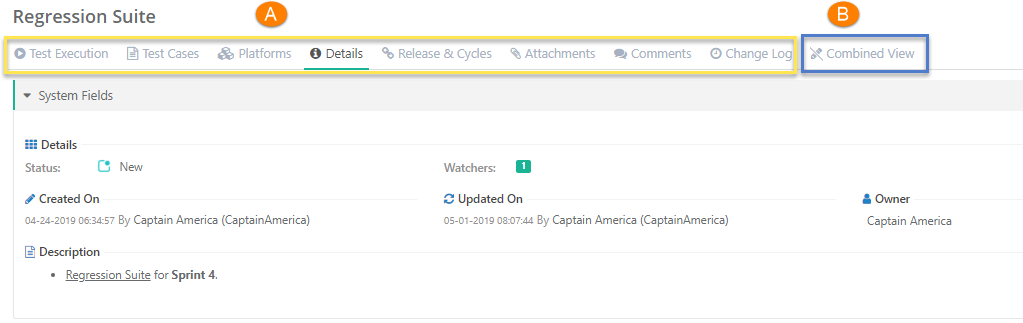
A. Individual Section Tabs
For Test Suite: There are individual tabs for Test Executions, Test Cases, Platforms, Details, Release & Cycles, Attachments, Comments, Change Log
Each tab displays relevant details. The details are editable.

B. Combined View (Read Only View)
The tab renders the old view of details page. You can view the details of all the section on a single page. The details displayed on the page are read-only and it can not be edited.
The Previous and Next buttons on the detail page are added for ease of navigation and updation of test suites.
Filter Test Suites
Users can easily filter test assets by any system/custom fields on all module grids. It also helps users in carrying out bulk operations. Filters placed horizontally above the grid earlier, are now placed on the tree panel at left.
Testers can view details grid aligned with folder tree even when they are clicking a folder which is at the bottom. It displays top of the screen instead of bottom of the screen.
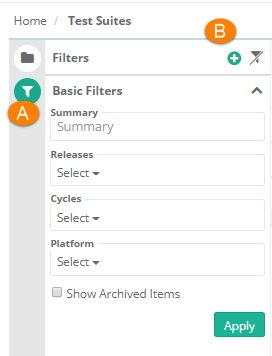
Apply Filter
Users can apply basic as well as advanced filters to the records.
- Basic Filters: By default, basic filter fields are provided to filter the records.
- Advanced Filters: If users need more fields to filter test assets then click on the '+' icon. It opens the drop-down with a list of additional system and user defined fields corresponding the module.
Select the field you want to apply filter on. The filter parameter is added as Advanced Filters. Apply filter as per your requirement.
User can click on the '+' icon and select the field Entity Key to search test suites using comma separated entity IDs (i.e without specifying the complete Entity Key as described below)
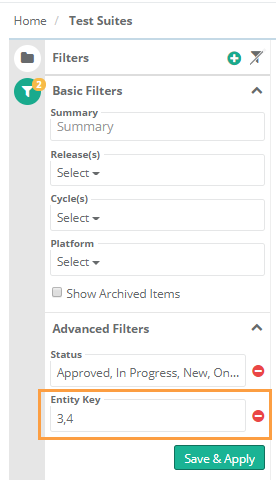
For example,
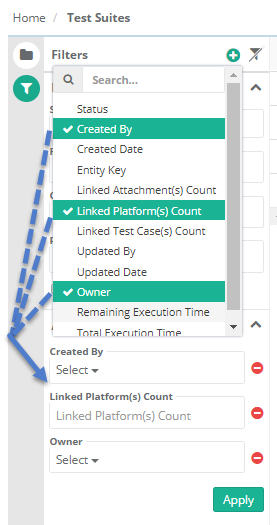
Users want to filter test assets on Created By, Linked Platform(s) Count, and Owner, then click on the '+' icon and select the fields on the drop-down list as shown below.
Clear Filter and Sorting
Users can clear the applied filter and sorting to the records.
A. Clear Filter: Click on the Clear Filters button above the module grid or left pane. It will reset the view to default.
B. Clear Sorting: Click on the Clear Sorting button above the module grid.

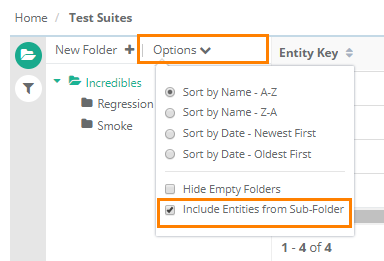
Choose to include/exclude Test Suites from Sub Folders at Parent Folder
Users can opt to include or exclude test assets from sub folders at parent folder. By default, Include Entities from Sub-folder remains selected, and entities from sub-folders are displayed at parent folder level on the module list view.
To hide the entities from sub-folder, open the Options drop-down on the test asset tree at left, and select deselect Include Entities from Sub-Folder.
Navigation
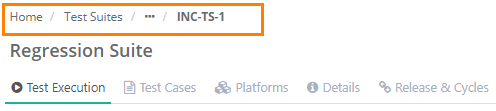
Once you are on the test suite details page, you can go back to the main screen of test suites by clicking on the breadcrumbs.
The Test Suite module main screen displays test suites in the Project as per folder selection. You can apply filter to the columns as mentioned above. Multiple columns can be filtered at once to help users find the required test suites.
Managing Test Suite Folders
User can categorize different test suites and add different folders to manage all of them. Each test suite goes into relevant test suite folder.
Folders are added for grouping test suites with some common attributes. Users can use folders to perform operations on related test suite(s) like cut & paste, copy & paste, editing, deleting, etc. It also helps users to manage and arrange execution of all test suites based on specific feature/needs. The purpose to add separate folder is to add test suites of similar category to its respective folder so that testers can manage them easily. You can add a new folder to the root itself or as a child of other folder.
The default attributes set for a folder by default applies to all the test suites within that particular folder. Users can also add test suite(s) under root folder.
Adding a Test Suite Folder
On the Test Suite tree, click on the New Folder button to add a new folder.
Enter Folder Name and click Create.
The new folder is reflected on the tree.
Note: The following permissions related to the Requirement module are set from Administration > Roles for individual roles. Make sure you have relevant rights to carry out the operation.
Editing a Test Suite Folder
Select the folder on tree and click on the Edit icon on the toolbar.
The folder detail screen opens in editable mode.
Deleting a Test Suite Folder
Select the folder on tree and click on the Delete icon on the toolbar.
On deleting a folder, all the sub folders and entities within the folder will be deleted. Root folder cannot be deleted.
Managing Test Suites
A test suite is a collection of planned test cases which the users need to execute within different environment. The test strategy is defined before initiating test execution. Execution statuses are captured during this process and all defects are logged during the execution.
Adding a Test Suite
Open the Test Suite module.
Click on the New button on the toolbar.
The pop-up shows two options on it: Create Test Suite and Create Folder.

The Create screen opens for test suite.
Enter the following fields to add a test suite:
- Summary
- Owner
- Status
- Associated Releases: While adding a test suite, select the release and cycle for which the test suite is being added. The list of releases appears as per the releases added on the project details page (Projects > Project / Release / Cycle). Select the release under which you want to cover the test suite.
- Associated Cycles: Consequently, the cycle list is prompted for the selected release.
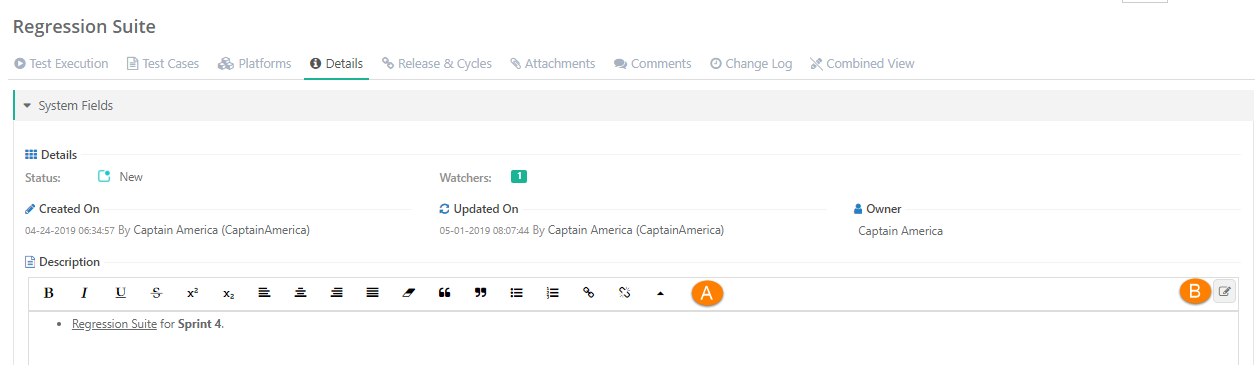
- Description: Enter description for the test suite. Description can be added either Plain Text or Rich Text.
Rich Text:
A. Use of Rich Text Editor allows users to apply text formatting for Description and reduces chances of missing important details.
B. Users can paste the html/xml content into the Source editor of the "Large Text" field type and it auto-renders the code to show the text outputs on the screen.
Use Case: An organization is using Rich text for Description field, in which they copy-paste the content from their source in html/xml format.
Click on the Edit icon at right to open the source editor.
Note: To enable rich text editor, the Enable Rich Text parameter should be enabled for the Project (Projects > Project / Release / Cycle). Refer to Enable Rich Text Editor for more details.
- User Defined Fields: If UDFs are added for the test case module, then they are displayed on the Create Test Suite screen and Test Suite Details screen.
Enable Rich Text and Source Code Editor: Refer to the Description field above.
Automation Testing
For Automation Testing, refer to QMetry Automation Agent.
Linking Platforms with Test Suite
Users can link Platforms with test suites to execute test runs. One default platform “No Platform” is provided to link with new test suite. Users can add more platforms from Projects > Platforms.
1. Go to the Platforms section on the Test Suite creation page.
2. Click on the Link button.

3. The Link Platforms pop-up opens with the list of Platforms on it. "No Platform" is available by default.

4. Select single or multiple Platforms to link with the test suite.
a) Add New Platform: If you want to add more platforms , then just click on the Create New Platform link on the screen. It opens the Platforms screen of Projects > Platforms in a separate tab, wherein you can add new Platforms. Read Creating New Platforms. Once you are done adding platforms, reload the Link Platforms screen. The new platforms are added to the list. Select the required ones.
5. Click on the Link Selected Platforms button.
The selected platforms are linked to the test suite.
Now check the Test Execution tab on the test suite detail page.
It will display the test suite to which you recently linked platforms.
If you try to save a test suite without linking a Platform to it, then the confirmation message shows up.
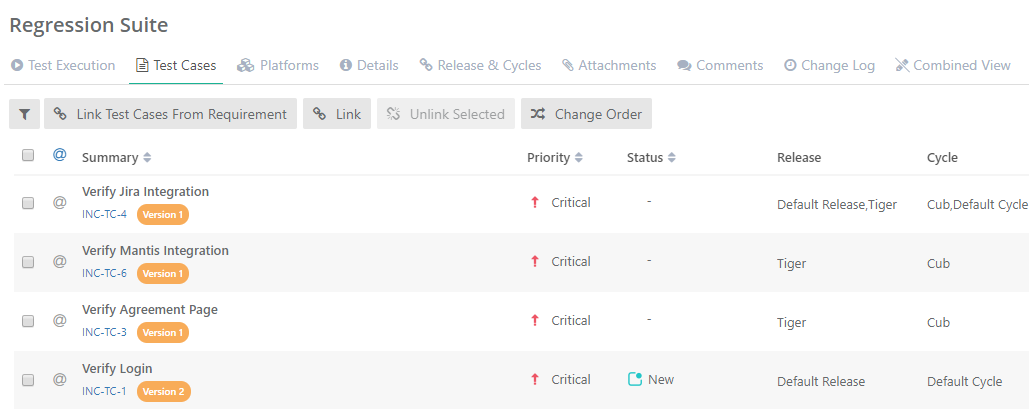
Linking Test Cases with Test Suite
There are 2 ways to link test cases with Test suite. Linking can be done while adding or editing a test suite.
- Link Test Cases from Requirement (a complete Requirement Coverage, Saves time, Reduces manual efforts, Reduce risk of missing a test case)
- Link Test Cases
Link Test Cases from Requirement
Link Test Cases from Requirement automatically links test cases that are linked to requirement, instead of selecting the test cases individually.
The benefit of linking test cases from requirement is that it provides a complete Requirement coverage. QA team can observe the traceability of requirements - from creation through execution in the testing cycle. Test Cases from Requirements of different projects can be linked. Read more under the Link Test Cases section.
Example:
There is a requirement “Login”. The requirement is associated with the following test cases corresponding to it:
- Verify valid Username.
- Verify valid Password.
These two test cases are associated with a test suite “Login Verification”. Now the test suite “Login Verification” is executed and respective execution statuses are recorded for test cases. The entire flow enables you to view the traceability of the requirement “Login”.
Link Test Cases from Requirement reduces lot of manual efforts and saves time. This also reduces the chances of skipping the test cases which were planned to be executed for testing the requirement.
Steps
- Click on Link Test Cases from Requirement button.
- A pop-up window with list of Requirements opens. The window displays only those requirements which have test cases associated with them.
- Filter the requirements based on your scope of testing. Use filter option based on Summary, Version Id, Priority, Labels, Releases, Cycles, Created By, and Folder path.
- Select the requirements.
- Click on the Link Selected Requirement button.
- Test Cases associated with the selected requirements will be linked to the test suite.
Link Test Cases
Use Case: Link Test Cases allows you to link ad-hoc or additional test cases to a test suite that were not planned/associated to a Requirement. Organizations that manage their test cases only in QMetry and do not use QMetry as requirement repository, should use the Link option to link test cases to test suites.
Steps
- Go to the Test Cases section on the Create Test Suite screen.
- To view the list of test cases that is available to link, click on the Link button.
- The Link Test Cases screen opens.
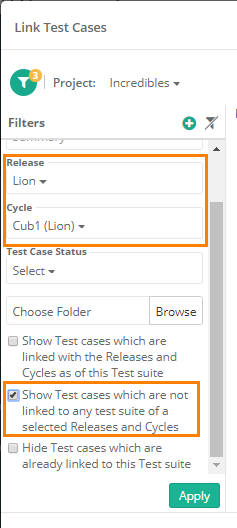
Users can apply Basic Filters as well as Advanced Filters on the Link Test Cases screen, which allows quick filter of test cases to link with the test suite.
Users can easily filter test cases by any system/custom fields for the ease of narrow down the search for required test cases.
Latest search filters will be preserved on the Link Test Case to Test Suite screen.
[A] Basic Filters: By default, basic filter fields are provided to filter the records.
The following Basic Filters are provided to filter test cases based on its linkage:
- Show test cases which are linked with the Releases and Cycles as of this Test suite:
If applied, the filter displays those test cases which are linked to the release and cycle to which the current test suite is associated. It displays test cases under the defined scope.
- Show test cases which are not linked to any test suite of a selected Releases and Cycles:
You can easily filter test cases that are not planned for execution for a combination of Release and Cycle.
If applied, the filter displays the list of test cases that are not linked to any test suite in the selected release and cycle. The purpose is to identify uncovered test cases in particular release and cycle.
To apply the filter, first select Release and Cycle under Basic Filters.
Use Case: There are more than thousand test cases in a cycle, QA Manager wants to find out test cases that are not linked to any test suite in a particular release and cycle. Checking each test case linkage is not feasible, hence, the manager wants a quick way to trace such test cases.
- Hide test cases which are already linked to this Test suite:
You can apply the filter to hide test cases already linked to a test suite to avoid duplicate linkage of test cases. This prevents testers from linking the same test cases again to the test suite.
Use Case: When test cases are large in numbers, it is very inconvenient to remember which test cases are already linked to the test suite. Hence, testers need a way to hide already linked test cases.
[B] Advanced Filters: If users need more fields to filter test assets then click on the '+' icon. It opens the drop-down with a list of additional system and user defined fields corresponding the module.
Select the field you want to apply filter on. The filter parameter is added as Advanced Filters. Apply filter as per your requirement.
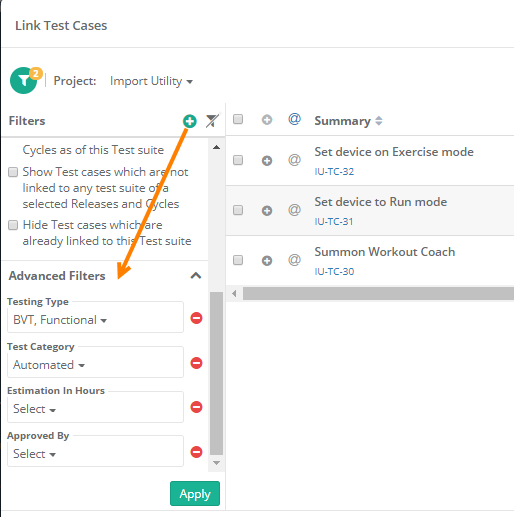
Users can link test cases from other projects as well. The Project drop-down is provided to select the project. The test cases for the project are displayed on the screen.
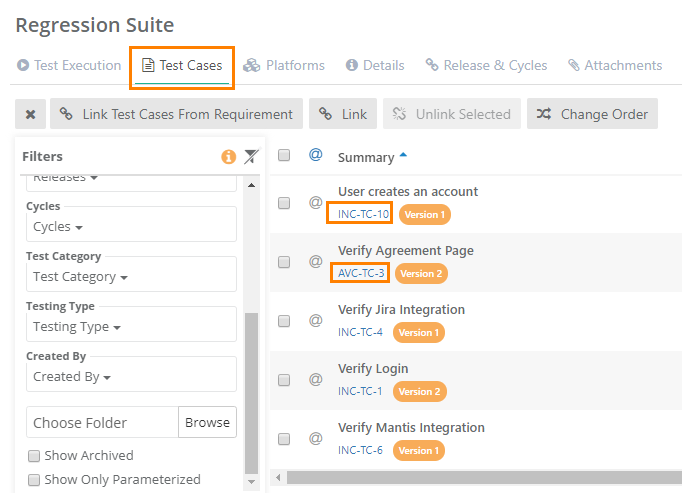
- Select test cases that you want link to the test suite. The Filters will populate only for the selected Project. Additional filters Labels and Folder path are added for the ease of searching.
- You can select a particular Version of the test case to link to the test suite. Test Cases with multiple versions are expandable.
Use Case: Each version of the test case is expandable so that users can view details of all versions at one place.
Expand the test case and select the required version to link with the test suite.
- If you want to link test cases from multiple projects, then first select one project. Search records and link them before moving to other projects. For example, User A is in Project 1 and searches for some records and link them before moving to Project 2. Else, all the selection of Project 1 will be wiped off.
Select the test cases you want to link with the test suite and then click on the Link Selected Test Cases button at the bottom.
You can also link individual test cases by clicking on the link icon for respective test cases.
The test case(s) are linked to the test suite.
If test cases from other project are linked, then the test cases show Entity Key of the corresponding project.
To view the test case of other project, click on the Test Case Entity Key. It opens the test case detail page in the respective project and will change your current project.
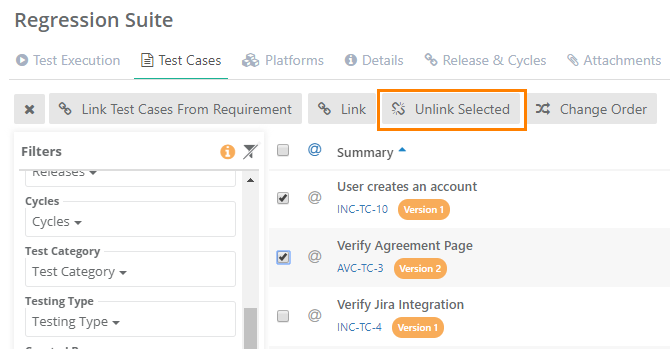
Unlinking Test Cases with Test Suite
The linkage of test cases with test suite can be removed while adding or editing the test suite.
Steps :
- Go to the Test Cases section on the Create Test Suite screen.
- Select the test cases you want to unlink from test suite.
- Click on the Unlink Selected button.
Note: If you are unlinking test cases after execution, then it will remove all the executions associated with the test suite for all the releases, cycles and platforms.
Change Order:
The order in which the test cases are linked to the test suite, in the same order the test cases will be displayed on the test execution screen. However, users can change the sequence of the linked test cases as per the execution flow.
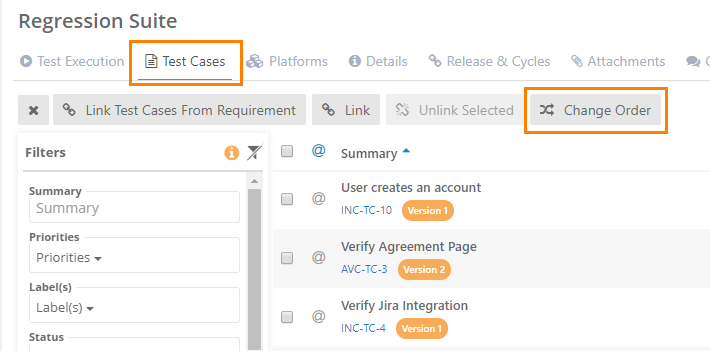
To change the order of linked test cases, click on the Change Order button.
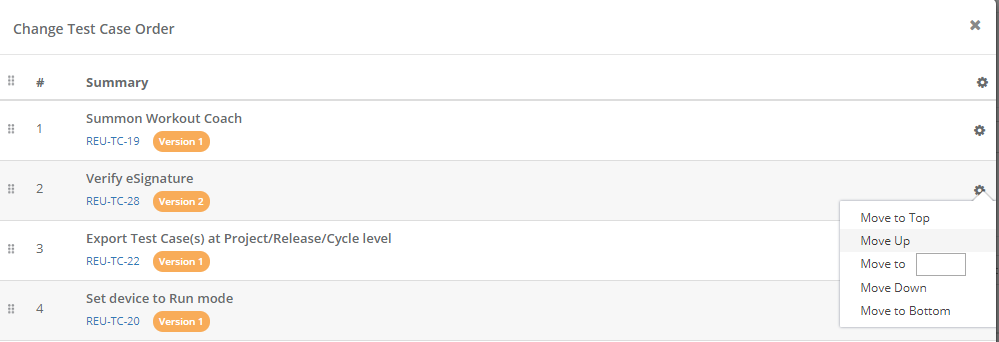
It opens the Change Test Case Order pop-up.
Click on the Con icon and select from the options to arrange the test cases:
- Move Up
- Move Down
- Shift to First
- Shift to Bottom
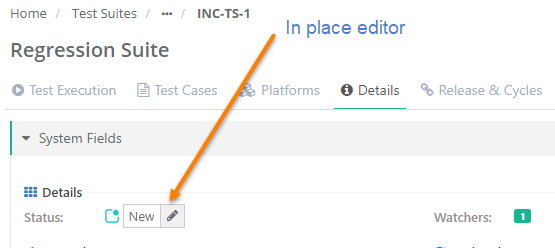
Editing a Test Suite
In-place editor is provided on the detail screens for all test assets. Just hover over the field and click on the edit icon.
It opens the field in editable mode. In case of text field, enter the value and save the details.
Open the test suite details page. Hover the mouse over the field and click on the edit icon to edit the value.
Associate Release & Cycles
Release and Cycle are associated are associated at the time of test suite creation.
Once the test suite is executed in the assigned release and cycle, now the users want to execute the same test suite in other release and cycle. For the reason, they edit the test suite and associate new release and cycle to it.
The Associated Release & Cycles tab on test suite detail page and test suite edit page allows users to associate further release and cycle to the test suite.
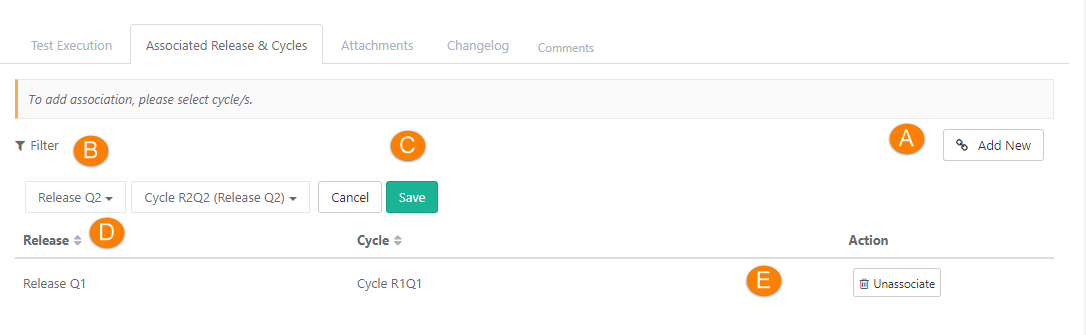
A. Click on the Add New button to associate release and cycle with the test suite.
B. The drop-downs are enabled on clicking on the Add New button.
C. Once you select the release and cycle, click Save.
D. The associated release and cycle are displayed on the pane.
E. To remove the release and cycle association for the test suite, click on the Unassociate button.
You can associate release and cycle through test suite details page and test suite edit page.
Attachments: The tab allows users to add attachments to the test suite. Read more Managing Attachments.
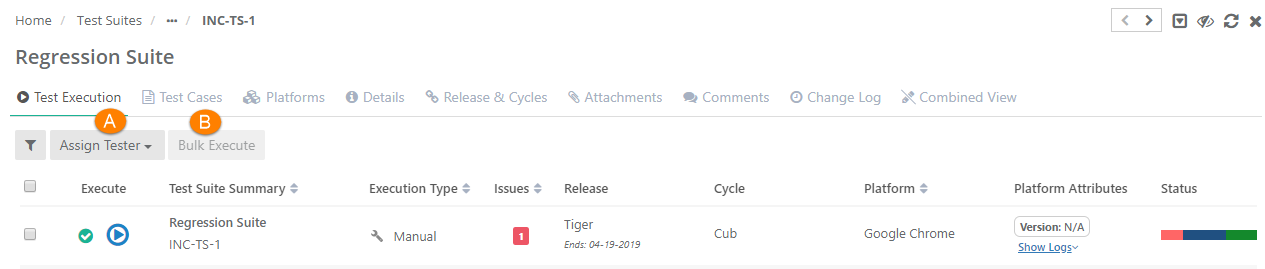
Test Execution
Platform wise records appear on the Test Execution tab once you associate Release, Cycle and Platform to a test suite. Test Execution records are added on the screen in accordance with the number of platforms, releases and cycles linked to the test suite.
For example, if there are 2 Releases, 4 Cycles and 2 Platforms are associated with the test execution, then the number of test execution records will be 16 for each combination of Release - Cycle - Platform.
The screen displays details like Test Suite Summary, Execution Type, Issues, Release, Cycle, Platform, Status, and Execution Time.
The Execution Type column is displayed on the Test Executions module screen to distinguish the Manual and Automated executions.
Use Case: Testers find it difficult to search through multiple pages in order to find their automated executions on the Test Execution Screen. Hence, they want a column which displays Execution Type and also allow them to apply Sorting on the column.
Status: Hover the mouse over the bar under the Status column to view the test suite status.
- A. Assign Tester: You can assign tester to execute test suite on a particular platform. Click on the Assign Tester tab and the Select User drop-down enables. Select test suite by selecting check box and then select user from the drop-down.
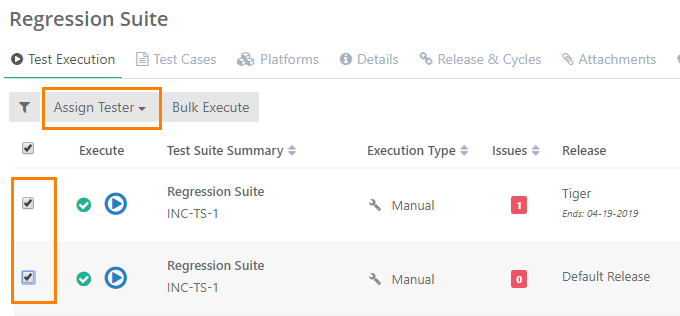
- B. Bulk Execute: If you want to execute the test suite on multiple associated platforms at once, then select the test cases and click on the Bulk Execute button.
The next screen opens with the associated test cases and corresponding platforms.
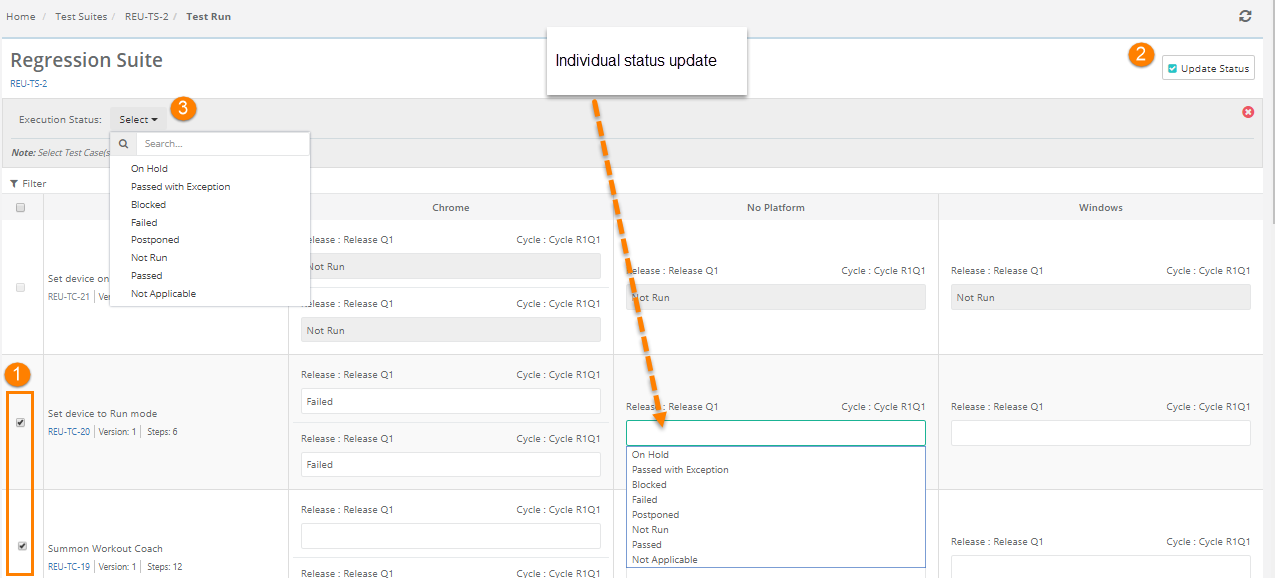
Status can be updated in bulk for multiple test cases and their platforms.
1. Select test cases the execution status of which you want to update.
2. Click on the Update Status button at top right corner. the Execution Status drop-down is enabled.
3. Select the Execution Status to apply to test cases and their platforms at a time.
Deleting a Test Suite
You need to archive test suites before deleting them. The Delete option will be enabled only for archived test suites.
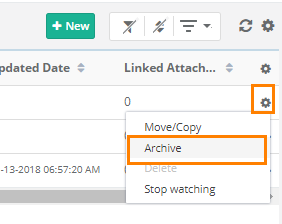
Archive Test Suites
User can archive test suites through any of the following ways:
- Clicking on the Archive icon at the top right corner on the test suite details page.
- Clicking on the Archive option on Cog icon of individual the test suite on the grid.
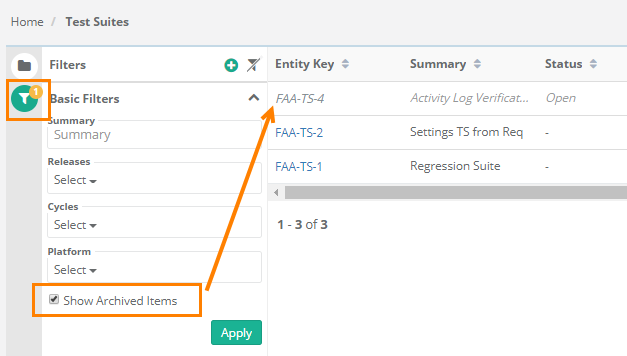
To archive multiple test suites at once, select Bulk Operations > Archive Records. The screen only displays archived test suites.
To view archived test suites on the grid pane, open the filter panel by clicking on the Filter icon.
Select the Show Archived Items check box.
The grid pane at right starts displaying the archived test suites.
User can delete test suites through any of the following ways:
- Clicking on the Delete icon at the top right corner on the test suite details page.
- Clicking on the Delete button on the Edit screen of the test suite.
To delete multiple test suites at once, select Bulk Operations > Delete Records. The screen only displays archived test suites.
Bulk Operations on Test Suites
Read about Bulk Operations
Import Test Suites
Read about Import Test Suites
Export Test Suites
Read about Exporting Test Suites