Back to QMetry All Products Help Page
Platform Attributes
Overview
Platform attributes are custom values which can be used to help track and identify testing results and pass-fail trends. An attribute can be added and then re-used by linking to any platform. Platforms can have multiple attributes that define features and/or configurations of a platforms.
Platform Attributes can be used across projects. A Platform Attribute created in one project can be used in other projects as well. Platform Attributes can help users:
- Search platform by its attribute value and then link filtered platforms to the Test Suite
- Record specific configuration information for different platforms that might be common across platforms
- Record specific configuration information that might vary during testing.
- Improve reporting by filtering test results by platform and/or attribute.
Example:
An organization may need to test a mobile app against the latest Android OS. They are not concerned about the specific device as much as the operating system itself. Each platform can have an attribute for OS which specifies the version. During test they can test multiple different mobile phones (often based on availability) and use the attribute OS to record which version of the OS was tested.
Add Platform Attributes
Expand the Projects section on the tree and open the Platforms & Attributes sub-section.
There are two tabs on the screen: Platforms and Platform Attributes.
Open the Platform Attributes tab.
Click on the New button icon at the top right corner of the screen.
It opens the Create screen for Platform Attribute.
- Field Type: Users can create different types of field: String, Large Text, Number, Lookup List, Multi Lookup List, Date Time Picker. Select the type of the field you are adding for the platform attribute. The remaining fields become visible as soon as you select the Field Type.
Let us add a Platform Attribute with Field Type as "Lookuplist".
- Field Name: This field represents the unique ID for the field. It remains same in any project. Blank space is not allowed in the name.
- Field Label: Enter the label that will be displayed on the screen. It is like a field alias and can be changed on project wise.
- If the Field Type is Lookuplist, then you need to select the list that will appear for the field. If the list does not exist, then click on the Add List link to create new lists.
- Default Value: Mention the Default Value you want to maintain for that list.
Share Platform Attributes Across Projects
Platforms can be shared across projects from the Create and Edit screen of platform attribute. Project Mapping with the Platform Attribute is required to make the attribute available in the project. The current project should also be mapped with the attribute to make it available in the current project. Users can only map those projects on which they have access over.
1. Select the Project with which you want to share the platform attribute.
2. Click on the Add Project button.
A project is added in the grid, which shows the projects in which the platform attribute will be available to use.
- Mandatory: Enable the flag to make the field mandatory to fill.
Click Save.
A new platform attribute is added to the list.
To edit and delete the attribute, click on the respective icons for the attribute.
Link Attributes to Platform
Expand the Projects section on the tree and open the Platforms & Attributes sub-section.
There are two tabs on the screen: Platforms and Platform Attributes.
Open the Platforms tab.
The screen shows list of platforms.
To link platform attributes to a platform, click on the Manage Attributes button for the platform.
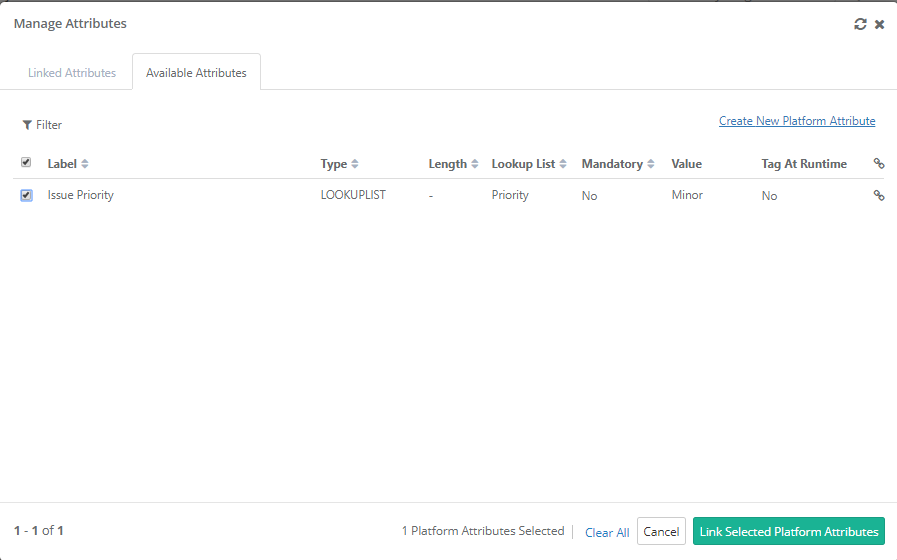
It opens the Attributes screen with two tabs on it: Linked Attributes and Available Attributes.
Open the Available Attributes tab. These are the attributes available to associate with the platform. To add more attributes, click on the Create New Platform Attribute link.
Select the attribute you want to link to the platform and click on the Link Selected Platform Attributes button.
The attribute(s) is linked to the platform. The linked attributes are displayed on the Linked Attributes tab.
If you want to unlink an attribute, then you can do so from this pane.
Note: To link/unlink Platform Attributes, the user role should have "View" and "Modify" rights for Platform. The rights are assigned from Customization > Roles.
Archive Platform Attributes
To archive a Platform Attribute, open the Linked Attributes tab on the Manage Attributes screen.
Enable the Archive flag for the attribute.
Edit Platform Attributes
Go to Projects > Platforms & Attributes.
The Platform Attributes tab shows platform attributes.
Click on the Edit button under the Actions column for the attribute.
It opens the Edit Platform Attribute screen.
You can modify the following values -
- Field Label
- Field Default (for "String" field type)
- Flag for Mandatory
- Remove association with current Project
Tag Attributes at Runtime
You can tag a Platform Attribute at runtime. Every execution of the test suite are run on the basis of default values entered from Projects > Platforms & Attributes. These predefined Platform attribute values can be changed at runtime.
Predefined Platform attributes can be changed at runtime if the parameter Tag At Runtime is set enable. This allows organizations to quickly tag a test with a variable information they wish to capture when executing a test case.
For example,
A customer has a platform that changes over time, but is important to track as part of the test execution history. For example, a hardware company wants to track the firmware versions of their hardware during test. The attribute can be tagged to the test run, and even modified at run time. As testing continues the testers can quickly adapt and change the firmware versions and even test past firmware if needed. Each test run is recorded and tagged with the correct firmware version.
On the Test Suite Execution Screen, you can see the Platform and its Attributes details. Attributes which are marked for “Tag at Runtime” appear as Runtime Attributes.
If any attributes are required at runtime they need to be set before each executions (e.g. it does not matter if the test suite / platform had been run before). Such run time values, which are edited on the execution screen, do not get saved in the database. These values are just displayed for that particular execution only and are stored in execution history once run.
Once you link attributes to platform, the linked platforms appear on the Linked Attributes tab for the platform.
Here, you can tag a platform attribute to be defined at runtime by enabling the Tag At Runtime flag on the grid.
User can provide attribute values on the Execution Screen either at run time or afterwards.
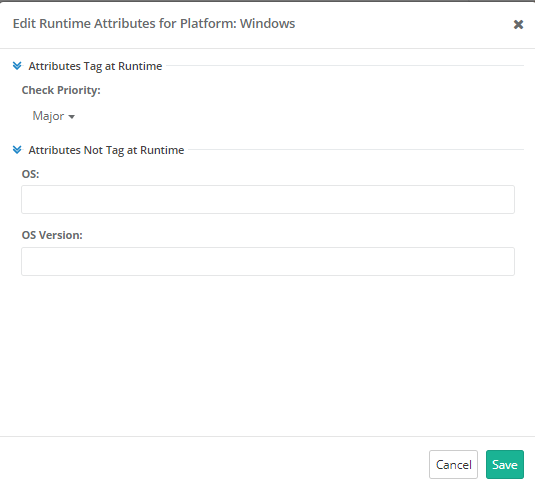
When you execute the test suite, the pop-up like following appears to edit Runtime Attributes for Platform Attributes that are tagged for runtime.
The attribute value is displayed set as default, you can change the value before execution.
On the Test Suite Execution screen, you can see the Runtime Attributes anytime by clicking on the Click to View button for Run Attributes.
If Platform Attributes are linked to Platforms (from Projects > Platforms & Attributes > Platform Attributes tab > Manage Attributes > Linked Attributes tab), then the Click To View button will be displayed.
Attribute values entered at run time will be displayed on the Platform attributes column on the following pages. It gives an idea about which test case was run with which Platform Attribute values.
- On the Test Executions tab of Test Case detail view
- On the Test Executions tab of Test Suite detail view
Managing Platform
Refer to Managing Platforms for more details.
Back to QMetry All Products Help Page


