| Table of Contents |
|---|
...
Enterprise teams practicing Behavior-Driven Development (BDD) can author, store and sync feature files directly to/from Version Control Systems (VCS) like SVN, Git, GitLab, Bitbucket and BitBucketAzure DevOps, using the built-in Gherkin editor in QMetry requirements. The two-way syncing between QMetry & VCS keeps developers, testers and product owners up-to-date with the latest source code change commits with automated step definitions. Using QMetry automation agents, test executions could be triggered directly from QMetry. Test cases are smartly created/reused authored based on the feature step definitions and link them to requirements. Test Suite stores the automation execution results ensuring complete feature traceability with requirements.
...
3. Click on the + sign to add BDD Configuration.

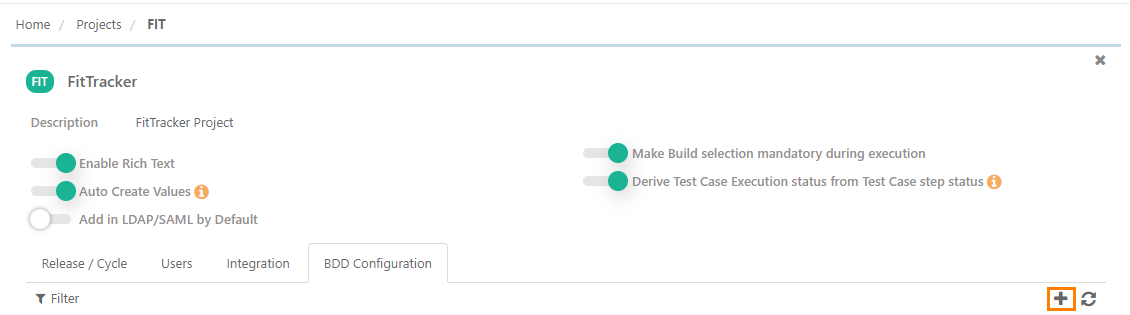
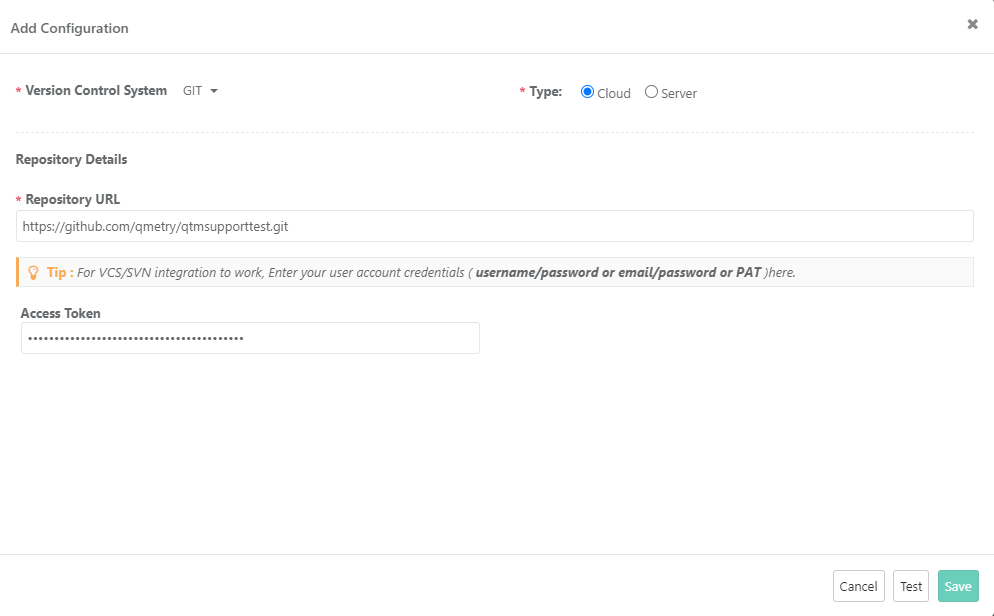
4. The Add Configuration screen opens. Enter the following details on it:
- Version Control System: Select the version control system your organization is using as code repository.
- Type: The field appears on the screen when GIT/Bitbucket/GitLab/Azure DevOps is selected as the Version Control System. Select the edition of the GIT/Bitbucket/GitLab i.e. Cloud or Server.
Git Integration
- Repository URL: Enter the Repository URL for the version control system selected above. Enter Access Token. Follow these steps to generate access token for GitHub.
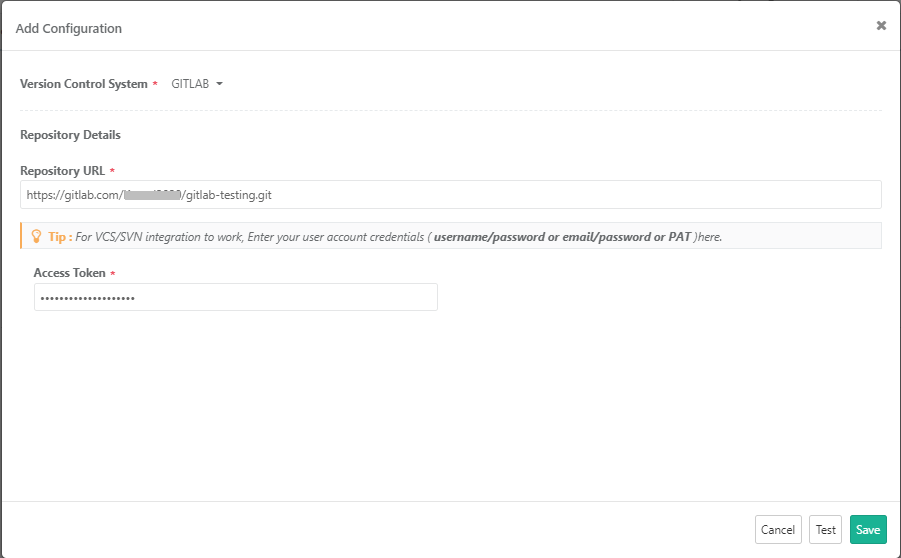
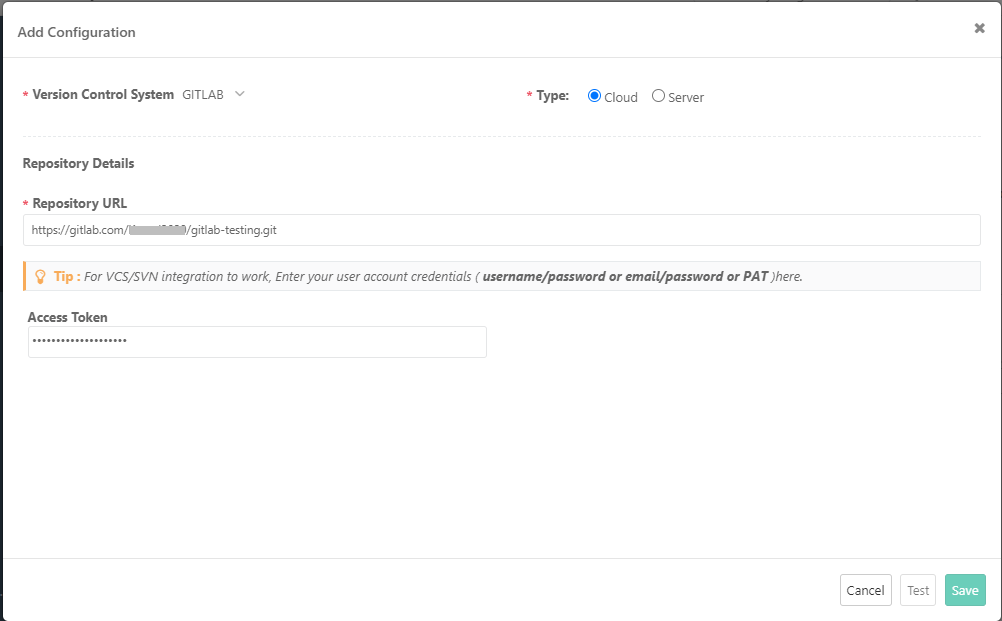
GitLab Integration
...
The Add Configuration screen opens. Enter the following details on it:
- Version Control System: Select GITLAB as the version control system your organization is using as code repository.
Type: Select the edition of the GitLab i.e. Cloud or Server.
Repository URL: Enter the Repository URL for the version control system selected above.
- Enter Access Token. Follow these steps to generate access token for GitLab. Provide all the Scopes access.
Bitbucket Integration
...
- Version Control System: Select BITBUCKET as the version control system your organization is using as code repository.
- Type: The field appears on the screen when GIT/Bitbucket is selected as the Version Control System. Select the edition of the GIT/Bitbucket i.e. Cloud or Server.
- Repository URL: Enter the cloned Repository URL for Bitbucket.
...
To delete the configuration with the project, click on the Delete button.
Azure DevOps Integration
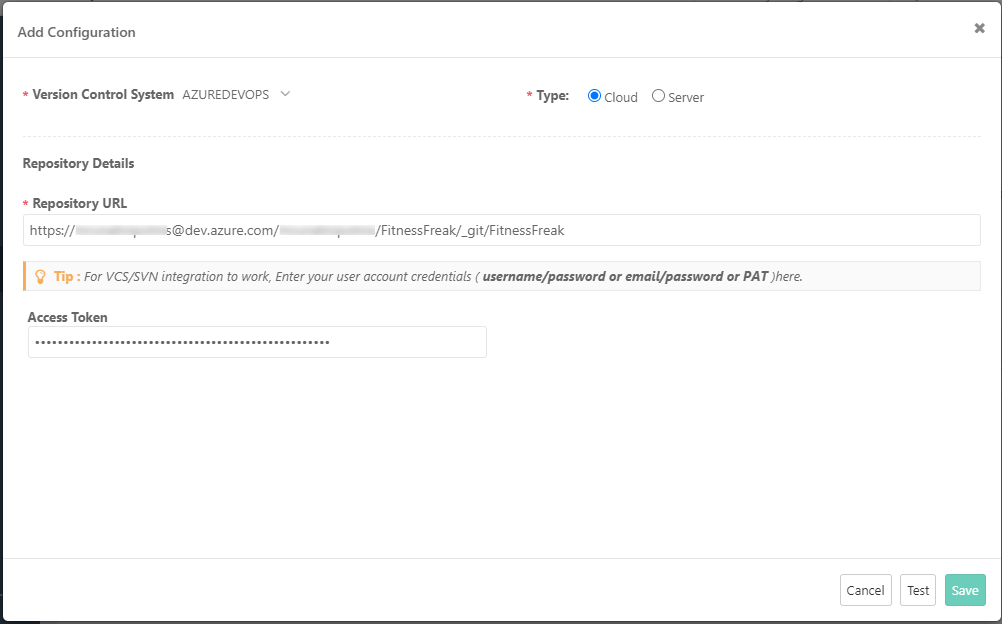
The Add Configuration screen opens. Enter the following details on it:
Version Control System: Select AZUREDEVOPS as the version control system your organization is using as a code repository.
Type: Select the edition of the Azure DevOps i.e. Cloud or Server.
Repository URL: Enter the cloned Repository URL for Azure DevOps.
Steps to generate the cloned URL in AzureDevOps:
| Expand | ||
|---|---|---|
| ||
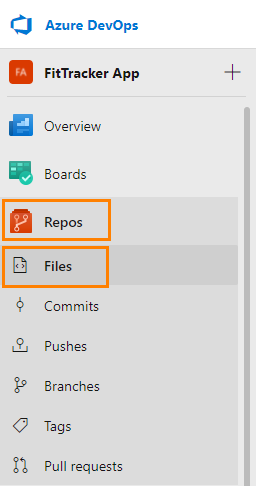
1. Log into AzureDevOps, open the team project for your Azure DevOps organization and select Repos, then select Files.
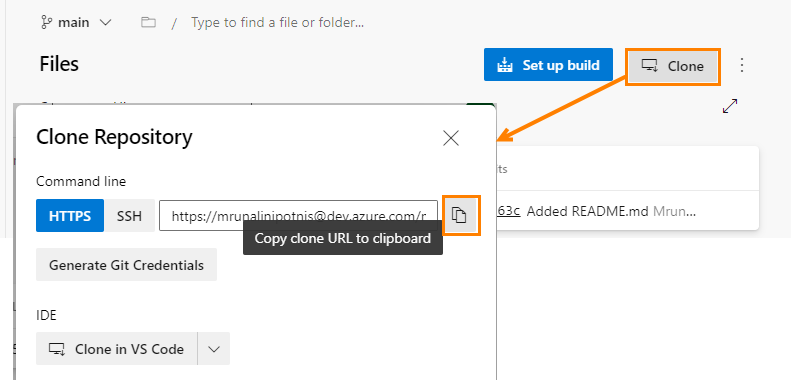
2. Click Clone in the upper right. Copy the cloned repository URL and paste it into QMetry.
|
- Enter Access Token. Follow these steps to generate an access token for Azure DevOps. Provide Full access for Scopes.
BDD in QMetry
| Note |
|---|
BDD section in the Requirements module will be visible only when a version control system is configured for the QMetry project. |
...
- Version Control: Version Control Systems configured for the Project populate for the field. Select the Version Control System you want to use for the requirement.
- Repository: Repository populates in accordance with the Version Control System selected above.
- Branch: Select branch based upon repository selection. You will be able to choose folder of respective branch. Branch access depends on the user through whom the BDD integration is done.
- Folder Path: Click on the Choose Folder to select the folder from the tree structure to store the BDD file. If folder path is not given, it will push it into root directory of repository.
...
- File Name: Enter the name (with file extension) of file that you want to pull/push from/to the repository. The File name should contain only characters, digit and "_" with a file extension. No other special characters and spaces are allowed in the file name. Now QMetry also supports files generated through BDD code in QAS (i.e. one with .bdd extension).
- Notify Automation Engineer: Select users to whom notification for BDD update details should be sent. By default all the users which are currently on Watchers list for the requirement will be automatically selected. You can select other users of the current project. Thus, multiple users can be notified while pushing BDD modifications to Version Control System.
- Comment: Enter Comments related to the file. It is mandatory when you are pushing the code to repository.
...
- Version Control: Version Control Systems configured for the Project populate for the field. Select the Version Control System you want to use for the requirement.
- Repository: Repository populates in accordance with the Version Control System selected above.
- Branch: Select branch based upon repository selection. You will be able to choose folder of respective branch. Branch access depends on the user through whom the BDD integration is done.
- File Name: Enter the name (with file extension) of file that you want to pull/push from/to the repository. The File name should contain only characters, digit and "_" with a file extension. No other special characters and spaces are allowed in the file name. Now QMetry also supports files generated through BDD code in QAS (i.e. one with .bdd extension).
- Folder Path: Click on the Choose Folder to select the folder from the tree structure to store the BDD file. If folder path is not given, it will push it into root directory of repository.
- Notify User: Select users to whom notification for BDD update details should be sent. By default all the users which are currently on Watchers list for the requirement will be automatically selected. You can select other users of the current project.
- Comment: Enter Comments related to the file. Mandatory for Push to Repository.
...