Integrate QTM4J 4x with QAS
You can upload the QAS execution results to other products of QMetry product suite. This document describes integration of QMetry Automation Studio with QMetry Test Management for Jira 4x.
First you need to integrate QMetry Automation Studio with QMetry Test Management for Jira 4x.
There are multiple ways to access the Integration with QMetry screen. Follow either of the following options.
Option 1. Go to QMetry > Integrations with QMetry.

Option 2. In Test Recorder, click on the Configuration icon at top right corner in the tree panel.

The Integration with QMetry screen opens.
- Test Management: Set this configuration as a default to use it while uploading Execution results from terminal.
On the Integration List, the default configuration will be marked accordingly.
Provide integration details and save the integration.
- Story Key: Users can link test cases executed for particular integration to a Jira Story. Enter the Story Key to which you want to link the test cases. You can view the traceability in QMetry for Jira Test Management.

Parameters
| Parameter | Type | Required | Description | Default |
|---|---|---|---|---|
| Alias Name | string | Yes | QTM4J Integration Alias Name as per user preference. | |
| URL | string | Yes | QTM4J URL to upload execution test results. Example: https://qtmcloud.qmetry.com/rest/api/automation/importresult | |
apiKey | string | Yes | Your API Key. API Key is unique for a specific user in a single project. The result will be imported for the project associated with the given API Key. | |
| format | string | Yes | Format of result file to be imported. Supported formats:
| NA |
| testCycleToReuse | string | No | Issue Key of the test cycle to be reused | NA |
| environment | string | No | Name of the environment on which test cycle has to be executed | No Environment |
| build | string | No | Name of the build for test case execution | Blank |
| Story Key | string | No | The Story Key to which you want to link the test cases executed for particular integration. | |
| isZip | boolean | No (Yes for QAF) | Pass true for ZIP upload or pass false for single file upload | false |
| attachFile | boolean | No | Pass true to upload attachments in execution. For more details, Refer automation help documents. This parameter is supported only for-
| false |
| fields | JSON | No | Provide additional fields to be added on test case or test cycle level. Refer to following table for more. Note : If cycle is reused, fields of test cycle will be ignored. | Blank |
Supported Fields
| Supported Fields | Type | Test Cycle | Test Case | Default |
|---|---|---|---|---|
| labels | array | Yes | Yes | null |
| components | array | Yes | Yes | null |
| status | string | Yes | Yes | TO DO |
| priority | string | Yes | Yes | Medium |
| fixVersionId | number | Yes | Yes | null |
| sprintId | number | Yes | Yes | null |
| summary | string | Yes | No | Automated Test Cycle |
Refer to Import Results using Rest API for more details on configuration parameters/wiki/spaces/QTMFJC/pages/22478922
Once you save the integration, it appears on the Integration List.
To edit the integration details, click on the Edit icon.
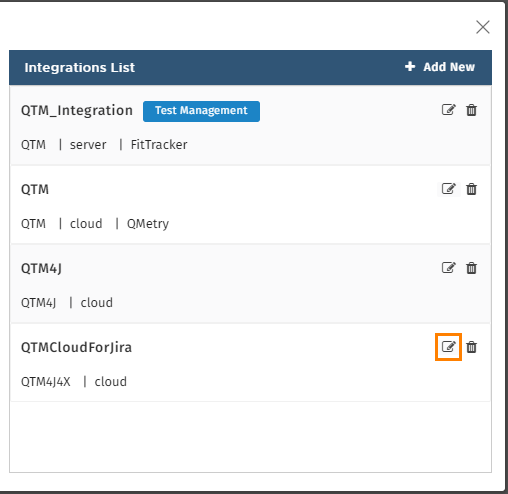
Modify the details and click Update to save the details.

Push Test Results to QTM4J 4x
Upload Test Results of already Executed Test Case
Option 1. Click on the Upload option and select QTM4J.
If the integration already exists, then the integration name will appear on the list. Select the one. In the absence of saved integration, click Other and follow Option 2.
To upload automated test cases with their execution results to QTM4J 4x, click Upload.
Select QTM4J 4x on the list.

Option 2. In the absence of saved integration, click on the Upload option and select Other.
Open the Integration screen (QMetry > Integrations).
The Integration screen opens. You can add a new Integration and Save it.
You can also upload the execution directly while saving the Integration by clicking on the Save & Upload button.

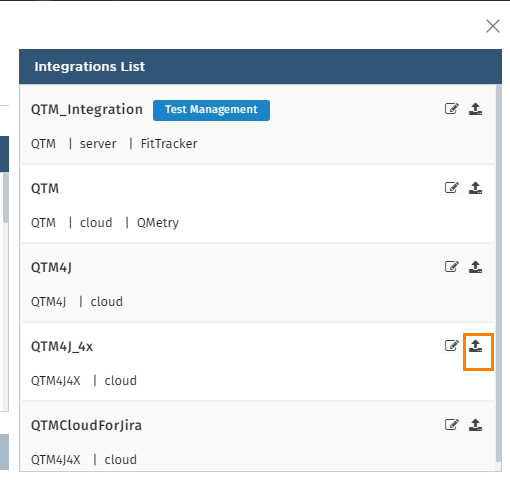
The saved Integrations are displayed on the Integration list.
Click on the Upload icon for the integration to which you want to upload the test results.
The Upload Results pop-up opens.
Select either of the following options:
- Enter or Change Test Cycle Key: It will use an existing Test Cycle to upload test result. If Test Cycle Key is not mentioned while configuration, you can mention the Key here to which the test results are to be uploaded. If the Test Cycle Key is already mentioned while configuration, it will display here. You can change the Test Cycle Key, if you want.
- Create New TestCycle and Upload Result: If the option is selected, a new test cycle will be created in QTM4J and the test results will be uploaded in that test cycle.
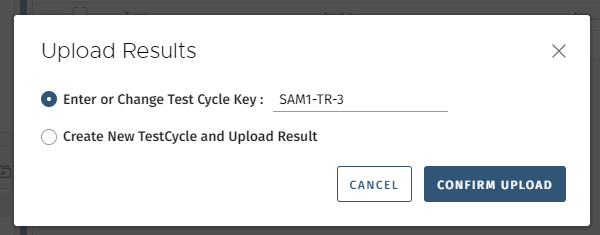
Confirm the upload.
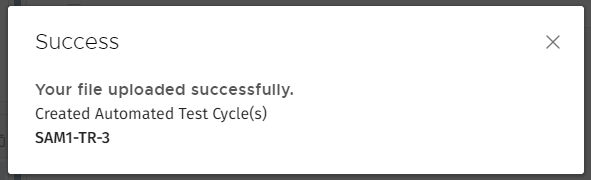
The success message appears with a link to the test run which is updated with test results.
The test run is updated with test case and test execution in QTM4J as shown below.

The Test Run screen displays test case and test steps with updated execution results.

Execute Test Case/Test Suite and Upload Test Results
Scenario 1. Execute a Single Test Case
When you execute a single test case from the tree and then upload its test results to QTM4J.
Once the execution is completed, click on the Upload button.
It opens the Integration screen. Click on the Upload button for the integration.
The Upload Results pop-up opens. Select either of -
- Enter or Change Test Cycle Key
- Create New TestCycle and Upload Result
Scenario 2. Execute a Single Test Suite
When you are executing a single test suite and then upload the test results to QTM4J.

Once the execution is completed, click on the Upload button.
It opens the Integration screen. Click on the Upload button for the integration.
The Upload Results pop-up opens. Select either of -
- Enter or Change Test Cycle Key
- Create New TestCycle and Upload Result: A new test cycle is created with auto-generated name and test cases are added to it. The test results are uploaded accordingly.
Scenario 3. Execute All Test Suites
When you execute all test suites at once and then upload the test results to QTM4J.

Once the execution is completed, click on the Upload button.
It opens the Integration screen. Click on the Upload button for the integration.
The Upload Results pop-up opens.
- Enter or Change Test Cycle Key: The existing test cycle with particular ID will be updated with all the test suite results.
- Create New Individual Test Cycles and Upload Result: For all the executed test suites in QAS, individual test cycles will be created in QTM4J.
Execute Test Script and Upload Test Results
You can easily upload test results into QMetry Test Management for Jira and set the configuration as default for Test Management. Whenever you run the automation code via CI, Command Line, test results will be pushed to system, so that you can track the details.
Either QTM Configuration or QTM4J Configuration can be set as default to upload test results at a time.
- Set Default for Test Management: Check the box to set the QTM4J configuration as default for uploading the test execution results whenever the test is executed using CI/CD tools. On the Integration List, the tag is attached to the configuration which are marked as default.
Note: If the QTM4J 4x configuration is set as default for Test Management, then the results will be uploaded to QTM4J 4x as and when a build is triggered through CI/CD tools.

If the QTM4J configuration is set as default, then the qmetry.properties file, under the resources directory (resources/qmetry.properties), will auto populate the configuration details.
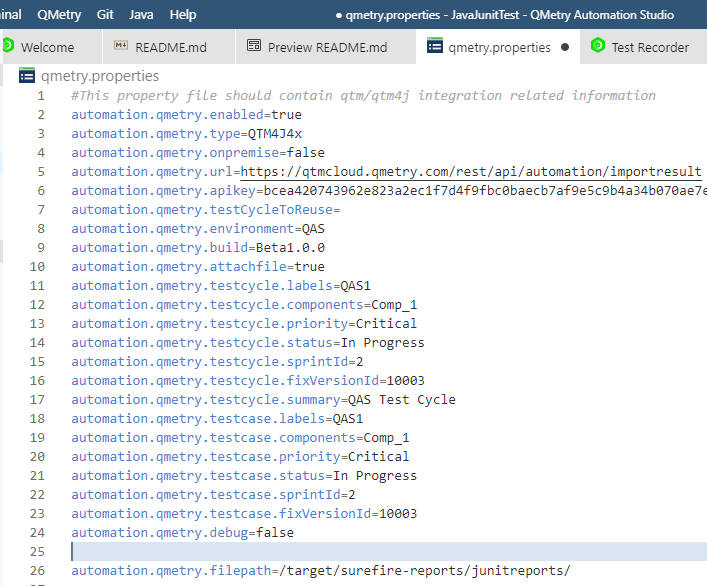
The following is the code snippet of qmetry.properties file.
#This property file should contain qtm/qtm4j integration related information
automation.qmetry.enabled=true
automation.qmetry.type=QTM4J4x
automation.qmetry.onpremise=false
automation.qmetry.url=https://qtmcloud.qmetry.com/rest/api/automation/importresult
automation.qmetry.apikey=6309e837d29b6c9f8679c8bae19ab78fef0e4de9989597594ba1584797ced43c829548bcc6ec513cfb373c16a472e57c4de96e
automation.qmetry.testCycleToReuse=QAS-TR-3
automation.qmetry.environment=QAS
automation.qmetry.build=Beta1.0.0
automation.qmetry.attachfile=false
automation.qmetry.testcycle.labels=QAS1
automation.qmetry.testcycle.components=Comp_1
automation.qmetry.testcycle.priority=Critical
automation.qmetry.testcycle.status=In Progress
automation.qmetry.testcycle.sprintId=3
automation.qmetry.testcycle.fixVersionId=1045
automation.qmetry.testcycle.summary=QAS Test Cycle
automation.qmetry.testcase.labels=QAS2
automation.qmetry.testcase.components=TCcomp1
automation.qmetry.testcase.priority=Major
automation.qmetry.testcase.status=In Progress
automation.qmetry.testcase.sprintId=3
automation.qmetry.testcase.fixVersionId=5926
automation.qmetry.debug=false
Steps to Upload Test Results to default QTM4J
1. Record test case and export.

2. qmetry.properties file:Set configuration details.
If the QTM4J configuration is set as default, then the qmetry.properties file, under the resources directory (resources/qmetry.properties), will auto populate the configuration details.
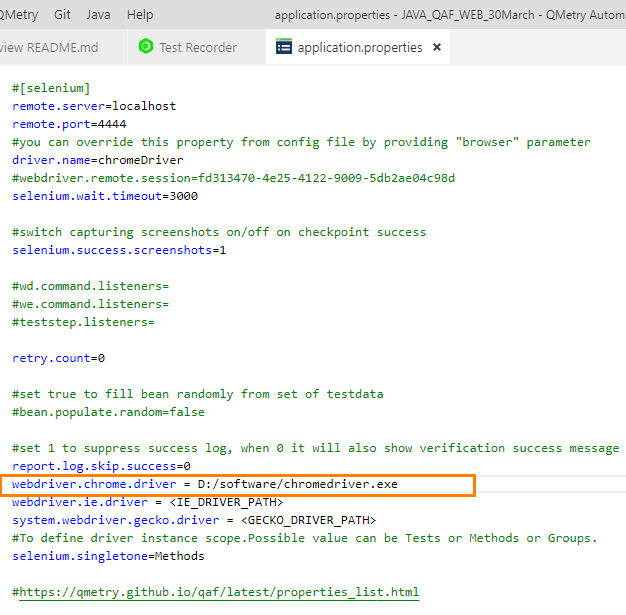
3. Open the application.properties file and set webdriver path.
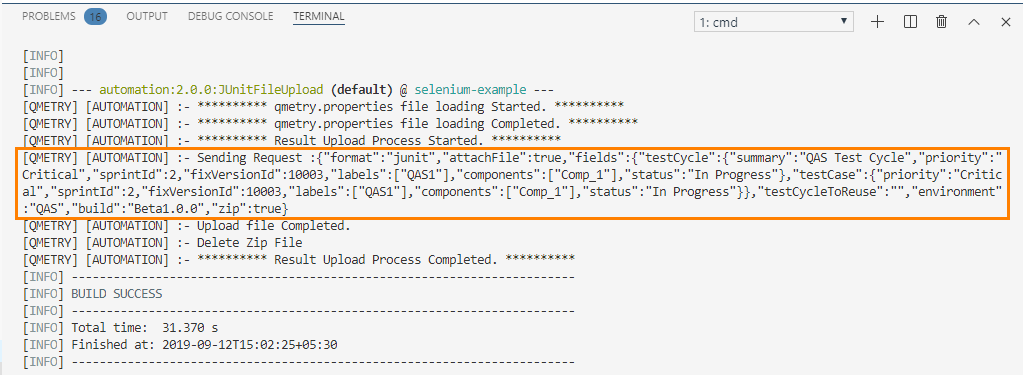
4. Open terminal and run command: mvn clean test


It will run the exported test case in the browser whose driver path is set in the application.properties file as per Step 3.
5. Success message is displayed once the results are uploaded to QTM4J 4x.
QTM4J 4x mvn clean test command result:
You can see the test execution results in QMetry for Jira 4x > Test Cycle.
