The user can export and import data (Test Run, Story, Test Scenario, Test Case, Test Steps and metadata) within the same instance of JIRA or different instances of Jira through QMetry Import/Export Utility. Click here to download QMetry Import/Export Utility. Once you are done with download, then you can Import assets using the Import/Export Utility.
Steps
- Download the zip for Import/Export Utility.
- Extract the “ImportExport_1.x.x.jar” from the zip.
- Execute the extracted .jar file.
- Pre-requisite: You should have JRE (Java Runtime Environment)/JDK (Java Development Kit) installed on your machine to execute the .jar file.
Follow the below steps to Import assets into the QMetry for Jira add-on.
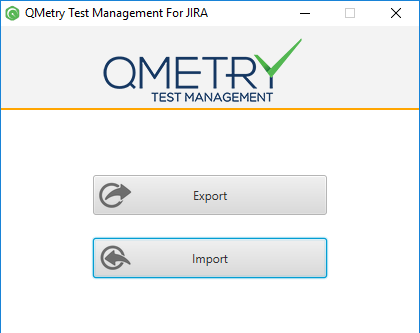
- Open the Import/Export Utility.
- The main page has two buttons on it: Export and Import.
- Click the Import button to import the Excel file that was exported.
- The next screen is the login screen.
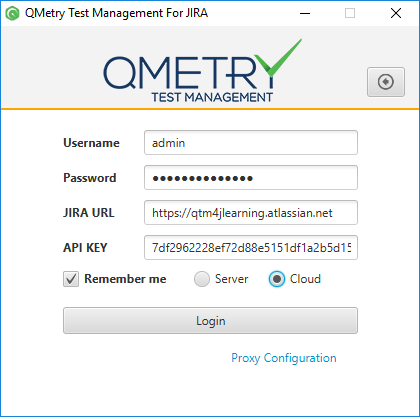
- Username: This is the Username displayed in of your JIRA Profile. It is different from the Email in JIRA.
- Password: Enter Password for the JIRA instance.
- JIRA URL: The URL of JIRA instance to which you want to import the data.
- API KEY: In case of Cloud version, API Key is required. This API Key is generated from the JIRA instance you want to conduct the import to. The API key is copied from QMetry > Configuration > Import/Export Tool > Authentication.
- Select the Cloud version.
Proxy Configuration
- Configure Proxy settings by entering Host and Port.
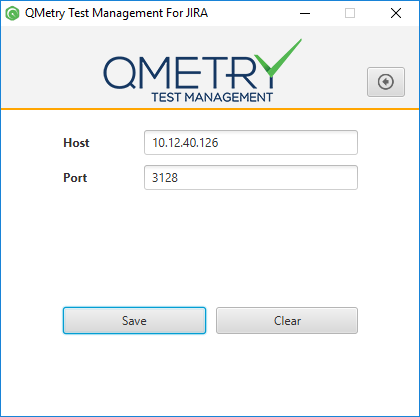
- Then click Save.
- It will navigate you back to the Login screen. Click on the Login button.
- Click the Login button.
The next screen opens.
Select either of the file formats you want to import.
QMetry Standard Template
Step 1 Getting Started
Select the excel file template you want to import into QMetry.
Here, select QMetry Standard Template.
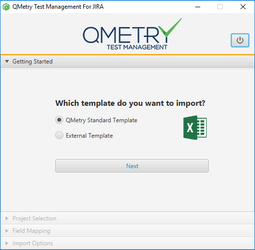
Click Next.
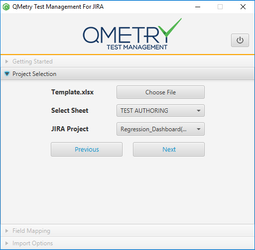
Step 2 Project Selection

Enter the following fields:
- Choose File: Click the Choose File button to browse and pick the file to import.
Note: The file should be in the format defined by QMetry Test Management for JIRA. Refer Template.xlsx for your reference.
- Select Sheet: The field remains disabled if you are importing file in QMetry Standard Template.
- JIRA Project: The drop-down menu has list of projects on it. Select the project in which the data is to be imported.
Note: User should have Admin rights for the Project to carry out import.
Click Next to proceed towards Field Mapping of columns in the Excel file.
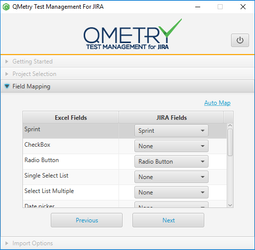
Step 3 Field Mapping
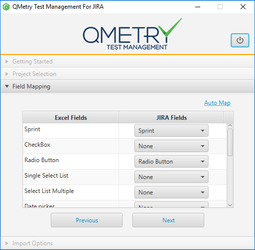
The left side of the screen displays custom Column Names from Excel file you uploaded to import and the right side displays Issue Fields i.e. custom fields from JIRA.
You can auto map the fields by clicking on the Auto Map link.
If the excel file does not have custom fields in it, then the Field Mapping step will be skipped.
Click Next to proceed towards next step.
Step 4 Import Options
The screen asks for setting Import behavior for User Story, Test Scenario, Test Case and Test Run independent of each other.
In case of issues already exist in JIRA, you can either update existing issues or create new issues in JIRA.
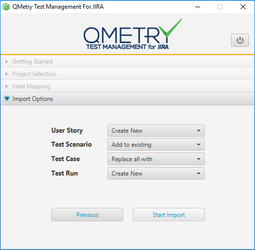
- Create New: It will create issues afresh as per the Excel even if the same issues exist in JIRA.
- Add to existing: It will reuse existing JIRA issues. If issues do not exist in JIRA, then new issues will be created as per the Excel file and added to the existing association. It will add test cases to the associated test cases of the story.
Example: There are 10 issues in Excel, out of which 6 already exist in Jira. Then the remaining 4 will be imported and added to the test cases associated with the story. The existing 6 issues will not get affected.
If Jira Summary does not match with Summary in Excel file, then the Summary of issue being reused will also get changed according to the Excel file.
- Replace all with: It will reuse existing JIRA issues. It will replace all existing association of issues in JIRA. If issues do not exist in JIRA, then new issues will be created as per the Excel file and will be added to the association.
Example: There 10 issues in Excel, out of which 6 already exist in Jira.Then the remaining 4 will be imported and added to the test cases associated with the story. The association of existing 6 issues will be replaced as per Excel.
If Jira Summary does not match with Summary in Excel file, then the Summary of issue being reused will also get changed according to the Excel file.
Click the on the Start Import button to initiate the import process.
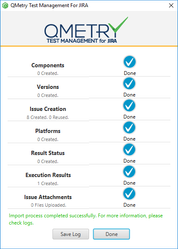
The next screen opens displaying the progress of import in terms of:
- Components
- Versions
- Issue Creation
- Platforms
- Result Status
- Execution Results
- Issue Attachments: There is an Attachment column in the excel sheet which contains path on wards the excel file location on the drive. The issues that lie on the mentioned path are get attached to Jira.
Save Log: In case of errors, the relevant message is displayed on the screen. The Import process is still carried out. User can click on the Save Log button to save the logs and view it later for the list of errors.
Note: If you are performing re-import of issues from Excel file, then new issues will be created in JIRA. The existing issues in JIRA will not get updated.
External Template
Note: If you are importing using External Template, then it will impact only Authoring (issue creation and association) section. Using External Template, you can not execute test runs.
Step 1 Getting Started
Select the excel file template you want to import into QMetry.
Here, select External Template.
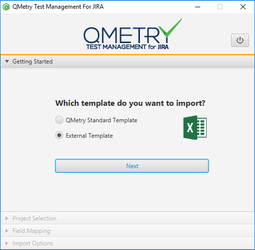
Click Next.
Step 2 Project Selection
Enter the following fields:
- Choose File: Click the Choose File button to browse and pick the file to import.
- Select Sheet: The field becomes enabled when you are importing excel file in external template. The drop-down shows all the sheets of the excel file that you uploaded in the previous step. Select the sheet you want to import the data of.
- JIRA Project: The drop-down menu has list of projects on it. Select the project in which the data is to be imported.
Note: User should have Admin rights for the Project to carry out import.
Click Next to proceed towards Field Mapping of columns in the Excel file.
Step 3 Field Mapping
The left side of the screen displays custom Column Names from Excel file you uploaded to import and the right side displays Issue Fields i.e. custom fields from JIRA.
You can auto map the fields by clicking on the Auto Map link.
Map the remaining fields manually.
Click Next to proceed towards next step.
Step 4 Import Options
The screen asks for setting Import behavior for User Story, Test Scenario, Test Case and Test Run independent of each other.
In case of issues already exist in JIRA, you can either update existing issues or create new issues in JIRA.
The next screen opens displaying the progress of import in terms of:
- Components
- Versions
- Issue Creation
- Platforms
- Result Status
- Execution Results
- Issue Attachments: There is an Attachment column in the excel sheet which contains path on wards the excel file location on the drive. The issues that lie on the mentioned path are get attached to Jira.
Save Log: In case of errors, the relevant message is displayed on the screen. The Import process is still carried out. User can click on the Save Log button to save the logs and view it later for the list of errors.
Note: If you are performing re-import of issues from Excel file, then new issues will be created in JIRA. The existing issues in JIRA will not get updated.