Note: Users should have project browse permissions to access QMetry Project Settings.
Configure QMetry for Jira
Note:
The mentioned settings are mandatory to start working on QMetry Test Management for Jira.
For a team-managed project, if the Administrator does not have a permission to the team-managed project (in case of private access) they will not be able to enable/disable the app.
Steps
1. Open the Projects drop-down on the main menu and select the Project to which you want to apply the QMetry settings.
2. Click on the Project Settings at the bottom left on the navigation bar.

3. On the Project settings page, click on the QMetry Project Settings at the bottom left on the navigation bar.

4. On the screen at the right, enable QMetry For Jira to start managing test cases.

Once you enable the QMetry For Jira option, you will be able to view QMetry for Jira features in the project.
Enable Issue Types for Story and Bug
The section becomes visible as soon as you enable the QMetry For Jira option. You can enable/disable Story and Bug Issue Types for particular issue types in Jira. Selected issue types will be considered as Story/Bug.
For example, Story and Epic are enabled as Story Issue Type. Then issues with "Story" and "Epic" type in Jira can be linked as Story in QMetry for Jira. In the same way, you can enable issue types for Bug.
This configuration at the Issue Type level is applicable to a particular project in Jira.
Note: Only Administrators - Jira Admin, Project Admin with the “Administer Projects” and “Browse Projects” permissions can access the settings page and configure QMetry for Jira features at the Issue Type level.
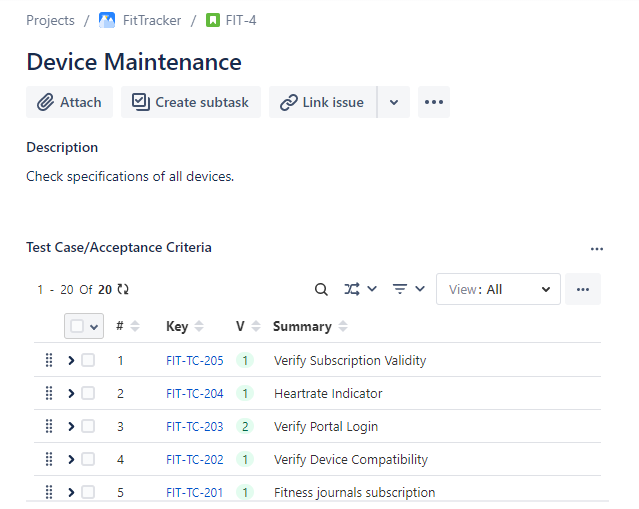
If enabled, the QMetry for Jira features will be available to use with that particular Issue Type in Jira. The Test Case/Acceptance Criteria panel will be visible below the Description section.
Steps
Open the Projects drop-down on the main menu and select the Project to which you want to apply the QMetry settings.
Click on the Project Settings at the bottom left on the navigation bar.
3. On the Project settings page, click on the QMetry Project Settings at the bottom left on the navigation bar.
4. On the screen at the right, enable QMetry For Jira to start managing test cases.
The section becomes visible as soon as you enable the QMetry For Jira option. You can enable/disable Story and Bug Issue Types for particular issue types in Jira.
This configuration at the Issue Type level is applicable to a particular project in Jira.
There are two tabs: Issue Type and BDD.
On the Issue Type tab, there are two sections: Story and Bug.
→ Story: You can link only those issue types as Story which are enabled here. QMetry 'Test Case/Acceptance Criteria' panel will be available for enabled issues type(s) only.
By default, all issue types will be enabled. Select the issue type(s) that you want to disable for Story and click on the Apply Changes button.
Notes:
Only enabled issue types will be allowed to link as a Story.
QMetry Test Case/Acceptance Criteria panel will be shown for Jira issue pages with Enabled issue types only.
A. You can select individual issue types by clicking on the adjacent icon.
B. Select/deselect all issue types at once by clicking on Enable All/Disable All option.
C. If there is a long list of issue types, you can also search for a specific issue type with the help of a search box.

The confirmation message pops up. Click on the Apply Changes button to proceed.

→ Bug: You can link only those issue types as Bug which are enabled here. QMetry 'Traceability/Test Case' panel will be available for enabled issues type(s) only.
By default, all issue types will be enabled. Select the issue type(s) that you want to disable for Bug and click on the Apply Changes button.
Notes:
Only enabled issue types will be allowed to link as a Bug.
QMetry Bug Traceability/Test Case panel will be shown for Jira issue pages with Enabled issue types only.
A. You can select individual issue types by clicking on the adjacent icon.
B. Select/deselect all issue types at once by clicking on Enable All/Disable All option.
C. If there is a long list of issue types, you can also search for a specific issue type with the help of a search box.

The confirmation message pops up. Click on the Apply Changes button to proceed.

Once enabled, the QMetry for Jira features will be available to use within corresponding issue types in Jira. The Test Case/Acceptance Criteria panel is displayed below the Description section.
Disable Issue Types for Story and Bug
The screen displays the list of Issue Types with flags indicating whether the QMetry for Jira features is “Enabled” or “Disabled” for each Issue Type. It is a toggle option to Enable or Disable the feature.
If you disable the issue type for Story/Bug, users will not be allowed to link the disabled issue type as Story/Bug. The QMetry for Jira features will not be available for that particular Issue Type in Jira.
To disable the QMetry for Jira Features for a particular Issue Type, click on the enabled icon and click on the Apply Changes button. To disable all the enabled issue types click the Disable All option and click on the Apply Changes button. The confirmation message pops up.
Click the Disable button after reading the message. The QMetry for Jira Features turns disabled for the Issue Type.
The Test Case/Acceptance Criteria panel will not be visible below the Description section in Jira.
If the Issue Type is "Bug", then the Traceability tab will not be available in Jira.
