Organize Test Plans in folders
QMetry allows testers to organize and manage test plans in a Folder structure based hierarchy. Testers can group related test plans and organize them systematically. For example, testers can create folders like Release 8.2, Release 8.3, etc. to group related test cycles.
Each new test plan folder creates next level of test plan organization in your test plan tree. It helps carrying out bulk operations like move test plans from source folder to destination folder.
Where to find the feature?
Click on the QMetry menu item.
It opens the menu like below. Select Test Management on it.

There are four tabs on the screen:
- Test Case
- Test Cycle
- Test Plan
- Test Report
Click on the Test Plan tab to organize test plans in folders.
The left pane displays folder structure of test plans. The right pane displays all test plans until you select a particular folder to view particular test plans.
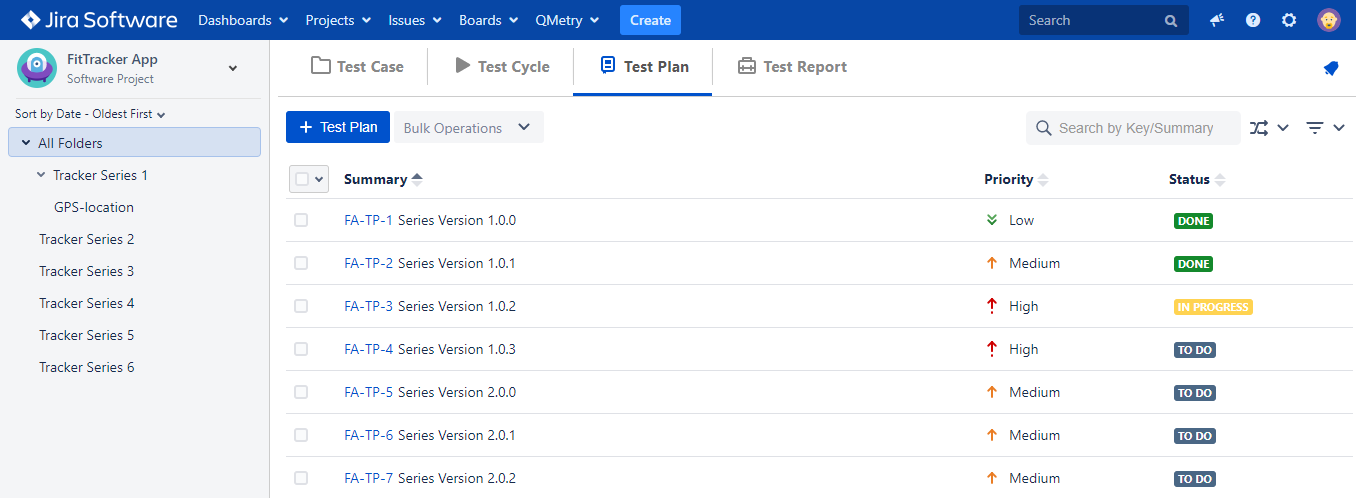

A. Project selection. By default, the project that you selected in Jira will be displayed here. You can select other project. The folder tree is rendered in accordance with the project selection.
B. Root test plan folder, which shows all the test plans created within the project irrespective the folder within which it is created.
C. Sub folders within the root folder.
Create Folders/Sub Folders
Right click on the folder and select Add Subfolder. Enter folder name and submit. It creates a sub folder under the selected folder.
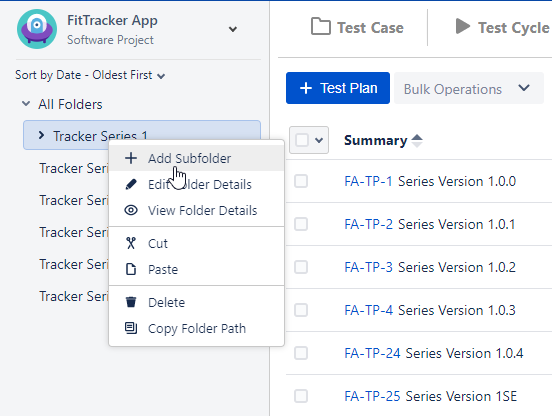
A new folder is added to the tree on the sub-level hierarchy.

Rearrange/Sort Folders
Test Plan folders can be arranged on Name and Date. Open the Sort by drop-down and select the option to arrange the folders on the tree. The folders can be sorted alphabetically and by date of creation in the ascending/descending manner. By default, folders are sorted on the Oldest First.

Edit Folder Name
Right-click on any folder and select Edit folder details. It allows you to edit the name and description of the selected folder.

You can change the Folder Name or its description from the 'Edit Folder Details' screen.

Cut and Paste Folder
Cut & Paste: You can also Cut a folder and Paste it to other location/folder on the tree to change the hierarchy. All the test plans under the folder will also move along with the folder.

Delete Folders
Right-click on any folder and select Delete. Select the option to delete that particular folder. All the test plans under that folder will be disassociated with the folder. If there are sub-folder under the folder, then all these sub-folders will be deleted. All the test plans under such folders will be disassociated with the folders.

On clicking Delete, the user is asked to select a folder in which they want to move the underlying test plans.
If a folder is not selected, then the test plans will be moved to the root folder. i.e. "All Folders" folder here.
Copy Folder Path
You can copy the folder path to search it while moving/reusing Test plans from one folder to another.
To copy the folder path right click on the desired folder > select 'Copy Folder Path'

Move Test Plans
You can move test plans from a particular folder to another folder.
1. On the folder tree at left, select the source folder wherein the test plans lie.
2. Select test plans that you want to move to another folder.
3. Open the Bulk Operations drop-down menu at the top and select the Move/Reuse option on it.

4. A pop-up opens. Select the destination folder in which you want to move the selected test plans.
5. Select Operation: Select the Move option and click Submit.

The test plans are moved to the selected destination folder.