Back to QMetry All Products Help Page
Test Data Parameterization
Introduction
The Test Data Parameterization functionality allows testers to execute same test case multiple times with different data inputs; without having to create duplicate test cases. It replaces the traditional practice of entering hard-coded input values with parameters. Test Data parametrization allows QA teams to store reusable test data in one centralized location, Import existing parameters and data sets, and share data across QMetry projects. Parameterization of test data is one of the ways to make your tests consistent and manageable. You can create automated data-driven tests quickly using Test Data Parameterization in QMetry.
Example
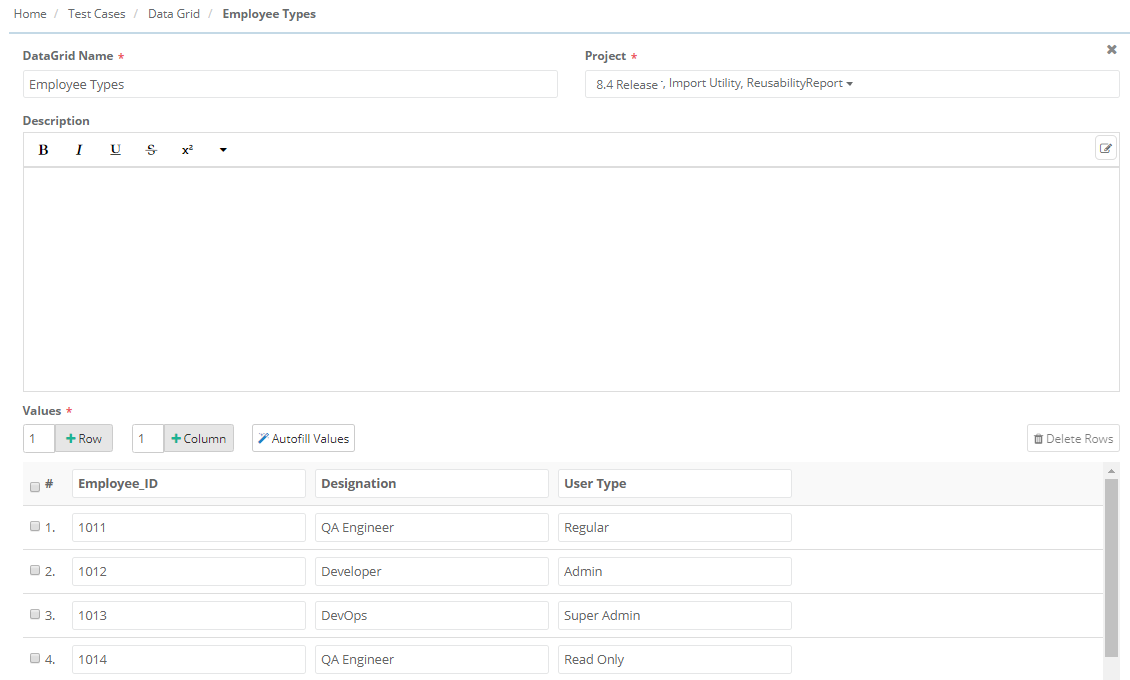
The following values need to be validated against Employee IDs in an organization.
| Employee ID | Designation | User Type |
|---|---|---|
| 1011 | QA Engineer | Regular |
| 1012 | Developer | Admin |
| 1013 | DevOps | Super Admin |
| 1014 | QA Engineer | Read Only |
| 1015 | Developer | Regular |
Here, Employee ID, Department and User Type are parameters with values. The combination of parameter values creates a data grid.
Hence, fist we will create Parameters with their values and then Data Grid.
Step 1: Add Parameters
Steps to Add Parameters
Go to Test Cases > Data Parameter.
Click the New button to create a new parameter.
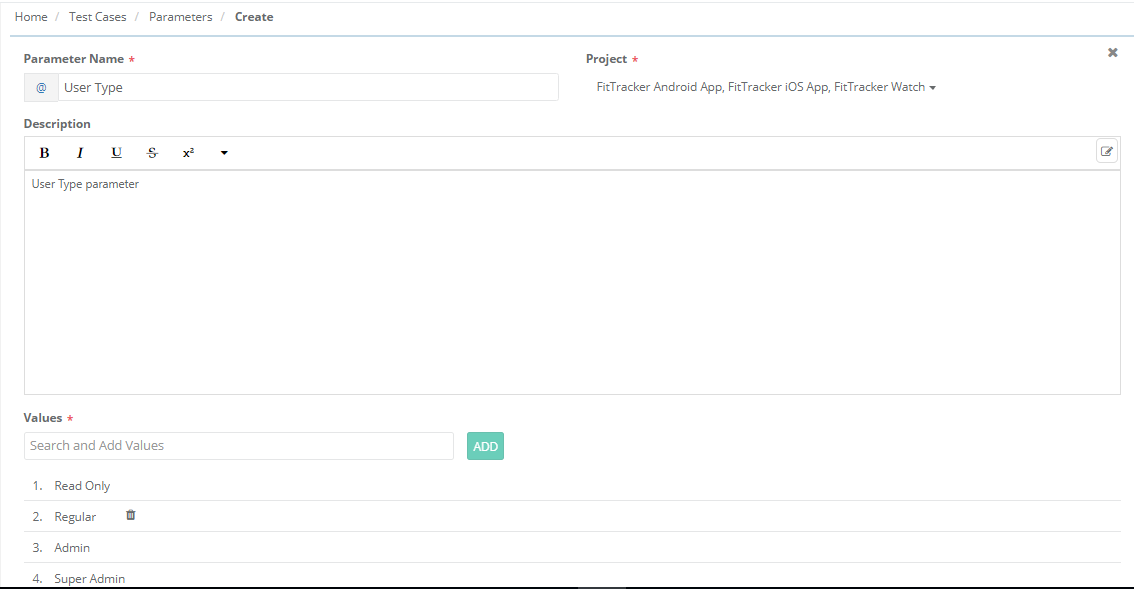
Enter the following details to create a parameter:
- Parameter Name: Enter Name of the Parameter. It should be unique across projects. Characters, number, and some special characters -_&.' are allowed.
- Project: The drop-down displays projects in which you have "Modify" rights of Test Data Parameterization module. Select project(s) to associate the parameter with. If you want to associate the parameter with the current project, then select the current project on the list. You can select multiple projects to link the parameter with. Maximum 10 Projects can be associated at a time.
- Description:
- Values: Enter values for the parameter. For example, for "User Type" parameter, the values can be "Read Only", "Regular", "Super Admin" and "Admin".
This way parameters for Employee ID and Departments can also be added.
Edit Parameters
Go to Test Cases > Data Parameter.
There are two ways to open the edit screen, follow either of them:
- Click on the parameter that you want to edit.
- Click on the Con icon for the parameter you want to edit and select Edit.

The Parameter details page opens in editable mode.
Note: Associated project can not be removed if the parameter is used in test case of that project.
If a parameter is updated with new values, then the existing test execution will not get affected.
Archive Parameters
Note: Parameters used in Data Grid can not be archived.
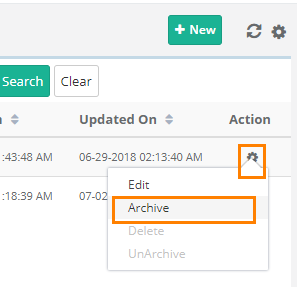
To archive a single parameter, click on the Con icon for that parameter and select Archive.
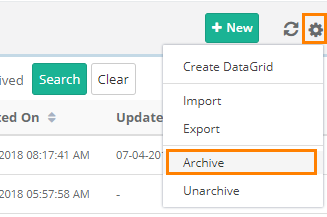
To archive multiple parameters at a time, click on the Con icon and select Archive.
The next screen opens with Parameters on it.
Select the Parameters you want to archive and click on the Archive button.

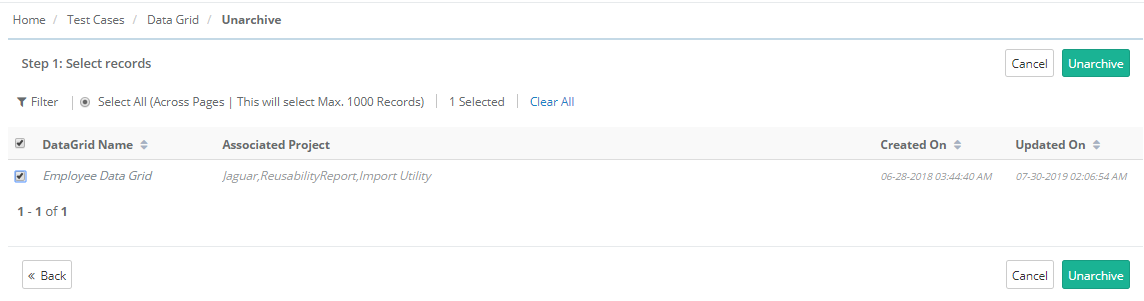
Unarchive Parameters
To unarchive the archived parameters, click on the Con icon and select Unarchive.
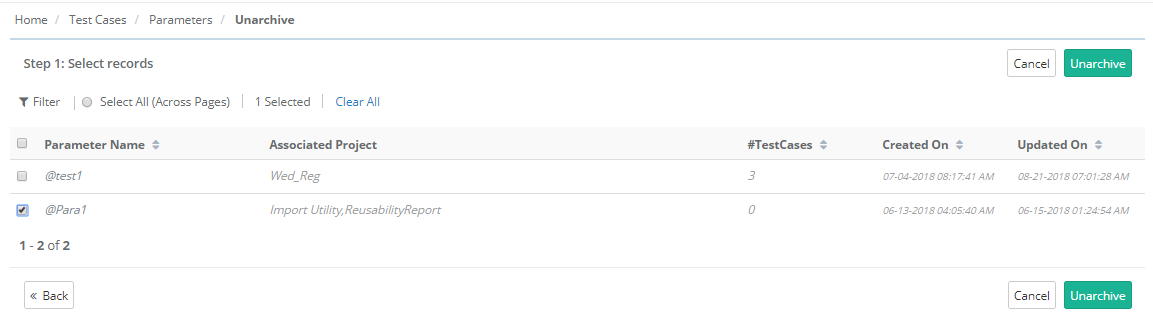
The screen displays all the archived parameters.
Select the parameters you want to unarchive and click on the Unarchive button.
Delete Parameters
First archive the parameter to delete it.
Note: Parameters used in test case (any version of it) can not be deleted.
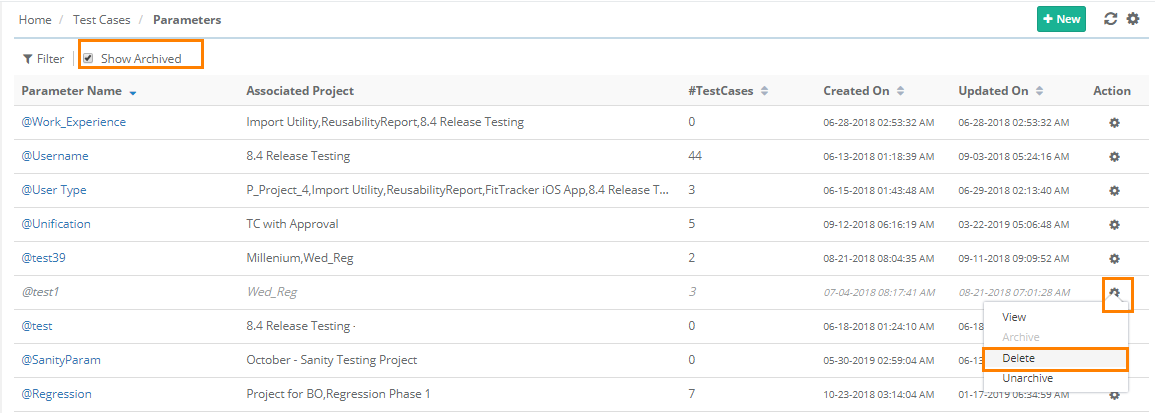
Select the Show Archived check box to view archived parameters along with other parameters on the grid.
These archived Parameters can be deleted individually. Click the Con icon for the parameter you want to delete and select Delete.
Step 2: Add Data Grid
Data Grid is kind of a table that will have rows and columns within it.
Steps to Create Data Grid
Once you are done adding parameters with values, you can create different combinations of these values i.e. Data Grid to run the test.
Go to Test Cases > Data Grid.
Click the + icon to create a new Data Grid.
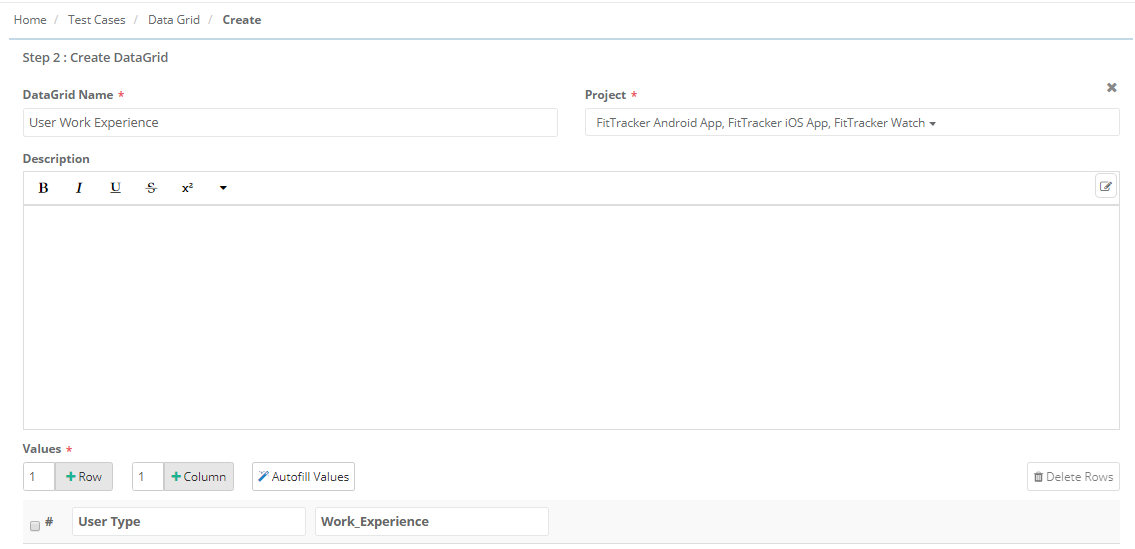
Enter the following details:
- DataGrid Name: Enter Data Grid Name that is unique across projects.
- Project: The drop-down displays only those projects in which you have the "Modify" rights of Test Data Parameterization module. Select project to associate the DataGrid with. If you want to associate the DataGrid with the current project, then select the current project on the list. You can select multiple projects to link the Data Grid with.
- Description
- Values: This will create a structure of rows and columns. First add columns that you required, then keep adding rows for the values. The values for rows are prompted for the parameter selected as column. For example, for "User Type" parameter, the values can be "Read Only", "Regular", "Super Admin" and "Admin". You just need to select values for the parameters and create different combinations. At lease one parameter name and value combination is required.
Note: Maximum 20 rows and 100 columns can be added in a Data Grid.
This way you can create multiple Data Grid for multiple data sets that will be executed.
Note: If you have already entered Data Grid manually, then the use of Autofill Values option will reset those values.
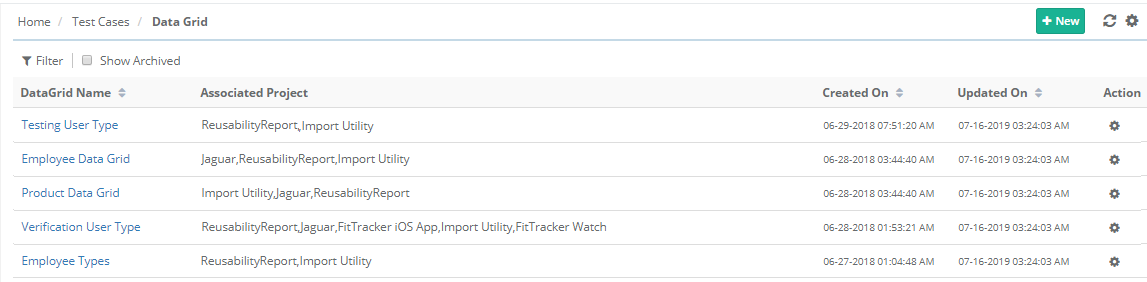
Data Grid List View
Once Data Grids are created, the list view is displayed like below.
These filters can be applied to the records: Projects (for which users has "View" rights of Test Data Parameterization), Name, Created Date, Updated Date, Archived.
Create Data Grid directly from Parameters
Click on the Con icon and select Create DataGrid.

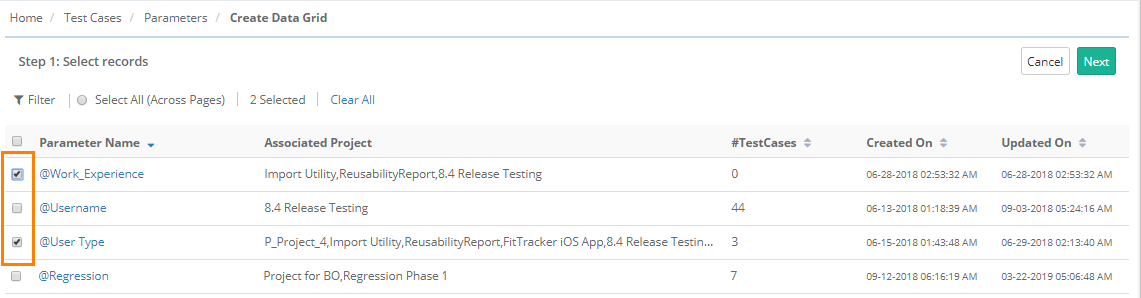
Step 1: Select Records
The screen opens with Parameters on it.
Select Parameters you want to add in Data Grid by selecting corresponding check boxes.
Click Next.
Step 2: Create Data Grid
The next screen opens for Data Grid creation.
Enter DataGrid Name, select associated Project(s), and enter Description.
Values:
Parameters are displayed as per the selection in Step 1.
You can still add more Parameters by clicking on the Column button.
You can use other options like Row and Autofill Values same as described in Create Data Grid.
Click Create.
Creating bulk data for Performance Testing
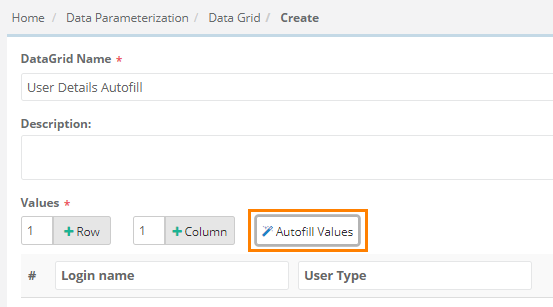
If you want to create Data Grid in bulk at a time, say for carrying out Performance Testing, then the Autofill Values option is provided.The option makes the data creation process fast.
- Go to Test Cases > Data Grid.
- Enter DataGrid Name.
- Select Project(s) to apply the Data Grid. You can select multiple project to associate the data grid with.
- Set Columns as required.
- Click on the Autofill Values button.
It further gives two options:
- Unique Values: It will create Data Grid with unique combination of values in sequential order.
- Randomize Data: It will create Data Grid with repeated values in it irrespective of number of time the values are used.
- Rows: The field becomes visible for Randomize Data. Mention the number of rows you want to generate using the random data. Maximum 100 rows can be created at a time.
Click Yes to proceed.
The rows are created with random values as shown below.

Edit Data Grid
Go to Test Cases > Data Grid.
There are two ways to open the edit screen, follow either of them:
- Click on the Data Grid that you want to edit.
- Click on the Con icon for the Data Grid you want to edit and select Edit.
The Data Grid details page opens in editable mode.
Note: Associated project can not be removed if the Data Grid is used in test case of that project.
If Data Grid is updated, then the existing test execution will not get affected.
Archive Data Grid
If you do not need a Data Grid any more, then you can archive it to stop it showing on the list.
Note: Data Grid that is mapped with test case can not be archived.
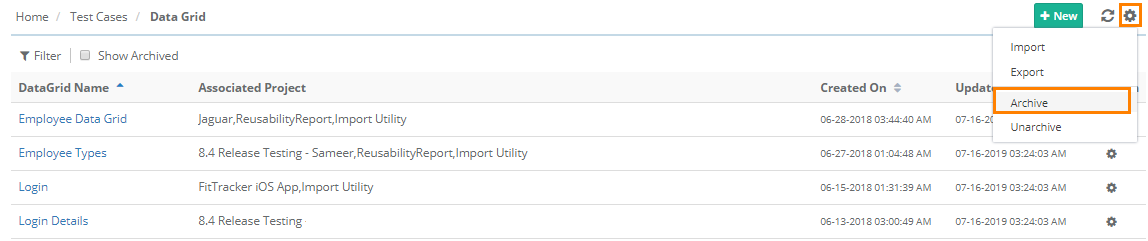
Go to Test Cases > Data Grid.
Click on the Con icon and select Archive.
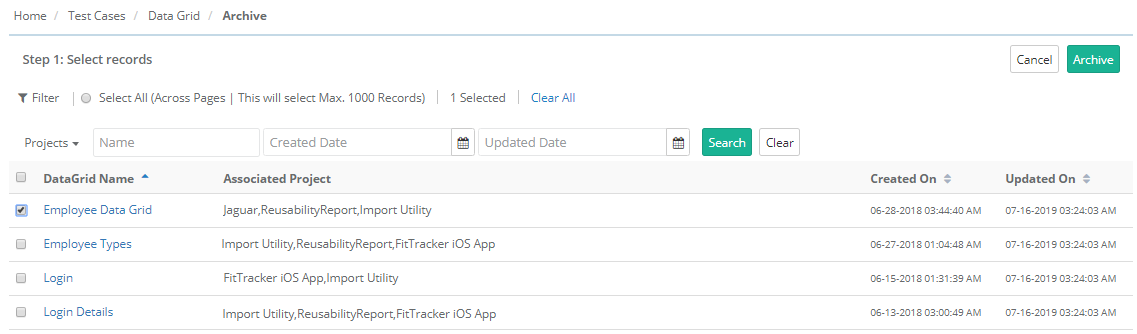
The next screen displays records of Data Grid with check boxes.
To archive multiple Data Grid records at a time, select records using check boxes and the click on the Archive button.
Unarchive Data Grid
Go to Test Cases > Data Grid.
Click on the Con icon and select Unarchive.

The next screen displays records of archived Data Grid with check boxes.
To unarchive multiple Data Grid records at a time, select records using check boxes and the click on the Unarchive button.
Delete Data Grid
First archive the Data Grid to delete it.
Click on the Con icon and select Unarchive.
The screen displays all the archived Data Grid records.
Data Grids can be deleted individually. Click the Con icon for the Data Grid you want to delete and select Delete.
Step 3: Use Parameters in Test Cases
Till now you have created test data sets through Parameters and Data Grid. Now we will see how we can use the parameters in test steps of a test case.
Go to the Test Cases Module.
Open test case detail page and go to Test Steps section
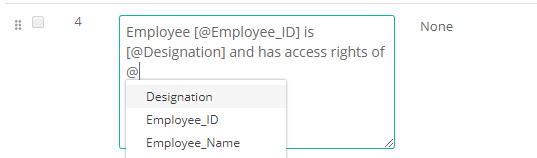
Insert Parameter using @ sign on the keyboard.
The list of parameters populate on entering @ sign.
Parameters can be mentioned for Step Description, Input Data, and Expected Outcome.
To use parameter, just press @ on your keyboard and the available parameters will populate.
The test step field looks like:
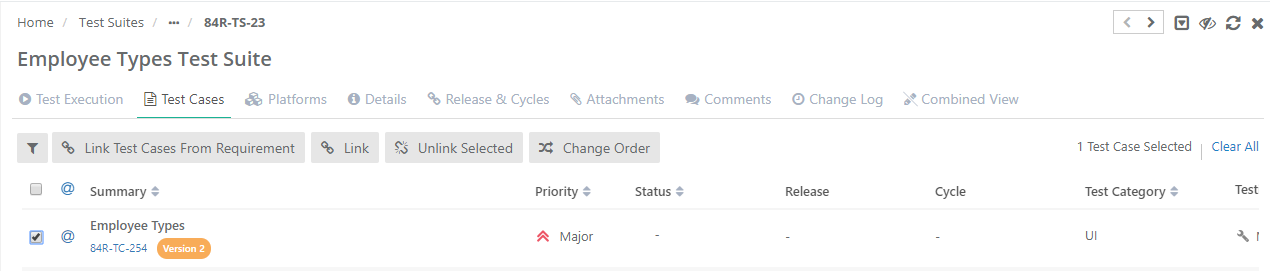
Step 4: Link Test Cases to Test Suite
Now link the parameterized test cases to test suite. Manual test cases can also be linked to test suite along with parameterized test cases. The test case with test data parameter gets a tag of Parameterized.
Mapping Data Grid
On the test suite detail page, go to the Test Cases section. If you have linked Parameterized test cases with the test suite, then the information is displayed on the screen like below.

Click on the @ sign to add values to the parameters. The can see that the @ sign for parameterization is highlighted one and has a hyperlink on it.
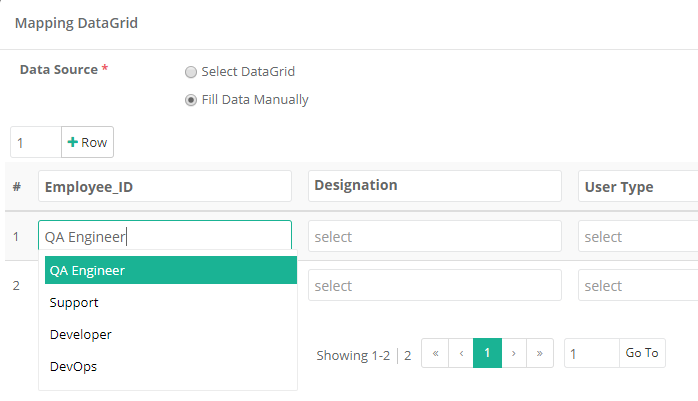
The Mapping DataGrid screen opens.
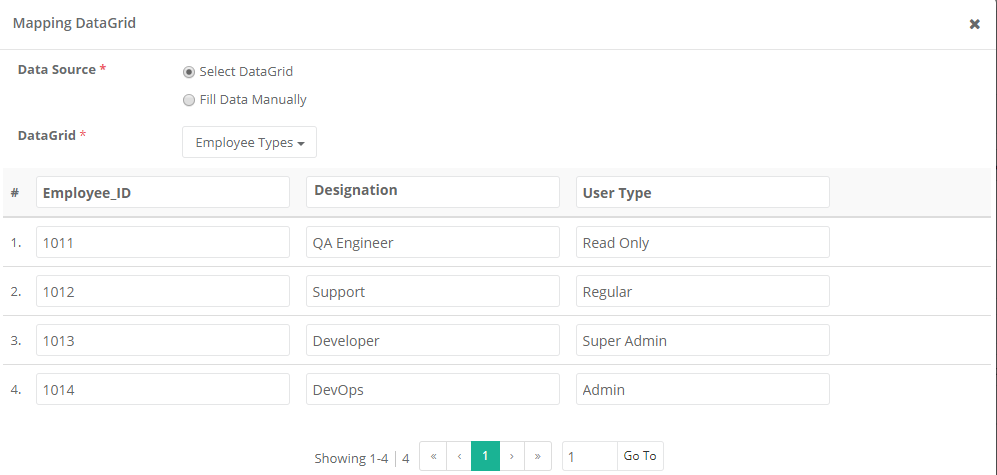
You can select either of the following as Data Source:
Select DataGrid: If you want to Select the option to select the Data Grid created under the Data Parameterization module.
- Data Grid: The drop-down displays all the Data Grids created under the Data Parameterization module. The data is populated in the below table as per the grid selection.
Fill Data Manually: As an alternate, you can enter the parameter values manually, then select this option. Map values with corresponding parameters.
Click Save to save the mapping of Data Grid.
Step 5: Execute Parameterized Test Cases
Open test suite detail page and open the Test Execution tab on it. Click on the play icon to navigate to the Test Execution Screen to run the test and record the status.

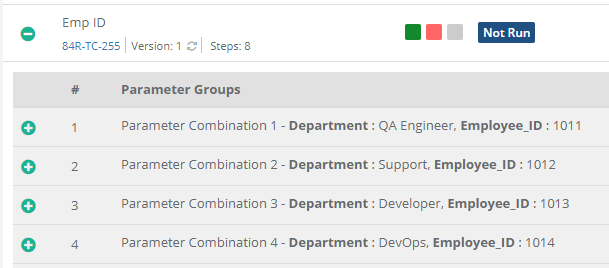
On the Test Execution Screen, when you click on the Expand All button, the test cases with parameterization get expanded up to Parameter Groups.
The steps count at test case level displays (the count of test steps X count of data sets).
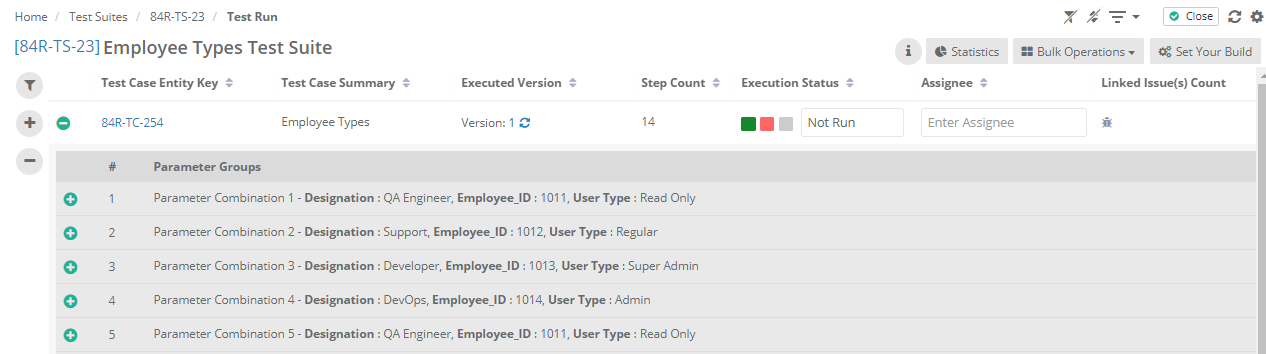
Expand each Parameter Combination to view the test steps under it.
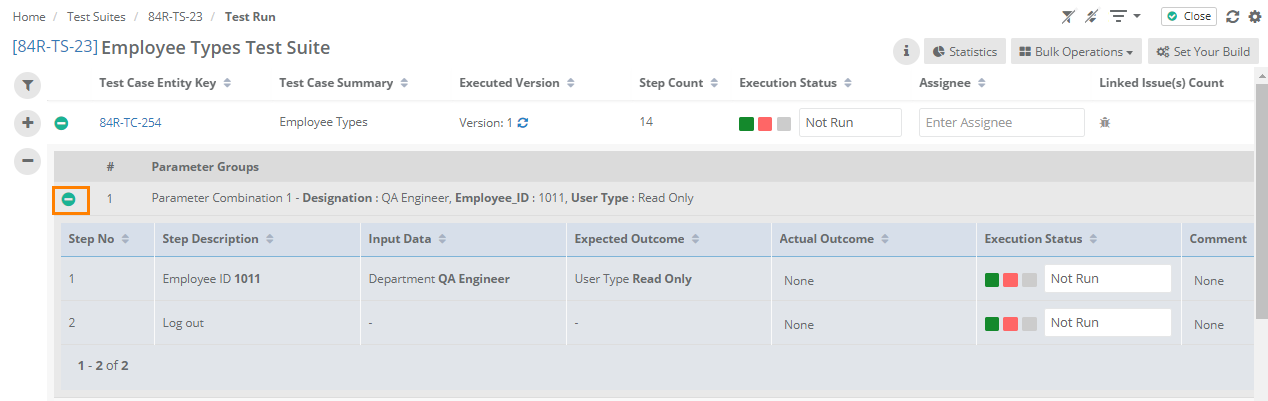
Execute the test steps and test cases on the screen.
If the Data Grid Mapping is not done
If a parameter is added, but the values are not mapped yet, then the test step on the Test Execution Screen is displayed with @ mark for the parameter as the values are yet not synced in the Data Grid.
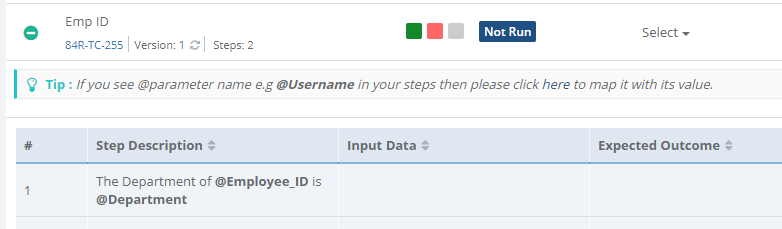
The link to map the parameter with its value is provided with the Tip on the screen,clicking on which opens the test suite detail page.
Go to the Test Cases section and Map the Data Grid for the test case.
Once you are done with Data Grid mapping, go to the Test Execution Screen and refresh it.
Expand the test case again. It displays parameter values now.
Now you can view the step with values instead of the parameter.
If a new column is added to the already mapped Data Grid
If a new column is added to the Data Grid from Test Cases > Data Grid.
Then to reflect the changes in the existing mapped Data Grid -
Open the test suite detail page and go to the Test Cases section.
Click on the @ sign to open the Data Grid Mapping screen.
Click on the Sync Columns button.
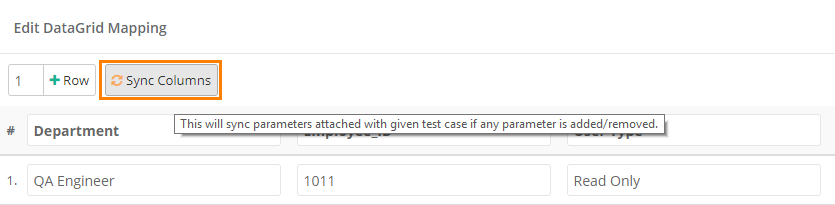
The newly added parameter will be added as a column. Now map the values and update the Data Grid.
| Edit In | Impact on Test Execution Screen |
|---|---|
Edit Data Grid Mapping: Go to Test Suites module. You can add/remove rows or edit values for the Data Grid. | When the Data Grid is updated, it reflects on the Test Execution Screen every time. Data Grid can be edited from Test Suite (linked parameterized Test Cases) also. But these changes remain temporary and do not sync with test parameter data. |
Edit Test Case: Any addition or deletion of test step in test case will reflect on the Test Execution Screen. | Now when you go to the Test Execution Screen and sync the test case to update it as per the new version, the steps count is increased. |
Import Parameters
If bulk Parameters are created and maintained in an excel file, then also you can use these parameters in QMetry by importing the file into QMetry.
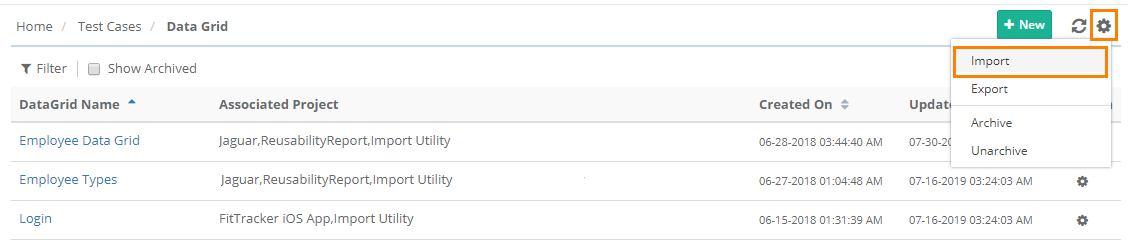
Click on the Con icon and select Import.

The Import screen opens.
- Select File: Browse the excel file that contains Parameters.
- Project: Select Project you want to the parameters to be available to use. Multiple Projects can be selected. Data Parameters are visible across projects irrespective of its linkage with the project. To use the Data Parameter within project, it should be associated with that particular project.
- Import Options: Select either of the following:
- Overwrite duplicate parameter with new parameter values: If the parameters that are being imported already exist in QMetry, then these existing parameters will be overwritten with new values in the file.
For example, existing parameter Username has values "admin" and "superadmin". The file contains the Username parameter with values "tester" and "test analyst". Then in QMetry, the parameter will be updated with values "tester" and "test analyst" overwriting the earlier values.
- Append parameters values to existing parameter: If the parameters that are being imported already exist in QMetry, then new values of parameters will be appended to the existing values in QMetry.
For example, existing parameter Username has values "admin" and "superadmin". The file contains the Username parameter with values "tester" and "test analyst". Then in QMetry, the new values will be appended for the parameter. The Username parameter will have all the four values in it: "admin", "superadmin", "tester" and "test analyst".
- Skip duplicate parameter: If the parameters that are being imported already exist in QMetry, then these existing parameters will be skipped while import. The parameter values will remain unchanged.
For example, existing parameter Username has values "admin" and "superadmin". The file contains the Username parameter with values "tester" and "test analyst". Then in QMetry, the Username parameter will be skipped and its values will be preserved.
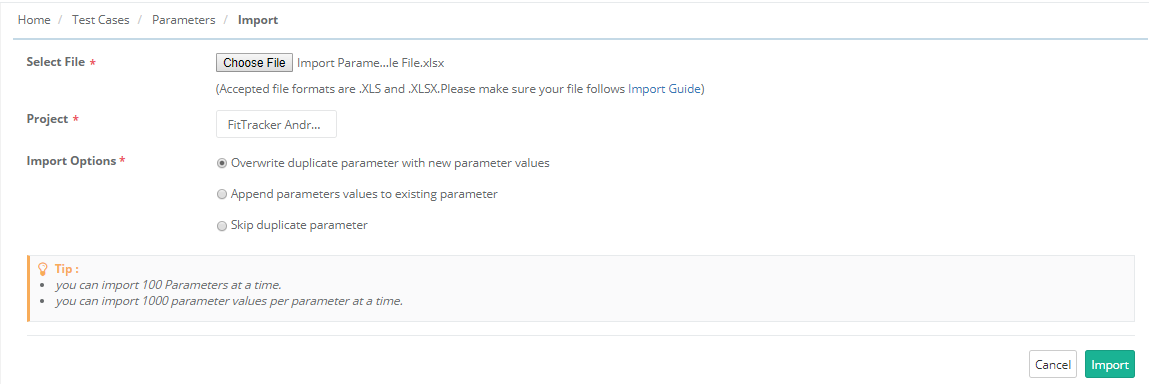
Click Import.
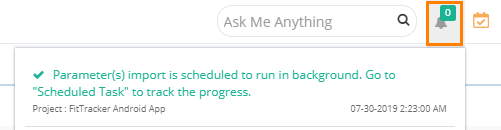
View Notification Window on the application header.
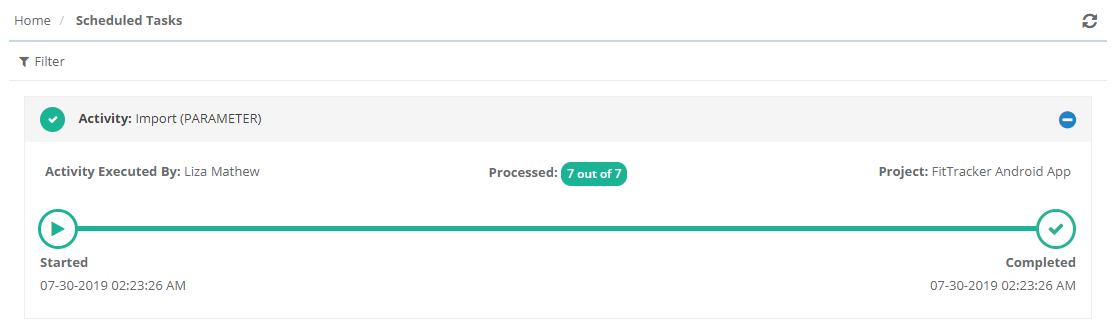
View Scheduled Task
Import Data Grid
If Data Grids are created and maintained in bulk in an excel file, then also you can use these Data Grids in QMetry by importing the excel file into QMetry.
Click on the Con icon and select Import.
The Import screen opens.
- Choose File: Browse the excel file that contains Parameters.
- Project: Select Project you want the parameters to be available to use. Multiple Projects can be selected. Data Parameters are visible across projects irrespective of its linkage with the project. To use the Data Parameter within project, it should be associated with that particular project.
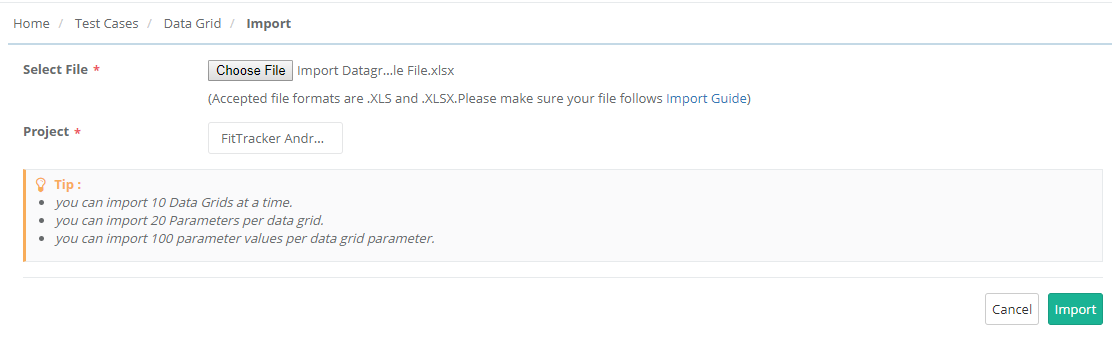
Click Import.
View (A) Notification Window and (B) Scheduled Task on the application header.

Audit Log Report
Audit logs for Create, Update, Delete, Archived, and Unarchived are added for Data Grid and Parameter in Audit Log Report (Audit Compliance > Audit Log Report).
Back to QMetry All Products Help Page