Back to QMetry All Products Help Page
Migrating from TestRail to QMetry using QMetry Migration Tool

In this guide, we will run you through the steps to migrate your data from TestRail to QMetry Test Management. This documentation enlists all the information on migration process like what can be migrated, and what are the assets/data that may not be migrated, features of the migration utility along with System Requirements and Pre-requisites to be taken care before proceeding with migration.
What TestRail assets are migrated?
| TestRail Assets | QMetry Assets |
|---|---|
| Test Cases | Test Cases |
| Test Plan | Test Suite folders |
| Test Suites | Test Suites |
| Test Runs | Test Suites |
| Tests & Results | Test Execution |
Capabilities of the Migration Tool
- Migrates Tests and all their fields, rich text in Test Steps.
- Migrates Test Data in Test Steps, Test Suites, Test Runs/Executions.
- Migrates Jira Story/Tasks, bugs through Jira Integration feature of QMetry.
- Migrates custom fields & their values for all the assets.
- Migrates folder structure.
- Migrates parent Milestones as Release and child Milestone as Cycle.
- Migrates section as folders.
- Migrates comments for all the assets.
- Migrates linkages between assets.
- Migrates all the attachments & URL links.
- Support for Mapping of TestRail Enumerated fields and their values with QMetry fields.
System Requirements
- JDK 1.8.0 needs to be installed.
- MySQL services and workbench 5.7 or above needs to be installed.
- Operating Systems: Windows 10, Linux - Cent OS 7, RHEL
- CPU: 8 Cores, RAM: 16 GB
- Apache Tomcat server needs to be installed. Reference: https://archive.apache.org/dist/tomcat/tomcat-8/v8.5.60/bin/ (select as per the system you are using).
- TestRail Professional cloud version 7.5.6, TestRail Professional server version 7.5.3.1000 (Utility is tested on)
- Get your QMetry Migration Tool (migrate2qtm.war) and its license (qmetry-license-version-1.0) from Professional Services team.
- QMetry and TestRail should be running on your system with valid license.
- Set UTC Time Zone in QMetry as all the dates from TestRail will be migrated in to QMetry as per UTC time zone.
Pre-requisites
Turn off API limits and Audit Logging.
For QMetry server:
These steps need to be followed in the QMetry database. Enter 'root' database credentials when prompted.
sudo su -
docker exec -it qmetry_rds_1 bash
mysql -uroot -p -A
USE qmetry;
Run the following SELECT query check the status and the UPDATE query to disable audit logs and email notifications.
0=disabled 1=Enabled
SELECT CAST(isEmailEnabled AS UNSIGNED) as isEmailEnabled , CAST(isLogEnabled AS UNSIGNED) as isLogEnabled from client;
UPDATE `client` SET `isEmailEnabled` = b'0', `isLogEnabled` = b'0';
To enable them back (after migration is complete) run the following UPDATE query, and to check its updated value run the SELECT query.
UPDATE `client` SET `isEmailEnabled` = b'1', `isLogEnabled` = b'1';
SELECT CAST(isEmailEnabled AS UNSIGNED) as isEmailEnabled , CAST(isLogEnabled AS UNSIGNED) as isLogEnabled from client;
Type \q to exit MySQL DB.
Type exit to exit the docker container.
- For QMetry cloud:
- Contact Professional Services team to turn off the API limits.
Install Certificate in JDK on the machine running the migration utility.
Follow the steps specified here : How to install certificate in JDK ?
- Remove/rename duplicate list values for system/custom fields in TestRail as QMetry does not support creation of duplicate values.
Create a TestRail Template Project in QMetry. The purpose of template project is to create a project structure that will be used to migrate the actual TestRail project with data into QMetry. In this template project, create and link the TestRail users. Refer to Users in QMetry.
Migration Steps
Run the migration utility from its dedicated machine.
- Open the command prompt and go to the migrate2qtm.war directory.
- Put license file "qmetry-license-version-1.0" besides migrate2qtm.war file.
- Run the following command by giving the path of the migrate2qtm.war file
- cd <PATH_TO_WAR_FILE>
- java -jar migrate2qtm.war --spring.datasource.username=<dbusername> --spring.datasource.password=<dbpwd> --testrail.cookie=tr_session=<sessioncookie>
- Get the session cookie from >Go to TestRail project >Open Inspect(F12 key) >Load any testcase by clicking on it >In inspect go to Network tab >Click on api starting with 'index....' >In the Headers tab go to Request headers and find tr_session >Copy the cookie and paste it in the above command
The application should be accessible from the same machine using the URL : http://localhost:8080/migrate2qtm . Once you're on the source selection page of the Utility, select TestRail and proceed with steps below:
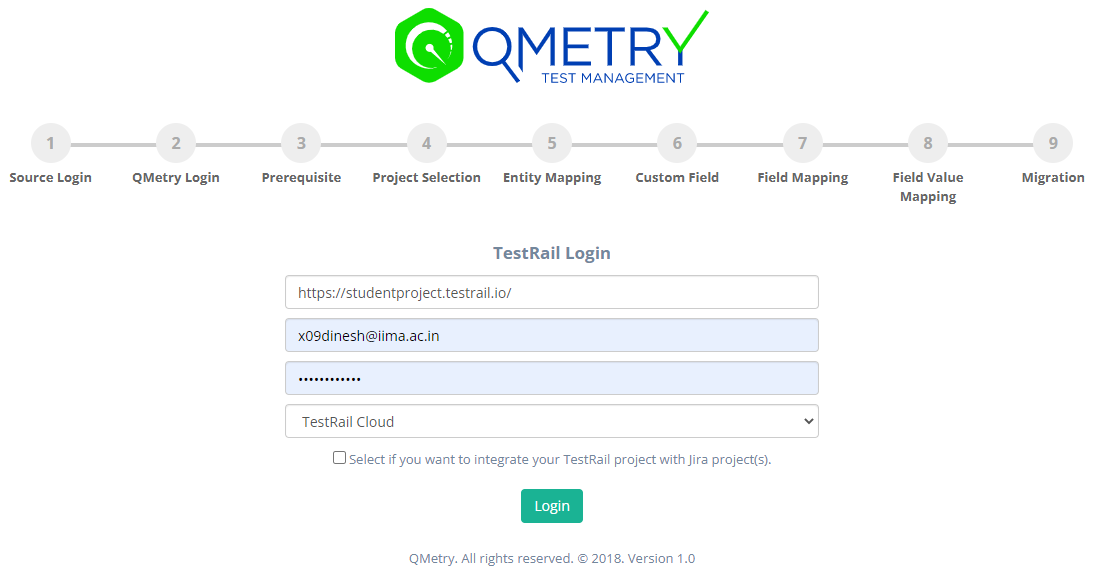
Step 1: Source Login
a) TestRail
We recommend logging in using Admin Credentials so that the Projects available for migration are not restricted by a user's permissions.
- Base URL: TestRail URL in the format: http://<IP Address/URL>
- Email : TestRail user's login email
- Password: TestRail user's login password
- Type: Choose TestRail instance type from dropdown: server or cloud
- Select the check box for Jira integration authentication.
b) Jira authentication for Jira Integration
If you use Jira for stories and bugs, then click on 'Select if you want to Integrate your TestRail project to Jira project(s)' check box.
We recommend logging in using Admin Credentials so that the Projects available for migration are not restricted by a user's permissions.
- Jira URL: Your Jira URL
- Jira Email ID: Email id used for Jira login
- Jira API token: Get the API token from: Atlassian Account settings > Security > Create and manage API token > Create API token
- Jira account type: Choose whether Cloud or Server

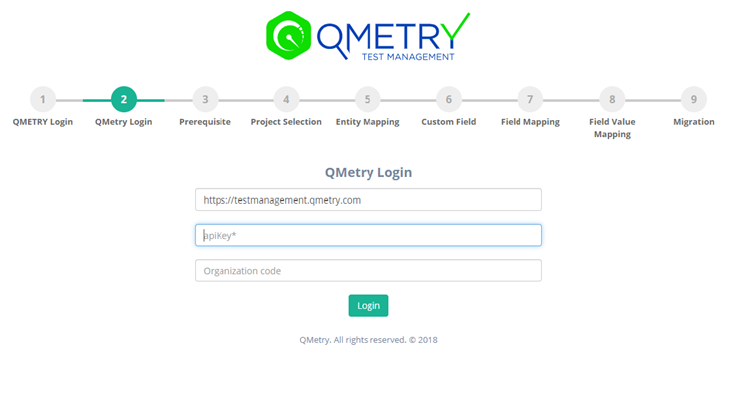
Step 2: QMetry Login
We recommend logging in using Admin Credentials so that the Projects available for migration are not restricted by a user's permissions.
- Base URL: Your QMetry login URL. For example: https://testmanagement.qmetry.com
- API Key: QMetry Open API Key from: QMetry -> Integrations -> Open API
- Organization Code: Enter QMetry Organization Code, or leave it empty.
Step 3: Pre-requisites
Make sure you comply with the pre-requisite mentioned on the screen.

Step 4: Project Selection
a) TestRail project and QMetry template project:
- Select TestRail Project you would like to migrate into QMetry. Also, select the QMetry Project Template to be used to create the project structure. The template project should be empty with 'Rich text enabled' and users linked to it.
- Project key and Project Lead can be given by selecting the '' If required, Add Project Lead....." checkbox.

b) Jira Project Selection
- Select the Jira projects that you want to integrate with the project which is currently being migrated.

Step 5: Entity Mapping
a) Jira Entity Mapping:
Under this section, for each selected Jira project, map your Jira assets i.e Story/task/Bug or any other custom Issue-type to Requirement and Issue(defect) entities of QMetry. These assets will be migrated through Jira Integration feature of QMetry.
Note: If the QMetry Requirement is mapped to any Jira issue type then it is mandatory to map QMetry Issue module to atleast one Jira issue type.

b) QMetry Entity Mapping:
Under this section, map your TestRail assets which need to be migrated into relevant QMetry Assets.

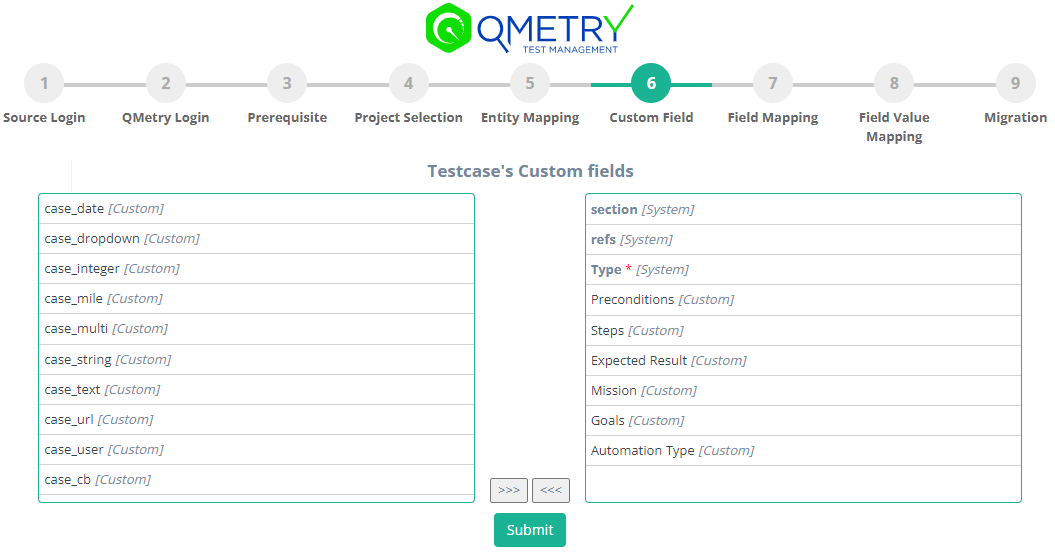
Step 6: Custom Fields
You can select system fields and user-defined fields that are part of your TestRail project that needs to be migrated to QMetry.
Note: This is an important step to ensure there is no data loss when the project is migrated to QMetry. Make sure all the required fields are selected correctly. Once migrated, the data cannot be reverted.
Selected fields will be converted as custom fields in QMetry and will be auto mapped with the appropriate fields in the field mapping page.
a) Custom Field for TestRail's Testcases
b) Custom Field for TestRail's Test Suites

Step 7: Field Mapping
Field mapping helps you to map the fields of your TestRail assets to respective QMetry fields. Complete the field mapping for all the fields to get their data migrated to QMetry.
Note: Any mandatory field of TestRail should be mapped to mandatory field of QMetry. The field type of the mapped fields of TestRail and QMetry should be same.
a) Field Mapping for TestRail Test Case → QMetry Test Case

b) Field Mapping for TestRail Test Suite → QMetry Test Suite

Step 8: Field Value Mapping
You can map the values of your different enumerated fields of TestRail to that of QMetry.
Migration Tool provides an option of "Add value" if user wants to create a new field value in QMetry same as that of TestRail. To create the new values > Click on the checkbox beside the field value > Click on "Add value" button below > Now map the TestRail field values to the newly created QMetry fields values.
Note: The Add Value option is not available for test execution status and test step execution status. For that you need to manually create the execution status in the template project of QMetry before beginning the migration process.
a) Field Value Mapping for Test cases

b) Field Value Mapping for Test Suite

Step 9. Migration
Click on the Migrate Button to start the migration process.

The migration progress can be monitored until it is completed.
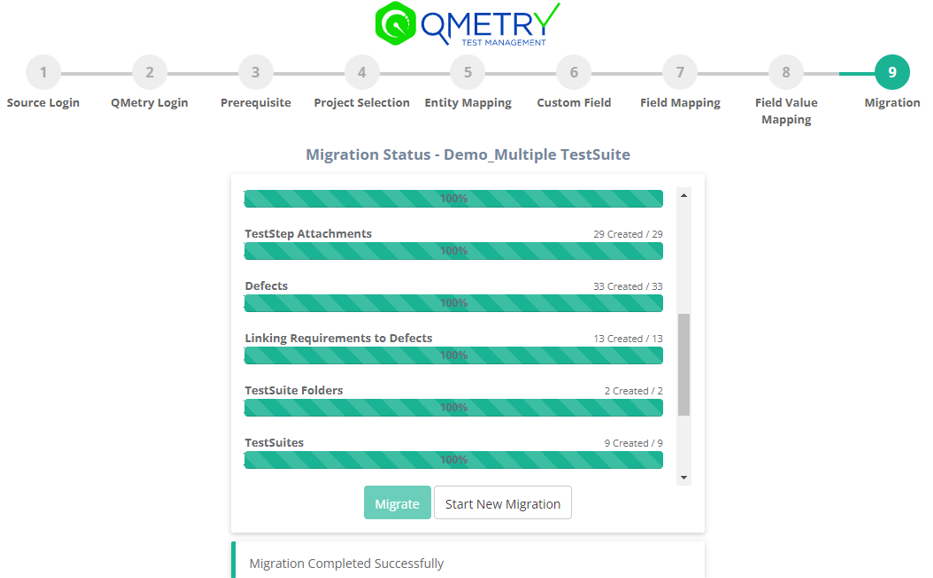
Once the migration is completed, you can log in to QMetry and verify all the migrated data in your migrated project(s).
Post-requisite
The migration utility is designed to support resumption of the data migration from the same point in case an error is encountered due to data issues or other reasons. In such cases re-migrating the project is not necessary. At times when you run into errors, you need to create a ticket on QMetry Professional Services support. Along with it try to resume the migration after capturing the logs as follows.
Capture Migration Logs
The logs should be present in the logs folder of the migration utility directory containing the .war file. Zip the logs folder and send it to Professional Services team for investigation.
Resume the Migration
The migration can be resumed by refreshing the existing page or clicking "Resume" on the migration page.
Reverting API metering, Audit history logging and Email Notifications.
Run the following UPDATE query, and to check its updated value run the SELECT query.
UPDATE `client` SET `isEmailEnabled` = b'1', `isLogEnabled` = b'1';
SELECT CAST(isEmailEnabled AS UNSIGNED) as isEmailEnabled , CAST(isLogEnabled AS UNSIGNED) as isLogEnabled from client;
Refer to the Pre-requisite for more details.
Important Notes & Limitations
- Dashboards, To Do, Reports of Projects, Overview, Activities, Graphs, History logs will not be migrated.
- TestRail users are not migrated to QMetry. The users need to be created and linked to the template project manually before starting the migration.
- Only latest result of a test run will get migrated as execution history is not supported in QMetry.
- QMetry does not provide customization at test execution level. Hence, custom fields of TestRail at execution level will not migrate.
- TestRail does not provide API to get attachments directly linked to test suite and shared steps. Hence, such attachments will not migrate.
- Test Plan are migrated as folder of Test suite. Hence, its data(description, attachments, etc) will not be migrated.
- Attachments greater than 100 MB(for QTM cloud) or 300 MB(for QTM server) in size are not migrated. Such attachment details will be added to the 'skipped_attachments.log' file.
- For assigning users to the migrated assets:
- If the user is found in QMetry, the entity assigned to him in TestRail, gets assigned to that user in QMetry.
- If the user is not found in QMetry, but the selected Project Lead user is present in QMetry, the assets of TestRail are assigned to that user.
- If the user and Project Lead are not found in QMetry, the assets are assigned to QMetry System Admin.
- QMetry Testcase: Estimated time maximum value is 99999 mins; the value will be skipped for Estimated time > 99999 mins.
- Cross-project sharing of test steps is not supported in QMetry. Hence, shared test steps of other projects will not be migrated.
- Description, reference and attachments of Milestones will not get migrated as Release and cycle of QMetry does not support these fields.
- Temporarily deleted testcase will not get migrated until they are restored before starting the migration process.
- Descriptions and attachments for sections and sub-sections will not be migrated.
Need Assistance?
If you run into any questions or concerns during your migration, you can reach out to Professional Services by raising a ticket directly on our QMetry Professional Services Portal. We would be happy to assist you!
Back to QMetry All Products Help Page